background image

©Copyright LOTRONIC  2017 


OPERATION 
Normal Function 

1.  Be sure to switch off the power and to connect to corresponding input jacks. 
2.  Turn on the power and wait 3-4 seconds till the speaker functions are connected. 
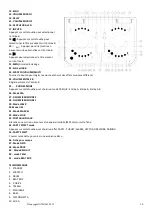
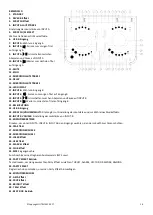
3.  Select an audio source by pressing the INPUT A  key on the front panel to display FM,AUX A, USB A, BT-A. Press the INPUT B 
key on the front panel to display AUX B, USB B, BT-B. 
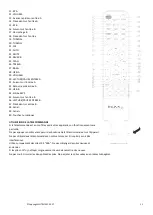
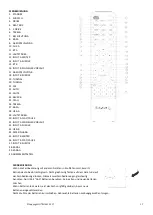
4.  Adjust the SCRATCH/VOLUME/MULTI knob on the front panel or the VOL+/- key on the remote control to adjust the setting 
of the main volume. Then turn the left push shot to adjust the volume of INPUT A, turn the right push shot to change the volume 
of the INPUT B. 
5.  Press the LIGHT button on the remote control or press the LIGHT button on the front panel to display light mode, then press 
the SCRATCH/VOLUME/MULTI knob to change the OFF, R,G, B,RG,RB,GB,RGB, AUTO,DEMO light mode. 
6.  Press the MUTE key on the panel or remote to mute, press it again to reset. 
Press the X Drive on the panel or remote to turn on/off X-Bass effect. 

 
Sound Effect 

1.  DJ EFFECT 
Press SCRATCH, REVB, B.BOX, YEAH, BRING IT, PROC, GEYA on the front panel, or select SCRATCH, REVER B, BEAT BOX, YEAH on 
the remote control, then turn the big knob to get the corresponding DJ effects. 
2.  MUSIC EFFECT 
Press “CLUB, MARVEL, USER, LASER, YEAH” on the front panel, then turn the big knob to get the corresponding Music effects. 
3.  PARTY EFFECT 
Press “PARTY EFFECT” on the front panel to select THRUST, ALARM, VECTOR, FIREWORK, RAINING. 
Push the PARTY EFFECT rod. At the MAX position, you will get the corresponding PARTY EFFECT. 
When you pull the rod back to OFF, the PARTY EFFECT will turn off. 

 
Light color control 

To control the light modes coming from the speaker panels by pressing the "MENU" button on the front panel or LIGHT on the 
remote control. 


R = red lights flash 


G = green lights flash 


B = blue lights flash 


RG = red and green lights flash 


RB = red and blue lights flash 


GB = green and blue lights flash 


RGB = red, green, and blue lights flash 


Auto = the various color combinations cycle through and flash. 


Demo = lights flash and change color as if they were responding to the beat of the music. 

 
Tuner applications 

1.  Before using the radio functions, you must attach the supplied antenna. Adjust the antenna to obtain optimum reception. 
Press the INPUT A key on the top control panel or the FM key on the remote control, to select "FM" function. 
2.  Press the CH+/CH- key on the remote control to find radio bands that you have previously saved. 
3.  Press or hold the TU+/TU- key on the remote control to adjust the radio frequency manually. 
4.  Press the AUTO key on the remote control, the machine will scan radio channels from low-frequency to high-frequency by 
itself and memorize the channels one by one. 

 
KARAOKE function 

1.  The machine can auto detect whether MIC 1 or MIC2 is inserted. Please turn off the microphone volume and adjust the 
volume gradually after inserting the microphone. 
2.  Press VOL+/- on the remote or adjust the MIC.VOL knobs on the front panel to change the microphone VOLUME. 
3.  Adjust the ECHO knob on the front panel to change the microphone ECHO. 
Note: Do not touch the top of the microphone when singing in order to avoid howling effect.  
Adjust the microphone volume gradually to avoid howling effect. 

Содержание STANDUP-PRODJ

Страница 1: ...M ATIVO 2 x 12 30cm 1000W AKTIVNI ZVO NI KI SISTEM 2 12 30cm 1000W BAFLE ACTIVO TIPO PUPITRE 2 x 12 30cm 1000W SISTEM DE SUNET 2 12 30cm 1000W Ref STANDUP PRODJ GB Instruction Manual F Manuel d Utilis...

Страница 2: ...reatening electrocution If any liquid or objects enter the appliance nevertheless pull the mains plug out of the socket immediately and contact a specialist The appliance has been constructed accordin...

Страница 3: ...ersons involved in operating installing and servicing the appliance and putting it into service must be trained and qualified accordingly and observe these operating instructions Defective mains cable...

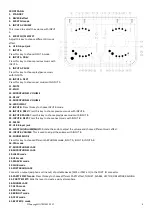
Страница 4: ...INPUT B PAUSE Press this key to choose play pause music with INPUT B 20 INPUT B NEXT Press this key to choose next music with INPUT B 21 MENU 22 USB B input jack 23 SCRATCH VOLUME MULTI Rotate the kn...

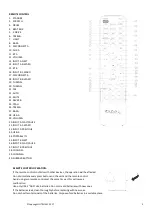
Страница 5: ...USB B 34 PORTABLE IN 35 INPUT B NEXT 36 INPUT B PLAY PAUSE 37 INPUT B PREVIOUS 38 CHANNEL 39 CHANNEL 40 NUMBER BUTTON REMOTE CONTROL OPERATION If the remote control conflicts with other devices the o...

Страница 6: ...ill get the corresponding PARTY EFFECT When you pull the rod back to OFF the PARTY EFFECT will turn off Light color control To control the light modes coming from the speaker panels by pressing the ME...

Страница 7: ...nsert the other USB to play music When two USB inserted at the same time you can play music at the same time Important The USB port is intended only for data transfer only other devices cannot be used...

Страница 8: ...r ils risquent de tomber l int rieur de l appareil Vous risquez de provoquer un incendie ou une lectrocution Si un liquide ou un objet p n tre dans l appareil d branchez imm diatement la prise secteur...

Страница 9: ...signes Remplacer les c bles secteur d fectueux uniquement par un sp cialiste Risque d lectrocution Ne pas laisser trainer le mat riel d emballage car il constitue un danger potentiel pour de jeunes en...

Страница 10: ...LUME ENTREE B R gle le volume de l entr e B 25 PHONES MODE Appuyez sur cette touche pour choisir un mode CASQUE Entr e A Entr e B Entr e AB 26 Mode YEA 27 FICHE MICROPHONE 2 28 FICHE MICROPHONE 1 29 M...

Страница 11: ...NTREE B 37 Pr c dent sur entr e B 38 Canal 39 Canal 40 Touches num riques UTILISATION DE LA TELECOMMANDE Si la t l commande est en conflit avec d autres appareils son fonctionnement sera perturb Ne pa...

Страница 12: ...de pour s lectionner un effet Party parmi THRUST ALARM VECTOR FIREWORK RAINING Poussez le curseur PARTY EFFECT En position maximale vous entendrez l effet Party correspondant Lorsque vous abaissez le...

Страница 13: ...ssi Appuyez sur la touche DISCONNECT sur la t l commande ou le panneau de contr le pour d connecter le Bluetooth Lecteur USB Le syst me poss de deux fiches USB Ins rez une ou deux cl s USB pour couter...

Страница 14: ...d Stromschlaggefahr Falls doch einmal Fl ssigkeiten oder Gegenst nde ins Ger t dringen sollten ziehen Sie sofort den Netzstecker ab und benachrichtigen Sie einen Fachmann Das Ger t entspricht der Schu...

Страница 15: ...ht auf eine weiche Fl che wie Teppiche oder Betten stellen Nicht die Bel ftungsschlitze verstopfen Nicht die Luftzirkulation mit Gegenst nden wie Zeitschriften Tischt chern oder Gardinen behindern Die...

Страница 16: ...NPUT B Weiter zum n chsten Titel auf Eingang B 21 BELEUCHTUNG 22 USB B Eingang 23 SCRATCH VOLUME MULTI Drehregler zur Einstellung der Lautst rke und zur Wahl eines Musikeffekts 24 INPUT B VOLUME Einst...

Страница 17: ...2 INPUT A ZUR CK 33 USB B 34 MP3 EINGANG 35 INPUT B WEITER 36 INPUT B PLAY PAUSE 37 INPUT B ZUR CK 38 KANAL 39 KANAL 40 NUMMERNTASTEN FERNBEDIENUNG Wenn die Fernbedienung mit anderen Ger ten in Konfli...

Страница 18: ...TOR FIREWORK RAINING zu w hlen Den PARTY EFFECT Regler ganz nach oben schieben um den gew hlten PARTY Effekt auszul sen Wenn Sie den Regler wieder nach unten schieben endet der Party Effekt Farbkombin...

Страница 19: ...ngeschlossen sind k nnen Sie die Musik von beiden Sticks gleichzeitig abspielen Wichtig Die USB Ports sind nur f r Daten bertragung Es k nnen keine anderen Ger te mit diesem USB Anschluss benutzt werd...

Страница 20: ...gesteld aan overmatig vocht als gevolg van druppels of spatwater bijvoorbeeld Plaats geen ontvangers gevuld met vloeistoffen zoals glazen of vazen op of direct naast het apparaat Ze kunnen omvallen wa...

Страница 21: ...s Dit kan enkele uren duren Plaats geen open vlammen zoals brandende kaarsen op of naast het apparaat Plaats het apparaat nooit op zachte oppervlakken zoals tapijten of bedden Niet de ventilatieopenin...

Страница 22: ...en pauze van INPUT B 20 INPUT B Verder naar de naaste track op INPUT B 21 MENU VERLICHTING 22 USB B ingang 23 SCRATCH VOLUME MULTI Draairegelaar ter instelling van het volume en keuze van een muziekef...

Страница 23: ...INPUT A F WARD 32 INPUT A TERUG 33 USB B 34 PORTABLE IN 35 INPUT B VERDER 36 INPUT B PLAY PAUSE 37 INPUT B TERUG 38 CHANNEL 39 CHANNEL 40 CIJFERTOETSEN AFSTANDSBEDIENING Wanneer de afstandsbediening...

Страница 24: ...RK RAINING Schuif de PARTY EFFECT regelaar naar boven In de MAX positie hoort u de party effect Als u de regelaar weer naar beneden schuift wordt de party effect uitgeschakeld Kleurcombinaties Volgend...

Страница 25: ...e muziek van beide bronnen tegelijkertijd afspelen Belangrijk De USB poorten zijn alleen voor data overdraging U kunt geen andere toestellen op deze USB poorten gebruiken Het is net aanbevolen USB ver...

Страница 26: ...ajhnih predmetov kot so kovanci sponke za papir na naptavo saj lahko padejo v notranjost aparata Za enete visoko tveganje za nastanek po ara ali ivljenjsko nevarne elektri nega toka e je vsaka teko in...

Страница 27: ...porabljajte samo v zmerni klimi in ne v tropskem okolju Vse osebe ki sodelujejo pri delovanju monta i in vzdr evanju naprave morajo biti usposobljeni in upo tevati navodila za uporabo Po kodovane omre...

Страница 28: ...VHOD B Pritisnite to tipko da izberete na in VHODA B 18 VHOD B NAZAJ Pritisnite to tipko da izberete prej njo skladbo z VHODA B 19 VHOD B PREMOR Pritisnite to tipko da izberete predvajanje premor gla...

Страница 29: ...2 SCRATCH 3 DRUM 4 BEAT BOX 5 X DRIVE 6 TREBLE 7 LIGHT 8 BASS 9 ODKLOP A 10 AUX A 11 BT A 12 GLASNOST 13 VHOD A NAPREJ 14 INPUT A PREVIJANJE NAZAJ 15 BT B 16 VHOD B PREVIJANJE NAPREJ 17 DISCONNECT B 1...

Страница 30: ...etlobnega na ina 6 Pritisnite gumb MUTE na sprednji plo i ali upravljalniku za uti anje pritisnite e enkrat za ponastavitev Pritisnite X Drive na plo i ali daljinskem upravljalniku da vklopite izklopi...

Страница 31: ...da je enota v na inu seznanjanja Nastavite va telefon ali predvajalnik glasbe za iskanje BT naprav Izberite STANDUP PRODJ A STANDUP PRODJ B na seznamu najdenih naprav na va em telefonu ali predvajalnk...

Страница 32: ...nos tais como moedas ou clipes de papel no aparelho uma vez que podem cair no interior Voc corre um alto risco de causar um inc ndio ou uma eletrocuss o com risco de vida No entanto se algum l quido o...

Страница 33: ...cais Todas as pessoas envolvidas na opera o instala o e manuten o do aparelho e coloca o em servi o devem ser devidamente treinadas e qualificadas e respeitar as instru es de opera o Os cabos de alime...

Страница 34: ...RADA USB B 23 SCRATCH VOLUME MULTI Gire o interruptor para ajustar o volume e escolher um efeito diferente 24 ENTRADA B VOLUME Utilizado para ajustar o volume da entrada B 25 MODO PARA AUSCULTADORES P...

Страница 35: ...RIOR 33 USB B 34 PORT IN 35 ENTRADA B PR XIMO 36 ENTRADA B REPRODUZIR PAUSAR 37 ENTRADA B ANTERIOR 38 CANAL 39 CANAL 40 TECLADO NUM RICO FUN ES DO CONTROLO REMOTO Se o controlo remoto entrar em confli...

Страница 36: ...espondentes efeitos de m sica 3 PARTY EFFECT Prima PARTY EFFECT no painel frontal para selecionar efeitos diferentes como THRUST ALARM VECTOR FIREWORK RAINING Empurre a haste PARTY EFFECT para a posi...

Страница 37: ...para selecionar USB A pressione INPUT B para selecionar USB B de seguida insira um dispositivo USB para reproduzir m sica Pressione INPUT B para selecionar USB B introduzindo outro dispositivo USB par...

Страница 38: ...quipo y puede producir da os al equipo y riego de descarga el ctrica a personas Si un objeto penetra dentro del equipo desench felo y ap guelo inmediatamente y contacte con su vendedor El equipo es de...

Страница 39: ...licos es conveniente respetar la reglamentaci n concerniente a la prevenci n de accidentes y el c digo de los seguros concernientes a la responsabilidad civil Si usted no sabe conectarlo o hacerlo fun...

Страница 40: ...l MP3 etc en esta clavija 34 PARTY EFFECT modo Apriete en esta tecla para seleccionar el efecto PARTY THRUST ALARM VECTOR FIREWORK RAINING 35 PARTY EFFECT Empuje la palanca de mando para crear una atm...

Страница 41: ...DEMO 6 Apriete en la tecla MUTE para cortar el sonido Apriete de nuevo para volver Apriete en X Drive del mando a distancia para activar desactivar el efecto X Bass Efectos sonoros 1 EFECTOS DJ Apriet...

Страница 42: ...luetooth Seleccione STANDUP PRODJ A STANDUP PRODJ B en la lista de equipos encontrados Seleccione OK o YES para emparejar el equipo con su Smartphone Si lo precisa entre la contrase a 0000 El indicado...

Страница 43: ...nsiunea de alimentare este de 230 Vac 50 Hz nu utilizati la o alta tensiune La deconectarea cablului de alimentare trageti de stecher nu de cablu Nu atingeti cablul de alimentare si nu operati aparatu...

Страница 44: ...ntrare USB A 7 INPUT A Apasati acest bton pentru a alege modul de intrare INPUT A 8 INPUT A PREV Apasati acest buton pentru a alege muzica anterioara pe INPUT A 9 INPUT A PAUSE Pauza redare muzica pen...

Страница 45: ...ER PROC 26 X DRIVE 27 JACK MICROFON 2 28 JACK MICROFON 1 29 INALTE 30 BAS 31 MOD CASTI Apasati acest buton pentru a alege intre diverse moduri pentru casti INPUT A INPUT B INPUT AB 32 DISCONNECT Decon...

Страница 46: ...URMATOR 32 INPUT A ANTERIOR 33 USB B 34 PORTABLE IN 35 INPUT B URMATOR 36 INPUT B REDARE PAUZA 37 INPUT B ANTERIOR 38 CANAL 39 CANAL 40 TASTATURA NUMERICA UTILIZARE TELECOMANDA Daca telecomanda interf...

Страница 47: ...PARTY EFFECT Apasati PARTY EFFECT de pe panoul frontal sau selectati THRUST ALARM VECTOR FIREWORK RAINING Apasati bara PARTY EFFECT La pozitia de maxim veti obtine efectul corespunzator PARTY EFFECT C...

Страница 48: ...e pe el Daca sunt introduse 2 stick uri USB in acelasi timp se reda muzica de pe ambele in acelasi timp Important Portul USB este doar pentru transfer de date nu puteti conecta alte dispozitive USB ai...

Страница 49: ...te d claration sont conformes aux exigences essentielles et aux autres dispositions pertinentes de Directive LVD 2014 35 EU Directive RED 2014 53 EU Directive ERP 2009 125 EC Directive EMC 2014 30 EU...

Страница 50: ...pe or model STANDUP PRODJ Conforms to the essential requirements of the LVD directive 2014 35 EU RED directive 2014 53 EU ERP directive 2009 125 EC EMC directive 2014 30 EU Based on the following spec...

Отзывы: