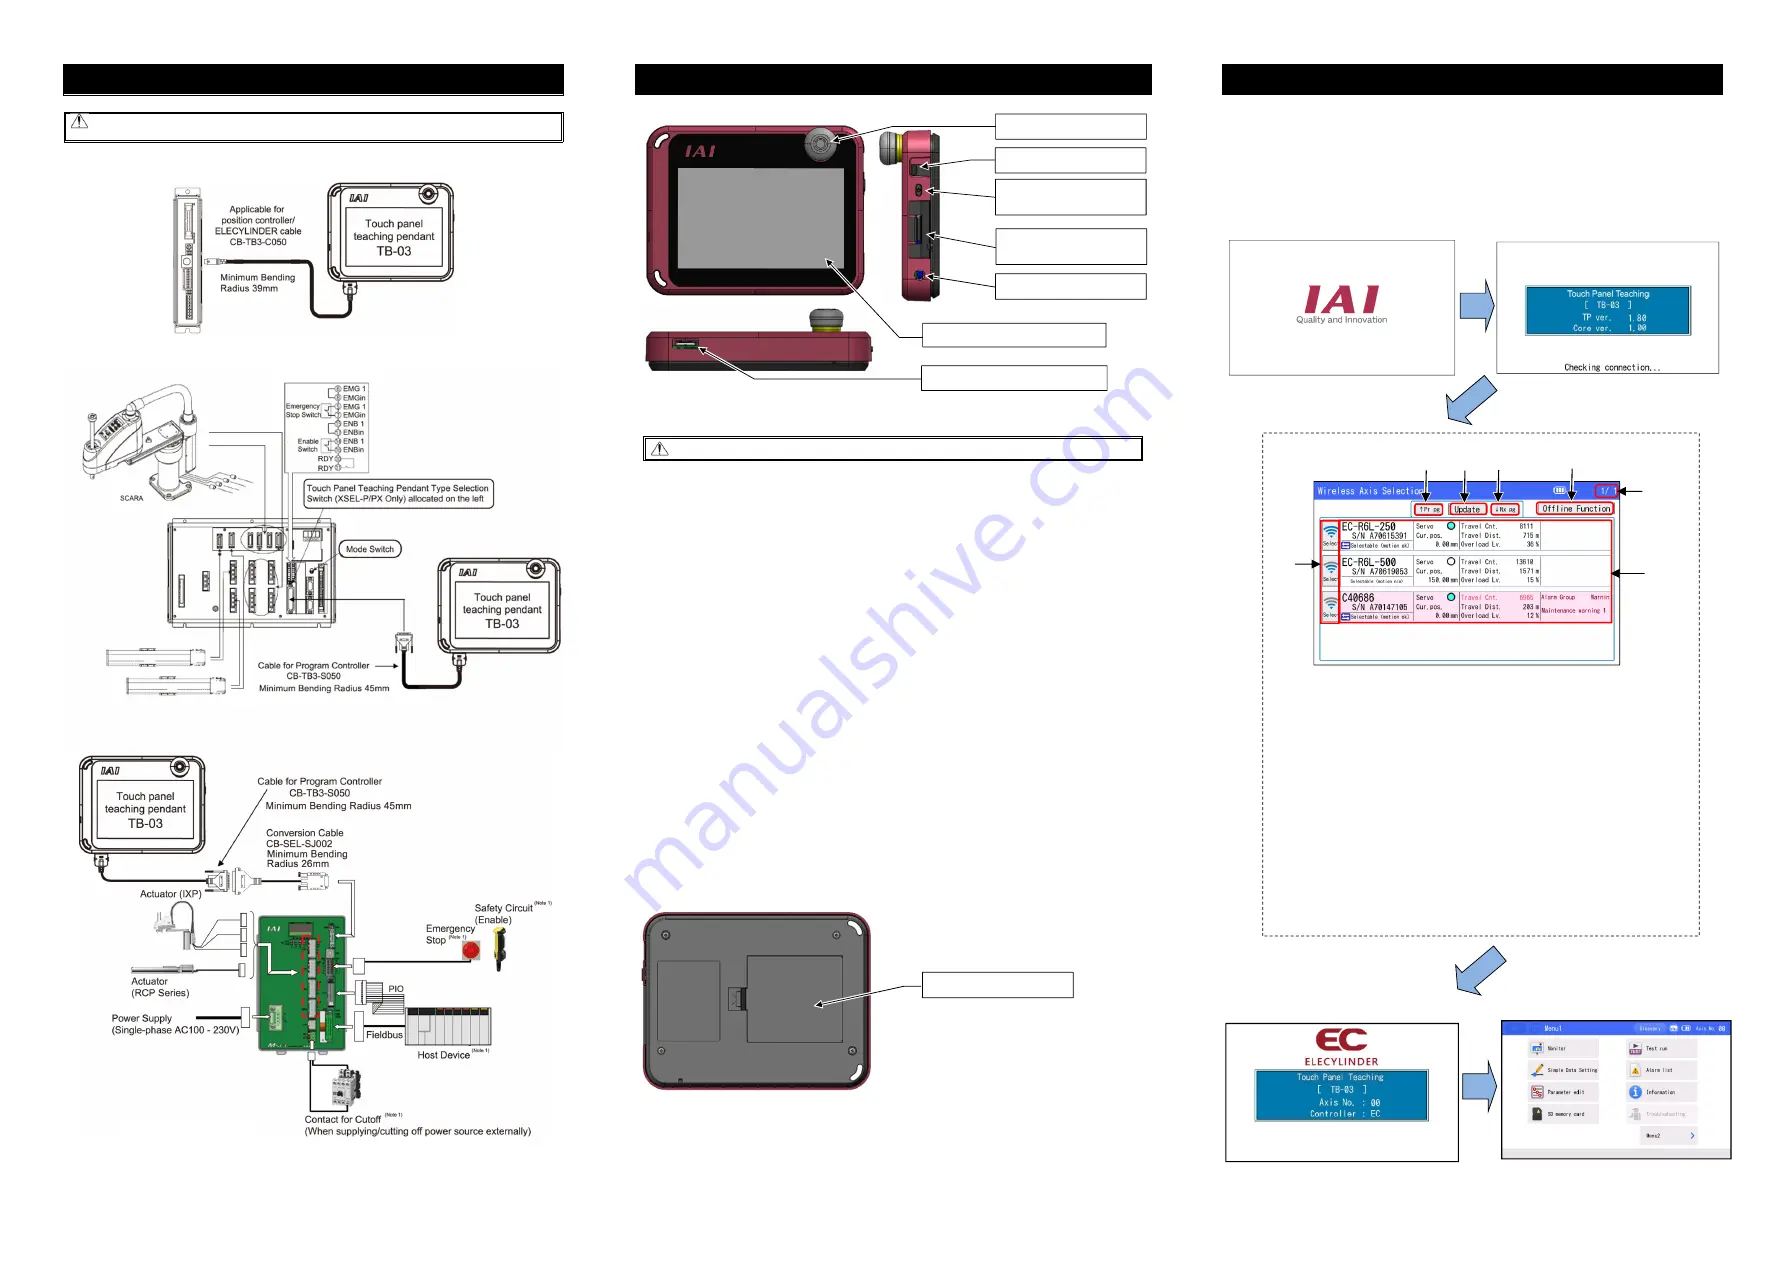
Wireless Axis Selection Screen
1) Wireless Icon (Wireless Link Button)
It is an icon to show the status of signal reception.
Status of signal reception should be expressed in five patterns, which are 4 no reception
of signal.
Press and hold this icon to move to a process to establish connection to the applicable axis.
This should not be available for an axis linked with wire or an axis with no link established.
2) [
↑
Pr pg] and [
↓
Nt pg] Buttons
You can change pages with these buttons. Four pages (16 axes) should be able to show at
maximum.
3) [Update] Button
Display in the screen gets erased once and wireless axes data get gathered and displayed again.
4) [Offline Function] Button
The display goes to the screen to edit positions (only for EC), establish the main unit environment
settings and perform teaching update which are available offline (with no connection to wireless
link).
5) Page Number
Current page number and total number of pages should be shown.
6) Data Display Area
Data for wireless axis should be displayed. Order of display should follow the strength of signal
reception.
Refer to the instruction manual for the contents of display.
Use the TB-03 unit with cables for each controller connected to the cable ports.
Caution: Turn the controller power OFF before connecting or disconnecting the Touch Panel Teaching
Pendant TB-03.
(1) ELECYLINDER, Position controller ERC2, ERC3, RCP6S, RCM-P6PC/P6AC/P6DC, ACON, PCON,
SCON, DCON, MCON, MSCON, RCON, RACON, RPCON, ASEP, PSEP, DSEP, MSEP, AMEC,
PMEC / ELECYLINDER (CB-TB3-C050 is used.)
(2) Program controller XSEL-K/KX/KT/KET/P/PX/PCT/Q/QX/QCT/R/RX/RXD/S/SX/SXD/RA/RAX/RAXD/
SA/SAX/SAXD, TT/TTA (CB-TB3-S050 is used.)
(3) Program controller MSEL-PC/PG/PCF/PGF/PCX/PGX, SSEL, ASEL, PSEL
(CB-TB3-S050, CB-SEL-
SJS002 is used.)
(Note) For other wiring except connection with Touch Panel Teaching Pendant TB-03, refer to the first step
guide or instruction manual of each controller.
Each Part Name
Front and Side Surface
1) STOP switch
When the wired link, press it to stop the operation. To cancel, turn it in the direction of arrow.
Caution: When the wireless link, operation can not be stopped with the stop switch.
2) Touch pen / Touch pen storage
The pen to touch on the touchscreen should be stored here.
3) Power supply switch
Press this button in order to turn the power on and off for TB-03 main unit.
Press it and hold for 2 seconds or more to turn it off.
4)
SD memory card slot cover
There is an inlet for SD memory card inside the cover.
Refer to instruction manual to set in or out a SD memory card.
5) AC adapter connection
It is a connector to have the AC adapter joined in.
6) Display and touch panel parts
This screen is configured of a TFT color LCD and touch panel.
Use this screen to edit the various setting values and to display the current value display, etc.
Touch the touch panel with a finger or touch pen (or fingers)
to perform operations.
*1 In a use of the LCD display for a long term, the brightness may drop.
In order to prolong the life of the LCD screen, set the extinction time in the environment setting
and turn it off automatically, or disconnect it from the controller when not using it.
*2 This touch panel is of analog resistance membrane type, so do not touch two or more locations on
the screen at the same time.
If two or more locations are touched at the same time, the centers of all touched locations may
respond and trigger multiple operations.
*3 When operating the touch panel, do not apply a force exceeding 0.5 N.
If any greater force is applied, the touch panel may be damaged.
*4 The life of touch panel is approx. 1 million touches at the same location. (Assuming a use
environment of 25°C)
7) Cable connection
Insert a cable applicable for each controller to establish wired link with controllers.
Back
8) Battery unit cover
There is the battery unit AB-7 inside the cover.
Refer to instruction manual to set in or out the battery unit.
ELECYLINDER Wireless Link (
EC
Wireless)
Reference for Wireless Link Reachable Distance
It is recommended to have distance between TB-03 and ELECYLINDER of 5m or less with no interruption.
The connection may get unstable even in distance of 5m or less depending on the peripheral environment
of use.
Also, be aware that, even if an axis is displayed in the wireless axis select screen with distance over 5m,
the connection could get unstable as the distance goes far.
After turning on the power, IAI logo will be
Versions of the teaching and core will be
seconds. displayed in the screen
displayed.
The number of axis to be operated and the type
The Menu 1 screen appears.
of controller will be displayed.
Refer to “ELECYLINDER Operation Menu (EC)” for explanation of each function
Product Check
5) Press and hold wireless icon
(wireless link button)
3)
2) 4)
5)
2)
1)
6)
Note 1 Please prepare separately.
6) Display and touch panel
1) STOP switch (Used for wired link)
4) SD memory card slot cover
(In state of close)
5) AC adapter connection
7) Cable connection (Used for wired link)
8) Battery unit cover
2) Touch pen /Stylus pen storage
3) Power supply switch
(Used for wireless link)


