background image

29

i3TOUCH 

V- SENSE 8404 T10 4K - operations manual

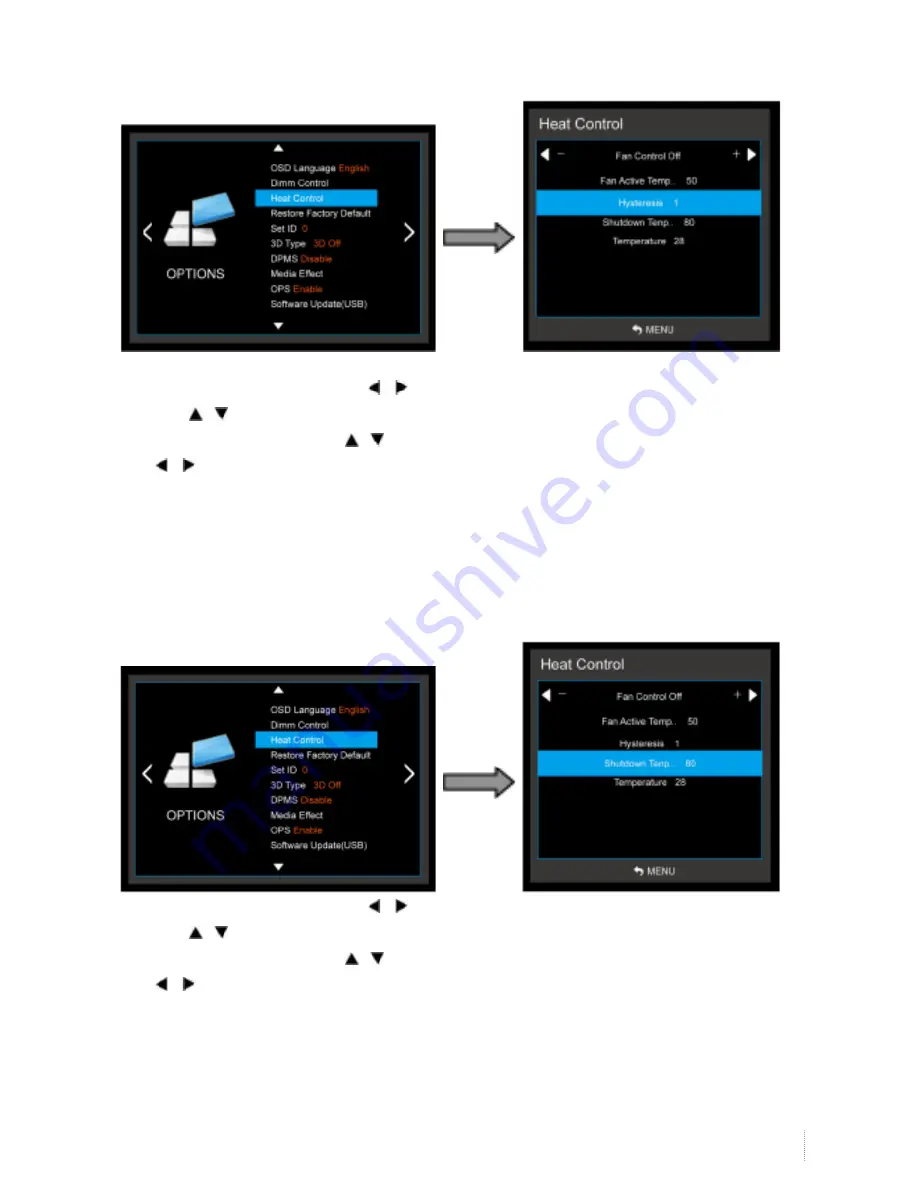
3-3) Heat Control Menu – Hysteresis

- Adjusts fan driving hysteresis temperature by Celsius degree.

1. Press the 

MENU

 button and then use 

 / 

 button to select the 

OPTION

 icon.

2. Press the   /   button to select the 

Heat Control

 Menu..

3. Press the 

OK

 button and then use   /   button to select the 

Hysteresis

 Menu.

4. Use 

 / 

 button to set fan driving hysteresis temperature by Celsius degree unit. 

5. Press 

MENU

 to return to the previous menu.

3-4) Heat Control – Shutdown

- Adjusts shutdown mode temperature by Celsius degree.
When current temperature reaches the shutdown temp, the monitor enters shutdown mode. 

1. Press the 

MENU

 button and then use 

 / 

 button to select the 

OPTION

 icon.

2. Press the   /   button to select the 

Heat Control

 Menu.

3. Press the 

OK

 button and then use   /   button to select the 

shutdown

 Menu.

4. Use 

 / 

 button to set fan driving hysteresis temperature by Celsius degree unit. 

5. Press 

MENU

 to return to the previous menu.

Содержание v-sense V8404 4K T10

Страница 1: ...i3TOUCH V SENSE V8404 4K T10 USER MANUAL SENSE SENSE SENSE...

Страница 2: ...nection 11 5 When using OPS PC CAUTION 11 6 Remote Control 12 7 OSD Menu Description 13 8 Product Specification 36 8 1 LED Specification 8 2 OPS Specification 9 Product Dimensions 40 9 1 LED Dimension...

Страница 3: ...rviceable parts inside Refer servicing to qualified service personnel To prevent fire or shock hazard do not expose the rear of the set to rain or moisture Do not rub or strike the Active Matrix LCD w...

Страница 4: ...ature Do not defeat the safety purpose of the grounding type cord 11 Power Cord Protection Power supply cords should be routed so that they are not likely to be walked on or pinched by items placed up...

Страница 5: ...ally by following the operating instructions Adjust only those controls that are covered by the operating instructions as an improper adjustment of other controls may result in damage and will often r...

Страница 6: ...cts when building or product do not hold the back of the handle under the product makes the handle is a secondary role Table stand and put them on the table by using the installation gets the nose doe...

Страница 7: ...g walls to ensure proper ventilation Failing to do so may result in fire or a problem with the product due to an increase in the internal temperature Install the product so the required distances show...

Страница 8: ...ents have been included Store the packaging box in case you need to move the product later If any items are missing contact your dealer Contact a local dealer to purchase optional items LED Display Co...

Страница 9: ...e RED 3 SOURCE Selection Input Signal button 4 IR Receive Remote Control Aim the remote control towards this spot on the LED Display USB 1 Terminal Direct connect to PC USB 2 Terminal Direct connect t...

Страница 10: ...t DVI High Definition Multimedia Input RS 232 Facility to control the screen via RS232 protocol USB Download software update Play contents USB OPTION When connecting the USB for touch dual touch USB f...

Страница 11: ...and then connect same as below drawing L R connection is same Internal speaker will not output Note Don t connect NC Notes Please turn off the power when connecting external speakers If there are no a...

Страница 12: ...Toggles sound status of speaker ECO Screen Bright SLEEP Set the sleep timer INFO Displays input source information ZOOM Activates OSD of aspect ratio control Fast Backward function contents play Same...

Страница 13: ...dialogue box will be displayed as the fourth or fifth level 1 To show and remove the Menu Press the MENU button on the Remote Control to display the menu A second press of the MENU button or a press o...

Страница 14: ...ologies com 7 2 Video Input Selection 1 How to select a video source from the OSD 1 Select a button you can click the SOURCE button to select each video source 2 To go to the desired video source pres...

Страница 15: ...nt to switch the sound off press the MUTE button on the remote control 3 You can cancel this function by pressing the MUTE or VOL button 3 On Screen Menus Language Selection The menus can be shown on...

Страница 16: ...ustment 1 How to adjust the OSD screen 2 Press the MENU button and then button to select each menu 3 Press the OK button and then use button to display the available me nus Your monitor s OSD On Scree...

Страница 17: ...Mode User menu Contrast Brightness Color Sharpness Tint 4 Press OK button and then use button to make appropriate adjustments 5 Press MENU to return to the previous menu Contrast Control the differenc...

Страница 18: ...he MENU button and then use button to select the PICTURE icon 2 Press the button and then use ENTER button to select Color Temperature menu 3 Press the OK button and then use button to select desired...

Страница 19: ...rt 4 Press MENU to return to the previous menu 4 MFC Select the picture appearance to suit your preference and viewing situations 1 Press the MENU button and then button to select the PICTURE icon 2 P...

Страница 20: ...on 2 Press the button and then use OK button to select PC Menu 3 Press button and then use button to make appropriate adjustments Only PC mode Support 4 Press MENU to return to the previous menu 6 Col...

Страница 21: ...to select User menu Treble Bass 4 Press MENU to return to the previous menu Treble Controls the relative intensity of higher pitched sounds Only user mode Support Bass Controls the relative intensity...

Страница 22: ...tton to select the Auto Volume menu 3 Press OK button to make appropriate adjustments On Off 4 Press MENU to return to the previous menu 4 Surround Sound Adjust the sound to suit your taste and room s...

Страница 23: ...make appropriate adjustments 0 100 4 Press MENU to return to the previous menu 6 User Control for 5 Band Equalizer If the Equalizer settings are changed sound mode setting goes to User automatically...

Страница 24: ...ts Language English Franais Espanol Deutsch Italiano Nederlands Chinese etc 4 Press MENU to return to the previous menu 2 Dimm Control 2 1 Dimming Automatic dimming controls by Adjusting the brightnes...

Страница 25: ...e button to set Auto Dimming options 6 Press MENU to return to the previous menu ON Dim level is adjusted by light sensor automatic control system OFF Dim level is adjusted by manual control manual co...

Страница 26: ...unctions 5 Use button to set detected light ambient value by LUX unit 6 Press MENU to return to the previous menu 2 1 4 Dimming Menu MIN Ambient Light Ambient Sensor Option only Adjusts detected light...

Страница 27: ...ent level by LUX unit Read Only 3 Heat Control Automatic Fan controls by internal external temperature sensor 1 Press the MENU button and then use button to select the OPTION icon 2 Press the button t...

Страница 28: ...button to set Off On Auto options 5 Press MENU to return to the previous menu 3 2 Heat Control Menu Fan Active Temperature Adjusts fan driving temperature by Celsius degree It works only when the Fan...

Страница 29: ...g hysteresis temperature by Celsius degree unit 5 Press MENU to return to the previous menu 3 4 Heat Control Shutdown Adjusts shutdown mode temperature by Celsius degree When current temperature reach...

Страница 30: ...ect the OPTION icon 2 Press the button to select Restore Factory Default menu 3 Press the OK button and then use button to select the Are you sure menu 4 Press MENU to return to the previous menu 5 Se...

Страница 31: ...after the input source has been unused for some time idle to save power 1 Press the MENU button and then use button to select the OPTION icon 2 Press the button to select DPMS menu 3 Press the OK butt...

Страница 32: ...e OPS PC adjustment 1 Press the MENU button and then use button to select the OPTION icon 2 Press the button to select OPS menu 3 Press the OK button to select the Details Menu Disable Enable 4 Press...

Страница 33: ...rmation 1 1 Clock If current time setting is wrong reset the clock manually 1 Press the MENU button and then use button to select the TIME icon 2 Press the OK button and then use button to select Cloc...

Страница 34: ...e button button to adjust on time schedule and activation 5 Press MENU to return to the previous menu 3 Off Timer Timer function operates only if current time has been set 1 Press the MENU button and...

Страница 35: ...nction operates only if current time has been set 1 Press the MENU button and then use button to select the TIME icon 2 Press the button to select Sleep Timer 3 Press the OK button and then use button...

Страница 36: ...tive screen size Diagonal 84 04 inches 2134 62mm Response Time 5 0ms Typ G to G Pixel Pitch mm 0 4845 mm H x 0 4845 mm V Pixel Format QWUXGA 3 840 x 2 160 Display Colors 10bit D 1 06Billon colors Brig...

Страница 37: ...al Sleep Timer Yes Max 240Min Time Zone Yes Dimm Control TV Only work 6 Modes Auto Dimming Local Dimming Manual Dimming mode Freeze Function Yes ECO Yes Resolution Component Optional 480i 480P 576I 57...

Страница 38: ...p 720p 1080i 1080p 4k2k Media Play Video MPEG1 MPEG1 Up to 1920 x 1080 30fps Bitrate 20Mbps MPEG2 MPEG2 MPEG4 AVC MPEG 4 Visual DivX5 DivX4 DivX3 XviD MS MPEG4 V3 MWV3 MJPEG M JPEG Photo JPEG The maxi...

Страница 39: ...ry By using CR2032 Li battery Power Requirement DC 12 19V 5 input minimum 5A maximum up to 8A External Front I O Audio 1x mic in phone Jack and 1x Line out phone jack connector Power on button 1x Togg...

Страница 40: ...40 www i3 technologies com 9 Product Dimensions 9 1 LED Dimensions...

Страница 41: ...41 i3TOUCH V SENSE 8404 T10 4K operations manual 9 2 OPS Dimensions...

Страница 42: ...e Not Supported Message Check the maximum resolution and the frequency of the video adapter Compare these values with the data in the Standard Signal Mode Table 3 Picture rolls vertically Check if the...

Страница 43: ...and AS guide 11 1 Before request AS 1 When the product does not operate normally product manuals can be found on the troubleshooting please refer to the page 11 2 AS Cost 1 Our warranty period is 2 ye...

Страница 44: ...WWW I3 TECHNOLOGIES COM INFO I3 TECHNOLOGIES COM AUTHORISED DISTRIBUTOR...

Отзывы: