background image

15

i3BOARD 

Manual

If you tried another cable and/or computer and the problem is only encountered with one computer, use a powered USB-
hub (a USB-hub with its separate power supply providing a power boost to all USB-ports) or a powered USB cable

When you need to prolong the cable length to the board, use active USB extender cables. See step 6. 

6.  USB-cabling of the i3BOARD
Normally a computer and a i3BOARD will communicate without any troubles if only the delivered USB-cable is used. In some 
cases however other cabling is necessary because of insufficient power (see step 5) or because the PC is located away from 
the board. 

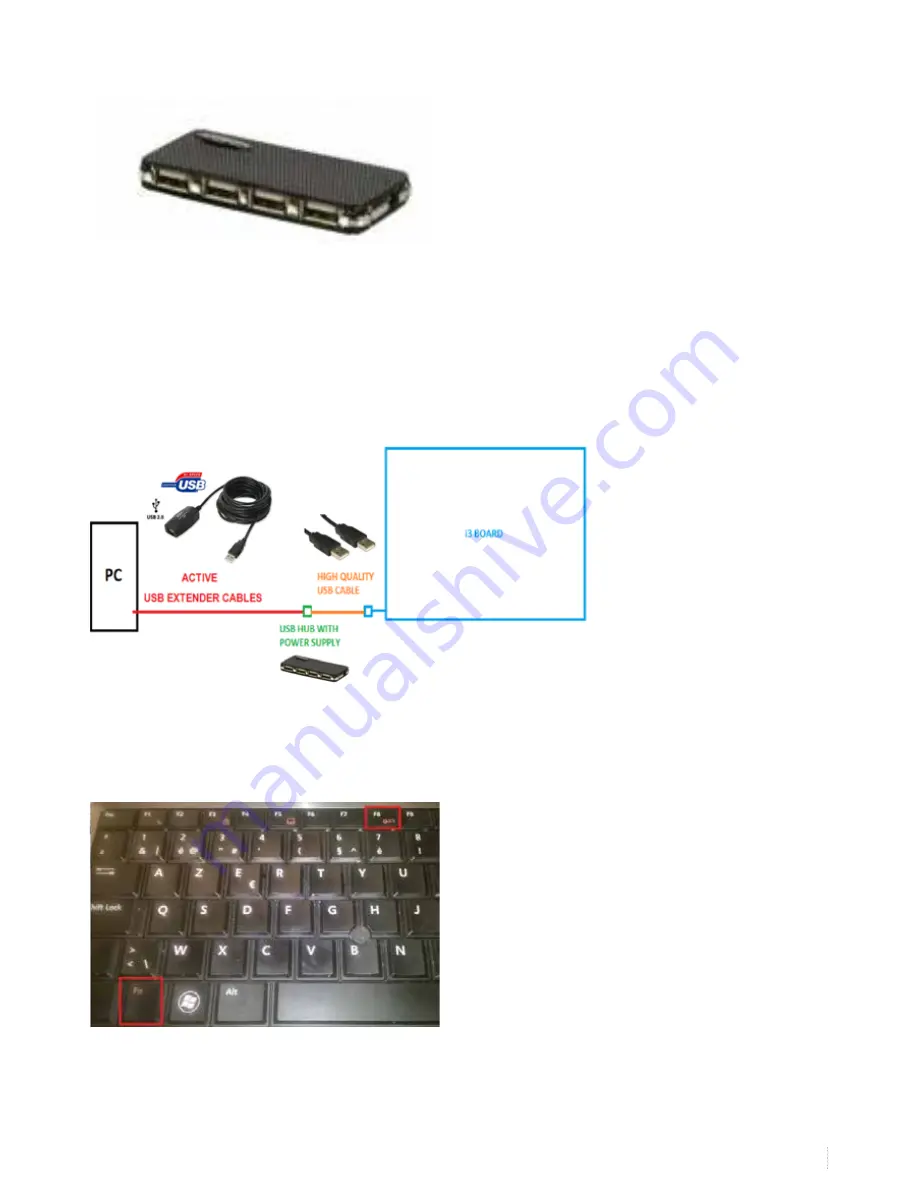
Check if your installation setting matches with the below image. The active USB extender cables (RED) are only used when 
cables need to be prolonged. The USB hub (GREEN) is only used when the board is not getting sufficient power.

7. Connecting the projector
Connect your computer with your projector. If necessary, duplicate the image. The key-combination to be used to extend 
your display depends on

 your computer brand. E.g. Dell-computers: FN+F5

Содержание i3board

Страница 1: ...MANUAL i3BOARD versie V3 15 05 ...

Страница 2: ... p11 IV Configuration driver installation p12 1 Driver download p12 2 Connecting the board p12 3 Installing the drivers p12 4 What to check when drivers can t be installed p14 5 Power supply p14 6 USB cabling of the i3BOARD p15 7 Connecting the projector p15 8 Calibrating the I3BOARD p18 9 What to do if calibration is still inaccurate p20 10 What to do if windows calibration does not start p21 11 ...

Страница 3: ...ARD Touch recognition can work without drivers starting from Win 7 but we always recommend to install them Can you right click on an i3BOARD Yes Hold your finger for 3 seconds on the desired point of activation Do I need a special computer for an i3BOARD A recent computer see i3 learning com for computer specs equipped with Windows7 Home Premium or Win dows 7 Ultimate or higher is perfect for an i...

Страница 4: ...Learn more about i3BOARD and the rest of the i3 product line Visit www i3 learning com 4 7309LT III Hardware installation manual ...

Страница 5: ...5 i3BOARD Manual 1 Wall Mount A B 1 2 2 ...

Страница 6: ...Learn more about i3BOARD and the rest of the i3 product line Visit www i3 learning com 6 1 C D E 2 ...

Страница 7: ... 7 i3BOARD Manual F G ...

Страница 8: ... i3BOARD on top of a radiator or central heating 2 Please mount the pentray exactly as described in the installation guide respecting enough distance between the board and the pentray in order not to create conflicts with the touch sensor of the board frame 3 Make sure there are no objects all around the i3BOARD on the left right or top bottom sides that could block the leds in the i3BOARD frame o...

Страница 9: ...rojector distance 309mm 654mm is the same The board has the same height but another width 4 3 On the drawing the use of VGA is similar to HDMI The use of RJ45 is optional When using VGA you should also use a jack to use the speakers of the projector The i3BOARD is not delivered with the VGA HDMI cables for the projector or USB extender cables 2640 mm 1222 mm 903 mm 215 mm 309 mm 965 mm 1880 mm 117...

Страница 10: ...rd with 2 persons on the correct location where the projection is full screen Open a folder on the computer where the top border is exactly on top of the projection Remove the board and draw a line on top of the projection The folder can help you to distinguish the exact top of the projection and draw the line Draw a second line 1 1 centimeters lower than the line you have drawn This line height i...

Страница 11: ...11 i3BOARD Manual Mounting plan i3BOARD 100inch ...

Страница 12: ...d the latest drivers products drivers i3BOARD drivers IInstall the projector in order to calibrate the board later on 3 Installing the drivers install the drivers you downloaded on the website you will find the driver in the download folder that has been set in your browser preferences 2 Connecting the board Connect the i3BOARD to the supplied USB cable Connect the other end of the cable to your c...

Страница 13: ...Driver x x xx xx exe version number depends on the download date If you cannot open the file right click on the file and choose run as administrator Make sure you have installation rights Run the installer and click 4 times next and finally install If you can finish the installation the drivers will ask for a reboot Reboot your computer to finish the installation If the installation was successful...

Страница 14: ...sufficient power see step 5 To check if the USB port cable are working first try another USB port Then try another computer and or try another short high quality USB cable Do not connect the board with your computer using multiple USB cables see step 6 Unless you concluded after testing that it is defect we advise only to use the USB cable delivered with the board Prolonging the distance from boar...

Страница 15: ... any troubles if only the delivered USB cable is used In some cases however other cabling is necessary because of insufficient power see step 5 or because the PC is located away from the board Check if your installation setting matches with the below image The active USB extender cables RED are only used when cables need to be prolonged The USB hub GREEN is only used when the board is not getting ...

Страница 16: ... to see the computer image on both PC display and projector or projector only to see the computer image only on the projector Make sure the image shown on both your computer screen as on the i3BOARD is full screen Prevent black borders left right or top bottom This means there is a difference in resolution ...

Страница 17: ...ble Preferably a 16 10 Then choose duplicate For the i3BOARD 77 choose a 4 3 resolution e g 800 600 and change the projector to the 4 3 aspect ratio Now choose advanced settings Choose the tab of your graphical card control panel In this field you should see the options display refresh rate rotation and scaling Click display and select the screen that needs to be scaled Either your computer displa...

Страница 18: ...native choose projector only in your display settings and only use the projector If you prefer to use both computer display and projector move on to step 9 before heading to step 8 8 Calibrating the I3BOARD Calibrate your board The best method to calibrate is using the V sense drivers Go to start all programs i3learning V sense V Sense Driver Configuration If you have a windows 8 1 computer search...

Страница 19: ...f so the board is ready to be used Before using the board please check step 11 If you cannot calibrate the board because of no touch move to step 12 If you calibrated the board but the calibration is not accurate you can perform an extra calibration using the Windows calibration tool on top of the V sense calibration Go to control panel tablet PC settings windows 7 windows 8 Now choose calibrate a...

Страница 20: ...n V sense windows If you calibrated the board using the V sense drivers windows calibration if there are no black borders on the PC screen or the projected image but still the calibration is not accurate go to screen resolution see step 7 and choose extend instead of duplicate and apply Now go to control panel tablet PC settings windows 7 windows 8 Choose Setup ...

Страница 21: ...V sense driver calibration If still not accurate after calibration go to screen resolution and choose duplicate again to duplicate your computer screen on the board Calibrate again with the V sense drivers and test the result If the i3BOARD is still not calibrated fully accurately the problem might be related to your computer graphical card or its drivers that needs to be upgraded 10 What to do if...

Страница 22: ...hoose Setup Follow the on screen instructions Tap on the board when the below instructions are shown on the board or press enter when you read the instructions on your computer screen only With this step you identify the board as the touch screen to be used in windows Finish with escape Now choose calibrate and press with your finger on the black crosses ...

Страница 23: ...ng USB Selective suspend setting Some customers experience that touch is lost after 15 minutes This is because the i3BOARD is feeded by the power supplied from the USB port of the computer and some computers have USB selective suspend setting enabled to save power Go to Control Panel All Control Panel Items Power Options Edit Plan Settings Click change advanced power settings For each power plan u...

Страница 24: ...gfix If you prefer to use older drivers unplug the USB cable and reboot your PC After reboot when an image is shown wait 10 seconds Then plug in the USB cable A touch driver conflict Check if you have touch when opening the V sense driver and selecting mouse mode in settings and then apply If you have touch you might need a driver update Check if you downloaded the latest drivers on the website an...

Страница 25: ... on fast start up function Some computers have a turn on fast start up function to quickly boot If that function is enabled sometimes the touch sensor is not recognized at start up or the touch sensor is recognized before the projector display which causes a conflict Go to Control Panel All Control Panel Items Power Options Choose require a password on wakeup Choose change settings that are curren...

Страница 26: ... motherboard controlling the display of the laptop e g intel HD Graphics 4000 but also have an extra stronger graphics card e g Nvidea NVS 5200M to control F HD projectors or displays connected to the computer It can happen the settings you change in display screen resolution only change the onboard graphics settings while the device connected to your HDMI port is controlled by the graphics card a...

Страница 27: ...27 i3BOARD Manual In that case you need to enter the control panel of your graphics card and choose duplicate or clone with laptop display Below is an example of Nvidea ...

Страница 28: ...WWW I3 TECHNOLOGIES COM INFO I3 TECHNOLOGIES COM AUTHORISED DISTRIBUTOR ...

Отзывы: