i3-TRNG-DVR-
UR-Ai_Intel-QSG
.indd
Rev. 220225
Thank you for purchasing i3 International’s UR-series NVR. Your UR NVR comes pre-
installed with i3’s flagship SRX-Pro software and i3Ai software. Purchase enough IP
licenses and i3Ai licenses for your desired solution.
SAFETY
When installing your UR-series NVR, be sure to:
• avoid excessive heat, such as direct
sunlight or heating appliances
• avoid contaminants (e.g. dust, smoke)
• strong magnetic fields
• avoid moisture and humidity
• avoid areas with mechanical vibrations
• avoid temperatures below 10°C (50°F) and
above 30°C (86°F).
• use VW-1 or FT-1 cables only
POWER SUPPLY
UR Power consumption requirements: 100~240VAC.
PACKAGE CONTENTS
Ensure that the items received match the following. In addition to this Quick Guide and the
UR NVR, the packing box includes:
1.
USB ke mouse (x1)
2.
Power cable (x1)
3.
DP++ to HDMI cable (x1)
4.
Security label (x1)
INSTALLATION
URX-Ai comes with a 4.5U tower chassis that can be wall- or rack-mounted with a
purchase of the optional mounting accessories.
Follow all safety precautions when selecting an installation location for your NVR.
Reminder:
Use i3 approved HDD models
only
(Western Digital Gold and Ultrastar).
Tip:
Ensure the NVR is within 1 meter (3 feet) from the UPS and the NVR and its
cables have sufficient space. The system must be placed on an even surface
(shelf or Rack mount).
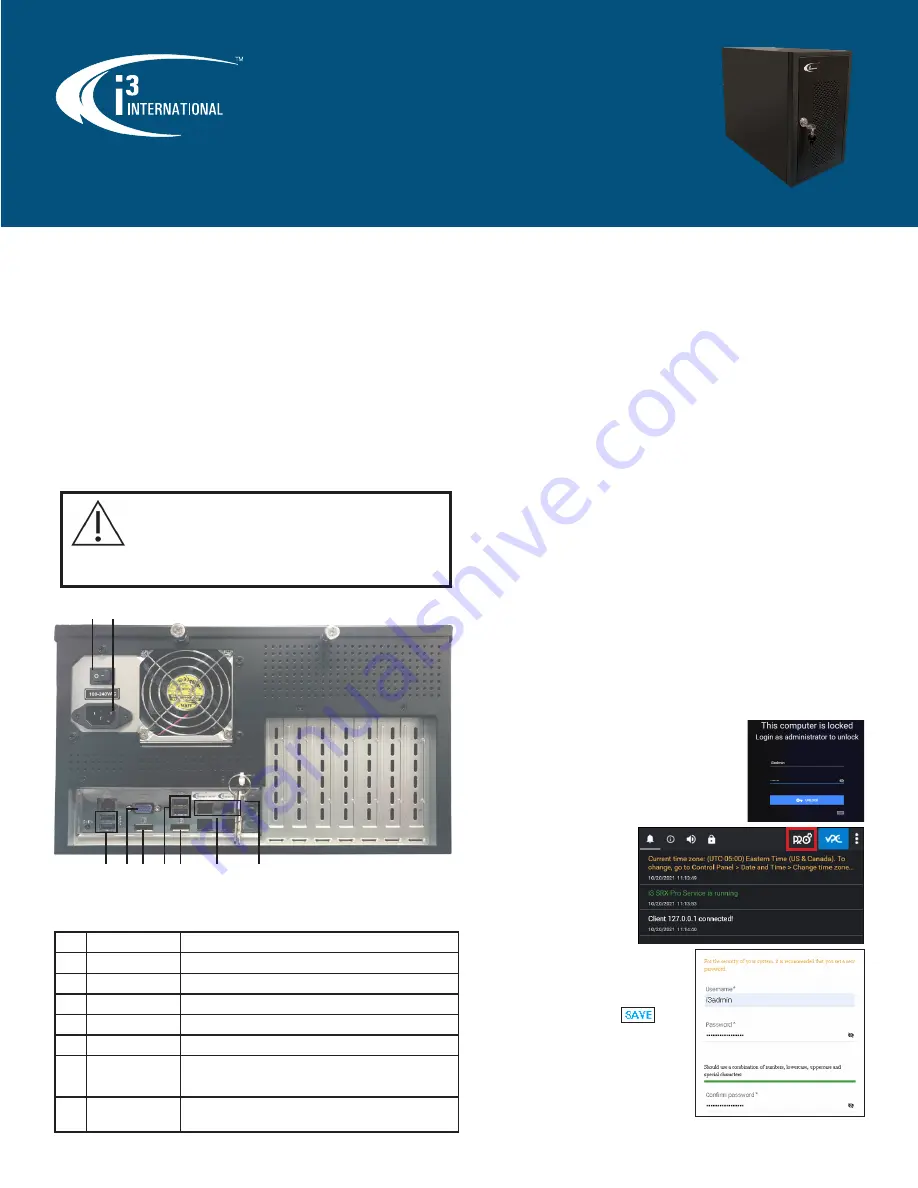
1.
Turn the Power Switch (#1) to the OFF position.
2.
Plug the USB mouse and the USB keyboard into the USB ports (#3).
3.
Plug the VGA (#4), DP++ (#5), or HDMI (via cable provided) monitor.
4.
Plug IP cameras into a Gigabit Switch and connect to IP CAM RJ45 port (#6).
5.
Use the RJ45 Ethernet port labeled WAN (#6) to connect NVR to the network.
6.
Plug in the supplied power cable into the AC Power In port (#2) and connect the
NVR to an Uninterrupted Power Supply (UPS).
Note:
Uninterrupted Power Supply usage is mandatory for the reliability and
longevity of your NVR. Failure to use UPS may void your factory warranty.
7.
Return the Power Switch (#1) into the ON position. The NVR will then power on. If
not, press the Power button located on the front panel of the NVR.
RACK MOUNT INSTRUCTIONS
1.
Elevated Operating Ambient - If installed in a closed or multi-unit rack assembly,
the operating ambient temperature of the rack environment may be greater than
room ambient. Therefore, consideration should be given to installing the equipment
in an environment compatible with the maximum ambient temperature (Tma)
specified by the manufacturer.
2.
Reduced Air Flow - Installation of the equipment in a rack should be such
that the amount of air flow required for safe operation of the equipment is not
compromised.
3.
Mechanical Loading - Mounting of the equipment in the rack should be such that a
hazardous condition is not achieved due to uneven mechanical loading.
4.
Circuit Overloading - Consideration should be given to the connection of the
equipment to the supply circuit and the effect that overloading of the circuits might
have on overcurrent protection and supply wiring. Appropriate consideration of
equipment nameplate ratings should be used when addressing this concern.
5.
Reliable Earthing - Reliable earthing of rack-mounted equipment should be
maintained. Particular attention should be given to supply connections other than
direct connections to the branch circuit (e.g. use of power strips).
FIRST STARTUP
Your UR NVR is running Windows 10 IoT OS and comes pre-
installed with the latest version of SRX-Pro software.
As part of the first startup, you will need to:
A.
Set a new administrative password.
B.
Ensure the Time Zone is configured correctly.
Set New Admin Password
When the NVR first boots up, you
will see the Windows Lock Screen
1.
Unlock the NVR with default
credentials.
Username:
i3admin
Password:
i3admin
2.
Click
PRO
icon in the SRX-Pro
monitor utility to open SRX-Pro Setup in a
web browser.
3.
Set the new administrative password for
i3admin username and click
.
Follow suggested password guidelines for a
strong password.
Keep your new password secure.
Note: Unmarked components are not in use.
No.
Item
Description
1
Power Switch
Power ON/OFF
2
AC Power In
AC Power in Port
3
USB 3.1
4x USB 3.1 interfaces
4
VGA
1x VGA video output
5
DP++
2x Dual-Mode Disp+ ports (4K monitors supported)
6
Network Port
2x RJ45 10/100/1000 Mbps Ethernet interface
IP CAM (left) - connect to the IP Camera network
WAN (right) - connect to the Internet (WAN) network
7
Keys
Front panel keys.
Tip:
Lock the front panel to restrict
access to storage hard drives.
i3Ai / SRX-Pro Server
UR5-Ai / URX-Ai
Quick Start Guide
CAUTION: Risk of Explosion if Battery is replaced by an Incorrect Type.
Dispose of Used Batteries According to the Instructions.
ATTENTION: Risque d’explosion si la batterie est remplacée par un type incorrect.
Mettre au rebus les batteries usagées selon les instructions.
Equipment is intended for installation in Restricted Access Area.
Les matériels sont destinés à être installés dans des EMPLACEMENTS À ACCÈS RESTREINT
The inside of the equipment is intended for service access only.
2
3 4 5
6
5
7
1
3


