

QUICK START GUIDE
i3 INTERNATIONAL INC.
1.866.840.0004
www.i3international.com
UR5-Ai / URX-Ai, i3Ai/SRX-Pro Server
ADJUST THE TIME ZONE
All NVR units sold by i3 international are pre-set to Eastern Time zone (UTC -5:00). If
your NVR is in a different time zone,
you must set the correct time zone on the first
system start up.
If the NVR is later re-located to a different time zone, this setting must be changed
again. All previously-recorded data must be formatted after each time zone change.
Failure to do so may result in system malfunction.
To change your NVR time zone, unlock the NVR first, then Go to Start menu and type
Control Panel. In Control Panel, click
Date and Time
>
Change time zone...
Set your NVR’s Time zone from the drop-down menu and click
OK
.
ADD VIDEO INPUTS to SRX-PRO v7
Make sure to set unique IP address to every IP camera/encoder before adding it to SRX-Pro
v7. Use i3’s ACT (Annexxus Configuration Tool) utility for i3 cameras and encoders. ACT is
pre-installed on your NVR.
1.
Launch i3 Pro Setup from the Desktop or from the SRX-Pro Monitor.
2.
Enter
your administrator
Username
and
Password
and click
LOGIN.
3.
Click the
Add
tile.
4.
If using SRX-Pro v.7.1, find your cameras in the list of UNASSIGNED CAMERAS.
You may need to click
REFRESH
.
If using SRX-Pro v.7.2 and above, click
SEARCH
and
wait until your cameras are discovered.
5.
Enter correct login credentials for all devices with “Login failed”
symbol
(if any).
Select all “Login failed” devices that share login credentials and click
.
6.
Enter device’s
Username
and
Password
and click
Green checkmark
indicates that the camera/encoder is ready to be added.
7.
Select all devices with a green checkmark and click
.
Your cameras/encoders have now been added and are set to record based on
Motion schedule.
Or
QR Code for Complete
User Manual and ACT
and download
Annexxus Configuration Tool (ACT)
and
additional documentation.
Contact our Technical Support team at:
1.877.877.7241
or
if you have any questions
or concerns regarding camera installation or if you require
software services or support.
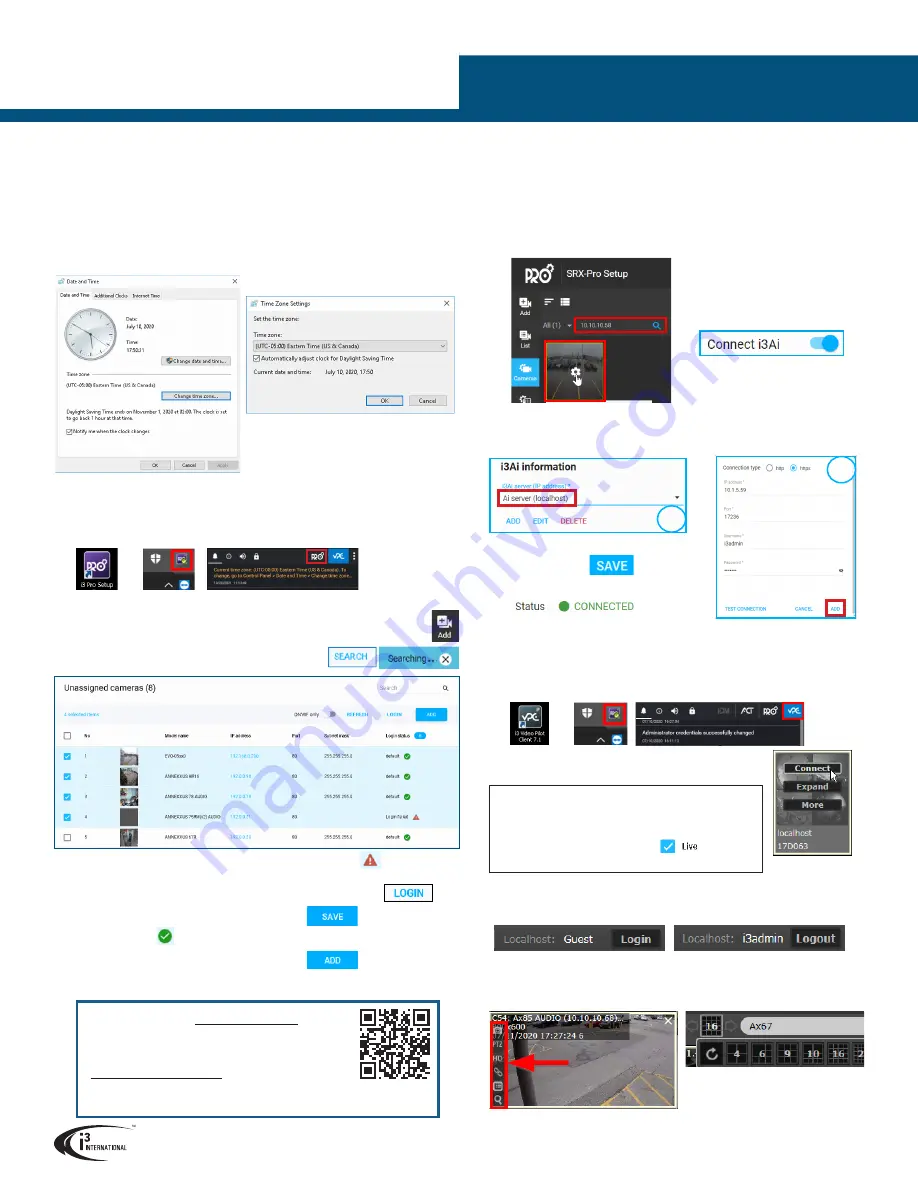
LINKING SRX-PRO SERVER to i3AI SERVER
When running i3Ai Server on the same NVR as the SRX-Pro Server, or on a
different unit on the same network, an active connection between the two must
be established.
1.
In i3Ai Server, add one or more cameras and configure as needed. Make a note
of the camera’s IP address.
2.
In SRX-Pro Setup, go to
Cameras
.
3.
Use the search field to fine a camera already added to the i3Ai Server. Use
camera IP address, name, model or other identifying information.
4.
Click on the camera thumbnail and
go to i3Ai setup tab.
5.
Click on the
Connect i3Ai
toggle to
turn it ON.
LIVE VIDEO
Use Video Pilot Client application (pre-installed on your NVR) to view Live video and
to Search/Backup recorded video.
1.
Launch i3 Video Pilot Client from the Desktop or from the SRX-Pro Monitor.
2.
Mouse over
localhost
tile and click
Connect
.
3.
Login using SRX-Pro administrative or user credentials
If using Guest account to view Live localhost video, you must
Login
before
being able to Search or Backup video. To protect the security of your system,
Logout when done.
Tip:
To view Live video instantly using Guest account,
go to
SRX-Pro Setup > Server > User
management > User groups
and edit the
Idle
group. In Permissions, expand Live - Search - Backup
drop-down and enable Live mode
for all or
select cameras.
• Double-click on any channel to bring it into Full Screen mode.
• Hover over any channel to see on-screen control panel.
• Click on the screen division icon to change current display mode.
• Use the Search bar to quickly locate camera by camera name, model or IP.
Or
6.
In i3Ai information,
A.
If the i3Ai server is installed on
the
same
NVR as SRX-Pro server,
select
Ai server (localhost)
.
B.
If the i3Ai server is installed on a
different
unit on the network, click
ADD
,
fill out the i3Ai server connection information and click
ADD
again.
6B
6A
7.
When done, click
. Wait until the
Status changes to
CONNECTED
.


