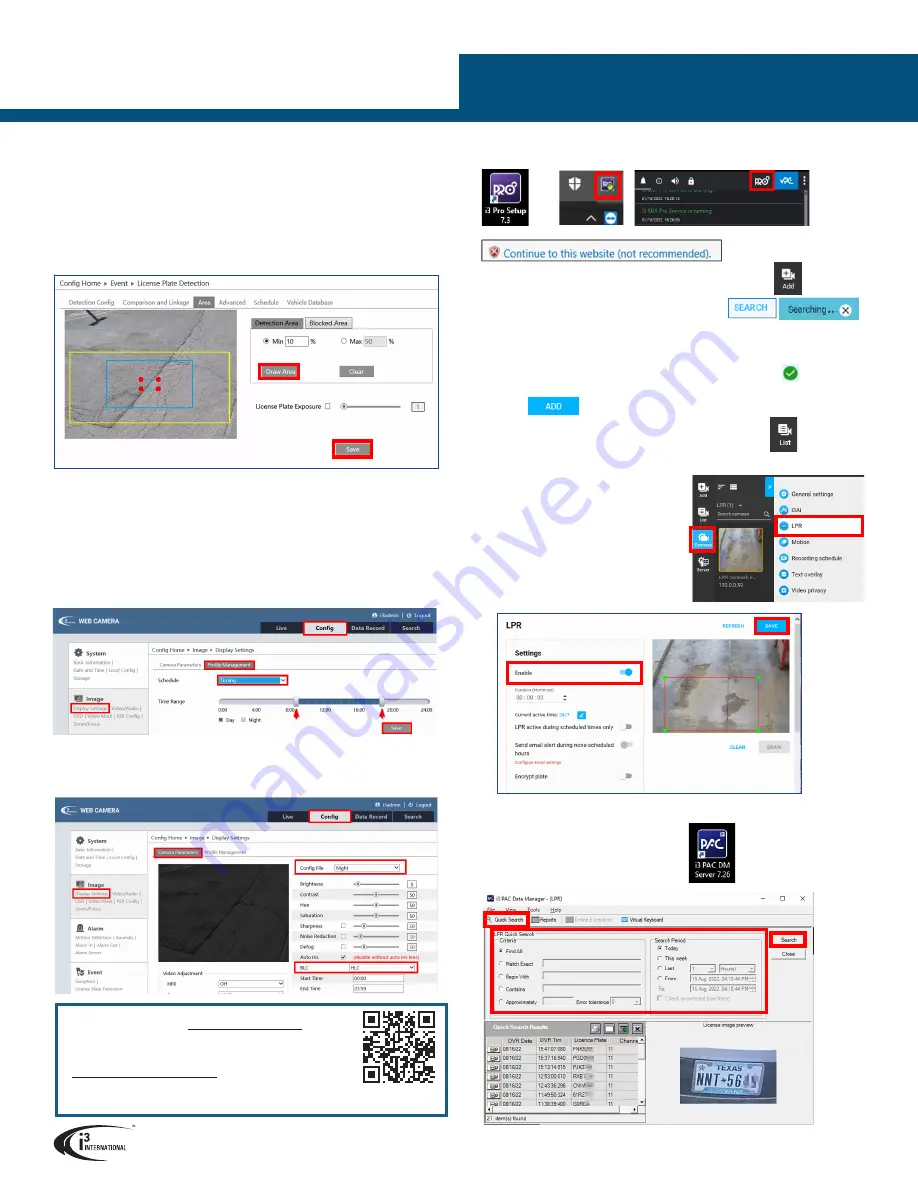
ADD CAMERA TO SRX-Pro PRO SETUP v7
1.
Launch the SRX-Pro Setup from the Desktop or from the SRX-Pro Monitor.
2.
In the IE browser, click
Continue to this website.
3.
Enter
your administrator
Username
and
Password
and click
LOGIN
4.
Click on the
Add
tile.
5.
Click
SEARCH
and wait until your H59 camera is
discovered.
6.
Select one or more H59 cameras with the same login credentials and click
LOGIN
7.
Enter camera’s
Username
and the (new) administrative
Password
and click
SAVE
Login status for your device must now show the green check mark.
Note: Devices with “Login failed” status will not be added.
8.
Click
ADD
. Your IP devices have been added to i3 SRX-Pro Setup and are
recording based on Motion schedule.
Change resolution and frame rate for each camera in the
List
section
of the i3 SRX-Pro Setup.
ENABLE LPR FUNCTIONALITY
In SRX-Pro Setup,
1.
Open
Cameras
section and click on the H59
camera thumbnail.
2.
Open the
LPR
tab and click on the toggle to
Enable
LPR functionality
3.
Click
SAVE
.
CONFIGURE NIGHT TIME EXPOSURE
When using H59B7 in the Velocity Timer drive through installation, configure the
camera Display Settings profile as shown, for best performance.
1.
In the camera’s web interface, go to
Config
>
Image > Display Settings >
Profile Management
2.
Select
Timing
in the
Schedule
drop-down menu
3.
Drag the sliders to set the Day time range to
9:00 - 18:30
, as shown.
4.
Click
Save
, then click
OK
in the confirmation window.
5.
In the camera’s web interface, go to
Config
>
Image > Display Settings >
Camera Parameters
6.
Select
Night
in the
Config File
drop-down menu
7.
Select
HLC
in the
BLC
drop-down menu
ACT Download &
Documentation
Scan this QR code or visit
and download
AnnexxusConfigurationTool v1.9 (ACT)
.
Contact our Technical Support team at:
1.877.877.7241
or
if you have any questions
or concerns regarding camera installation or if you require
software services or support.
H59 2MP H.265 Bullet LPR Camera
QUICK START GUIDE
i3 INTERNATIONAL INC.
1.866.840.0004
www.i3international.com
LICENSE PLATE DETECTION AREA
For best performance, draw the detection area to include only the relevant area of the
image.
1.
In the camera’s web interface, click on the
Config > Event > License Plate
Detection
> Area
.
2.
Set the
Min
and
Max
values to
10%
and
50%
, respectively.
3.
To adjust the detection area, click
Draw Area
and draw a (yellow) rectangle in
the Preview window.
4.
Click
Stop Draw
and click
Save
.
5.
Click
OK
in the confirmation window.
Or
SEARCH LICENSE PLATES
To search detected license plates:
1.
Launch
i3 PACDM Server
from the Desktop
2.
Click
Quick Search
3.
Configure search criteria and click
Search
.


