Ax63Z High-Speed Dome
QUICK START GUIDE
CONNECT CAMERA TO i3 SRX-PRO SERVER
Camera’s default IP address:
192.0.0.16.
Camera’s default Subnet mask address:
255.255.255.0.
Credentials*: Login -
i3admin
/ Password -
i3admin
*
Important:
For the security of your camera and of all connected devices,
i3 International recommends that you change your camera’s default administrative
password in the camera’s User Management setup tab. Keep your passwords
secure.
Change your Annexxus camera’s default IP Address:
Annexxus Cameras cannot share an IP address, each camera requires its own
unique IP address.
1.
Connect your Annexxus camera to the Gigabit switch.
2.
On your i3 NVR, launch i3 Annexxus Configuration Tool (ACT). ACT can be
accessed from the Windows Start menu or from the IP
Camera setup tab (
ACT Config Tool
button)
You can download and install the latest ACT installation
package from i3 website:
https://i3international.com/download
3.
Select your Annexxus camera in the ACT list.
4.
Enter the new
IP address
and
Subnet Mask
of the camera in the Device(s)
Communication Update area.
5.
Click
Update
and then
Yes
in the confirmation window.
Tip:
New IP address must match the IP range of LAN or NVR’s NIC1.
6.
Wait a few moments for a “
Success
” message in the Result field.
Repeat Steps 1-6 for all detected Annexxus cameras OR
7.
Assign IP range to multiple cameras by selecting two or more cameras in ACT,
then entering the starting IP address and the final IP octet for your IP range.
8.
Click
Update
and then
Yes
in the confirmation window.
Wait until “
Success
” message is shown for all selected cameras.
Ensure you can connect to your camera(s) using its new IP Address:
1.
Open an Internet browser window and enter the new IP Address you have just
assigned to your Annexxus camera in Step 4 (or 7).
2.
Enter the camera User Name and Password in the pop-up login window.
3.
Annexxus camera interface will be displayed in the Internet Explorer window.
You should be able to see the camera image on the screen. If you do not see
the camera image on the screen, call i3 International technical support team
for troubleshooting tips: 1.877.877.7241
Add your Annexxus camera to IP Camera tab in SRX-Pro Server:
1.
(SRX-Pro Service Users) Click
LOG IN
in SRX-Pro Service
Monitor, enter your credentials and click
LOGIN
.
2.
Click
PRO Console
button to launch Pro Console.
3.
Go to
Setup
->
IP Camera
tab.
4.
Click the
Search & Add
button to display connected
Annexxus cameras.
5.
Select the detected camera in the list and click
Select
.
6.
In the Select IP Camera window, enter camera’s User Name and Password and
click
Add
.
Selected camera will be added to the Camera list.
7.
Assign the camera to the SRX-Pro video channel in the
Ch In.
column.
Your Annexxus camera is now connected to SRX-Pro Server and is ready to record.
Change resolution and frame rate for the Annexxus camera in the IP Camera tab
menu or via Web Setup.
i3 INTERNATIONAL INC.
1.866.840.0004
www.i3international.com
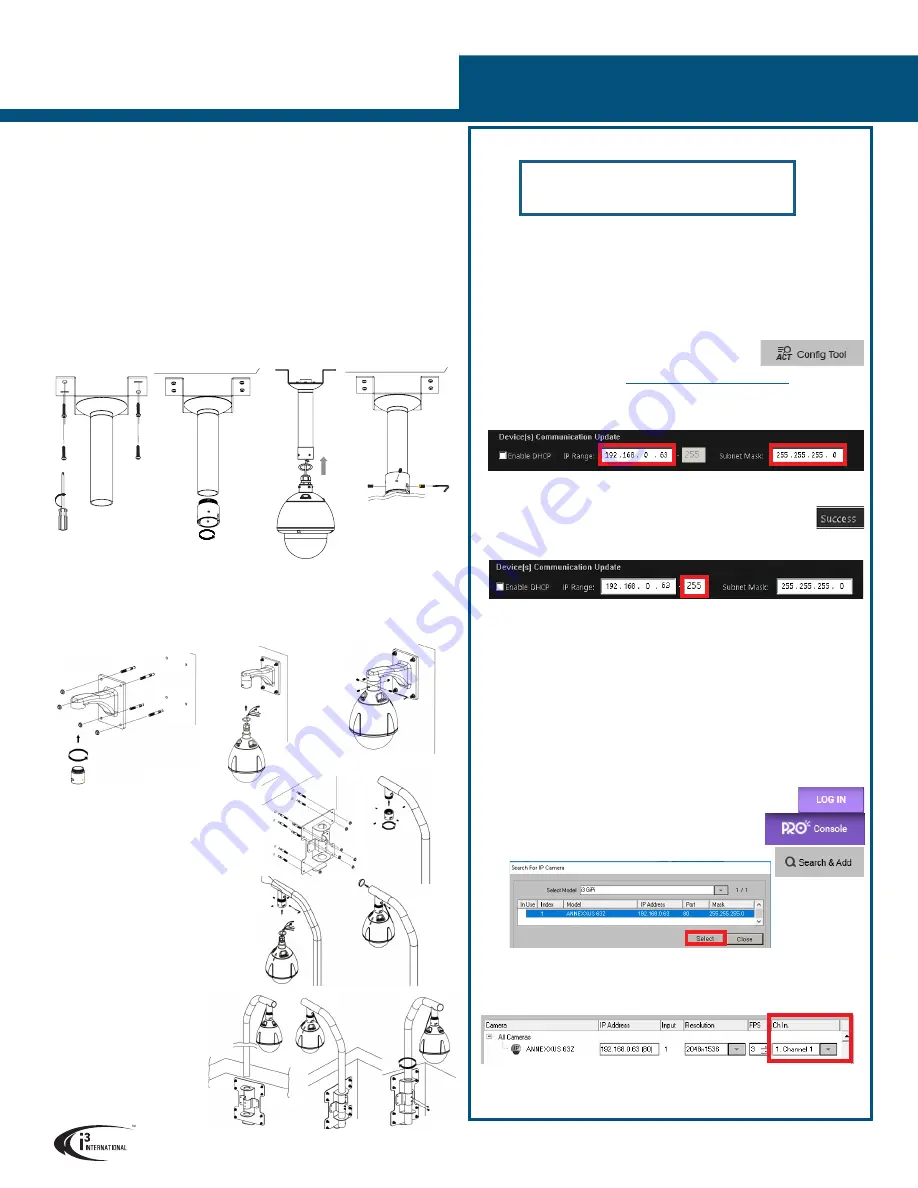
WALL MOUNT
1.
Mount the i3D703 Wall Mount bracket to the wall. Use appropriate mounting hardware
(not provided).
2.
Remove the 1.5” Female coupler from the camera and attach the 1.5” Male coupler
(E) to the end of the Wall Mount bracket by rotating clockwise.
3.
Thread all cables through the bracket and out of the opening on the back of the
bracket.
4.
Use hex key to secure set screw to connector ring and fasten safety cable.
PARAPET WALL MOUNT
1.
Mount the i3D702 Pendant Pipe bracket to a ceiling surface. Use appropriate
mounting hardware (not provided).
2.
Remove the 1.5” Female coupler from the camera and attach the 1.5” Male coupler
(E) to the end of the pendant pipe by rotating clockwise.
3.
Thread all cables through the pipe and out of the top opening of the bracket.
4.
Use hex key to secure set screw to connector ring and fasten safety cable.
PENDANT PIPE MOUNT
INSTALLATION
1.
Remove the dome cover using the Torx key (D).
2.
Remove the protective foam from the lens assembly.
3.
Re-attach dome cover.
4.
Mount the camera (basic options presented below).
5.
Connect the camera to Alarm In/Out and Audio In devices, if using.
6.
Connect the camera to a AC24V power source for outdoor installations or PoE+ switch
for indoor installations.
(For reliable PoE+ power, use i3 switches S81, S242, S243, or S244).
7.
If using AC24V power, connect the camera to a PoE+ switch, then connect the switch
to the IP CAMERA RJ45 port on the back of the i3 NVR.
1.
Mount the i3D706 Parapet
Mount bracket to the
parapet. Use appropriate
mounting hardware (not
provided).
2.
Attach the camera’s 1.5”
Female coupler to the
end of the Parapet Mount
pipe bracket by rotating
clockwise
3.
Thread all cables through
the bracket and out of the
opening on the other end of
the mount pipe.
4.
Use hex key to secure set
screw to connector ring and
fasten safety cable.
5.
Insert entire tube including
main unit into hole fitting on
secure plate
6.
Rotate tube 180 degrees
clockwise with secure plate
and fasten screws.


