USER MANUAL
Page -2-
Page -3-
Am73 Analog Dome Camera
CALLING UP OSD via VIDEO PILOT CLIENT (incl. SRX-PRO
SERVER v7 and up).
1.
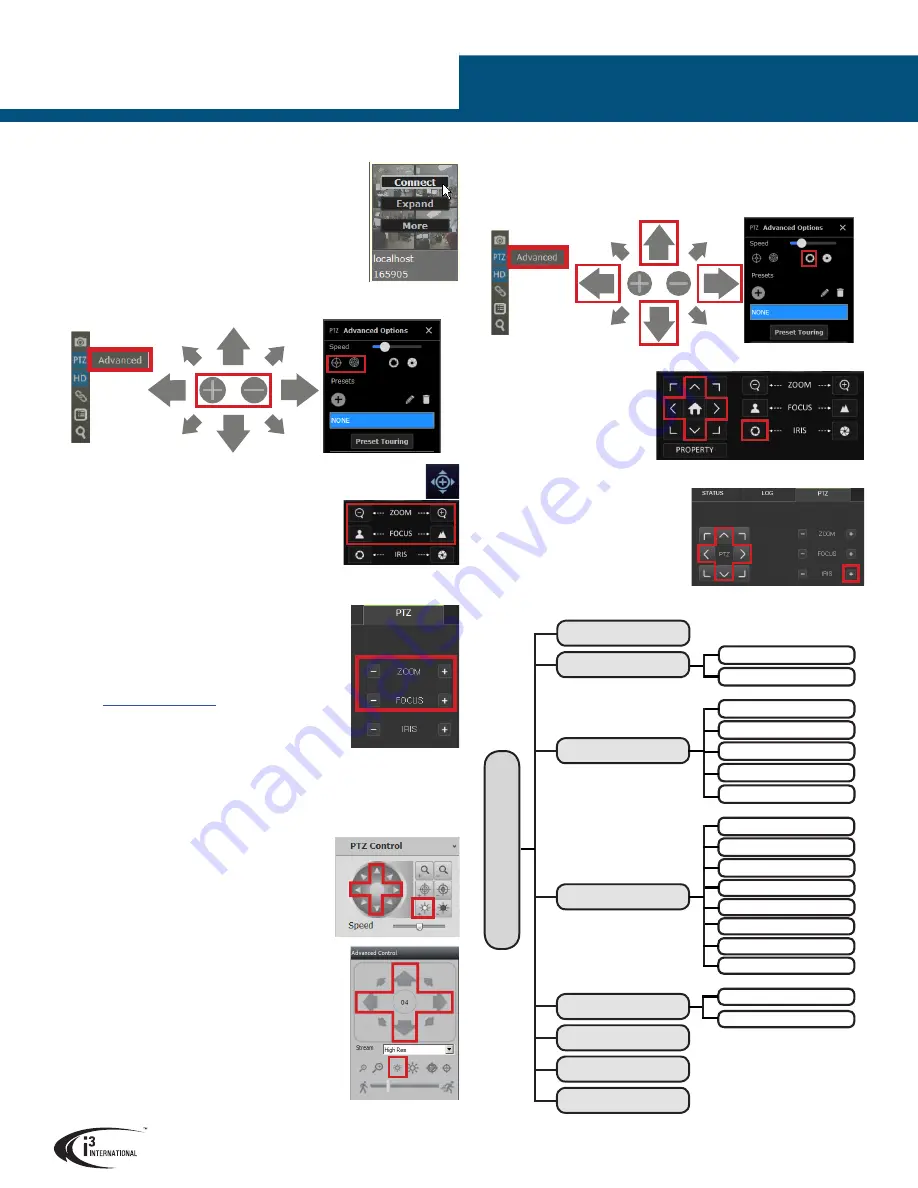
Repeat Steps 1-5 of the
ADJUST ZOOM/FOCUS via VIDEO PILOT CLIENT (incl.
SRX-PRO SERVER v7 and up) section.
2.
Use the
Iris Open
in the PTZ Advanced Options side panel and the on-screen
UP/DOWN/LEFT/RIGHT
buttons to bring up and navigate in the OSD menus.
CALLING UP OSD via VEO16p (LOCAL)
1.
Repeat Steps 1-5 of the
ADJUST
ZOOM/FOCUS via VEO16p
(LOCAL) section.
2.
Use the
Iris Open
icon and the
UP/DOWN/LEFT/RIGHT
buttons
on the PTZ panel to bring up and
navigate in the OSD menus.
CALLING UP OSD via VEO16p (REMOTE)
1.
Repeat Steps 1-7 of the
ADJUST ZOOM/
FOCUS via VEO16p (REMOTE) section.
2.
Use the
Iris Open
icon and the
UP/
DOWN/LEFT/RIGHT
buttons on the PTZ
panel to bring up and navigate in the OSD
menus.
CAMERA OSD MENU
ADJUST ZOOM/FOCUS via VIDEO PILOT CLIENT
(incl. SRX-PRO SERVER v7 and up)
1.
Repeat Steps 1-5 of the
ADJUST ZOOM/FOCUS via SRX-PRO
SERVER v6 and lower section OR Steps 1-3 of the ADDING
HR16 to SRX-PRO v7 depending on the SRX-Pro Server version.
2.
Add the SRX-Pro Server to CONTROL tab of the Video Pilot
Client if connecting from a remote location, or use
localhost
connection, automatically generated by VPC.
3.
Connect to the remote SRX-Pro Server with VPC.
4.
Double-click on the Am73 camera to bring it into full single-
channel division.
5.
Click
PTZ > Advanced
in the on-screen menu.
6.
Use the on-screen Zoom In/Out controls and
Focus In/Out controls in the PTZ Advanced Options side panel to adjust Zoom and
Focus until the desired view is achieved.
ADJUST ZOOM/FOCUS via VEO16p (LOCAL)
1.
Connect Am73 to Veo16p BNC output.
2.
Log into your Veo16p (Default: ADMIN/1234).
3.
Go to
MENU > SYSTEM SETUP > CAMERA > PTZ
SETUP
4.
In PROTOCOL drop down menu, select
COAXITRON
for
all Am73 cameras. Click
APPLY
, then
CLOSE
.
5.
On the Veo16p Live screen, click the PTZ button to
display PTZ control panel.
6.
Use the ZOOM and FOCUS icons adjust Zoom and Focus
until the desired view is achieved.
ADJUST ZOOM/FOCUS via VEO16p (REMOTE)
1.
Repeat Steps 1-4 of the
ADJUST ZOOM/FOCUS via VEO16p
(LOCAL) section.
2.
Connect your Veo16p to the network using the ETHERNET
port on the rear panel. Follow Veo16p manual for more
instructions.
3.
On the remote PC, open Internet Explorer and enter the IP
address of your Veo16p in the address bar, followed by the
Web Service Port. Default service port:
8080
.
)
4.
Enter user credentials in the login screen.
(Default: ADMIN/1234).
5.
Install ActiveX, as required.
6.
In the Veo16p Live screen mode, double-click on the Am73
camera to bring it into full single-channel division.
7.
Click on the PTZ tab and use Use the ZOOM and FOCUS icons adjust Zoom and Focus
until the desired view is achieved.
CALLING UP OSD MENU
Camera’s OSD menu can be accessed through i3’s encoder, i3’s standalone HVR’s local or
remote interfaces or through SRX-Pro/VPC interface.
In all cases,
Iris Open
icon in the Live Mode PTZ panel will
bring up the camera’s on screen display.
PTZ panel OSD Menu control buttons:
Iris Open
- Bring up the OSD, confirm menu selection/enter
sub-menu.
UP/DOWN arrows
to navigate within camera menus.
LEFT/RIGHT arrows
to adjust value of the selected item.
CALLING UP OSD via HR16
1.
Repeat Steps 1-8 of the
ADJUST ZOOM/FOCUS via HR16
section.
2.
Use the
Iris Open
and
UP/DOWN/LEFT/RIGHT
buttons
on the PTZ Control panel to bring up and navigate in the
OSD menus.
CALLING UP OSD via SRX-PRO SERVER v6
and lower
1.
Repeat Steps 1-8 of the
ADJUST ZOOM/FOCUS via SRX-
PRO SERVER v6 and lower section.
2.
Use the
Iris Open
and
UP/DOWN/LEFT/RIGHT
buttons
on the Advanced Control panel to bring up and navigate in the OSD menus.
MAIN MENU
CONTRAST
IMAGE MODE
EXPOSURE MODE
WHITE BALANCE
AGC
BRIGHTNESS
FACTORY DEFAULT
DAY/NIGHT
VIDEO SETTINGS
EXPOSURE
3DNR
SHARPNESS
SATURATION
EXIT
MODE
SAVE & EXIT
MIRROR
VIDEO FORMAT
IR LIGHT
SMART IR
FUNCTIONS
D->N THRESHOLD
N ->D THRESHOLD
MOTION DET
PRIVACY


