background image

4.2 Password 

Combo Cat6 KVM Usage 

The password is enabled by default, the default password is "00000000" eight zeros

 (Do not use "0" on 

number pad) 
■ Enable password 

1 Press the KVM hotkey

 Scroll Lock + Scroll Lock + U 

2. Logout the KVM by pressing the hotkey

 Scroll  L o c k + Scroll Lock + P 

3. In SUPERVISOR level, enter "00000000" eight zeros in user name & password field 

(Do not use "0" on number pad) 

4. In USER level, press

 Space bar + Enter

 in user name & password field 

Remark: Automatic logout after 10 minutes of inactivity 

■ Set your own user name & password 

1. Login the KVM in SUPERVISOR level by pressing "00000000" eight zeros in user name & password 

field 

2. Call KVM OSD menu by pressing the KVM hotkey

 Scroll Lock + Scroll Lock + Space Bar 

3. Press F1 to the MAIN MENU 

4. Select "USER SECURITY" 

5. Set password in SUPERVISOR & USER level 

a. In the left-top row "S" (SUPERVISOR), press

 Enter

 to set your own user name & password 

b. In the row 1 to 8 (USER), press

 Enter

 to set your own user name & password 

6. Press

 Enter

 to save the setting or press

 Esc

 to cancel the editing without any change 

Remark: a. Blank has underscore, while SPACE doesn't have 

b. Press any alphanumeric key to move to next input item. SPACE is treated as a valid 

character 

■ Change your password 

1. Login the KVM in SUPERVISOR level by pressing your own user name & password 

2. Call KVM OSD menu by pressing the KVM hotkey

 Scroll Lock + Scroll Lock + Space Bar 

3. Press F1 to the MAIN MENU 

4. Select "USER SECURITY" 

5. Change password in SUPERVISOR & USER level 

a. In the left-top row "S" (SUPERVISOR), press

 Enter

 to change your user name & password 

b. In the row 1 to 8 (USER), press

 Enter

 to change your user name & password 

6. Press

 Enter

 to save the setting or press

 Esc

 to cancel the editing without any change 

Remark: a. Blank has underscore, while SPACE doesn't have 

b. Press any alphanumeric key to move to next input item. SPACE is treated as a valid 

character 

■ Disable your password 

1. Press the KVM hotkey

 Scroll Lock + Scroll Lock + U 

2. Logout the KVM by pressing the KVM hotkey

 Scroll  L o c k + Scroll  L o c k + P 

3. You don't need user name & password to access the KVM OSD menu 

■ Forget your password 

Please contact your supplier for further support 

Remark: 

■ You must press the KVM hotkey within 2 seconds 

■ A beep sound will be heard for successful entering KVM hotkey 

P.21 

Содержание NVC1600

Страница 1: ...er Manual Combo Cat6 2 console KVM NVCIP800 1600 3200 Combo Cat6 2 console KVM NVCCE800 1600 3200 Combo Cat6 KVM NVC800 1600 3200 C 5L R C R E A C H T E j I i Tech Company LLC C DN RA TY TOLL FREE 888...

Страница 2: ...n the chassis Opening it yourself could damage the equipment and invalidate its warranty If any part of the equipment becomes damaged or stops functioning have it checked by qualified service personne...

Страница 3: ...3200 2 1 Package contents P 8 2 2 KVM port Cat6 dongle connection P 9 2 3 Remote Local console connection P 10 2 4 KVM Cascade P 12 2 5 Specifications P 13 2 6 Resolution Support Information P14 Part...

Страница 4: ...of direct sunlight away from sources of excessive dust dirt heat water moisture and vibration Unpacking The equipment comes with the standard parts shown in package content Check and make sure they ar...

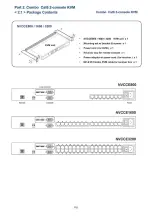
Страница 5: ...w bracket screws x 1 Power cord for KVM x 1 Local Console NVCIP800 i T i l in mi q o o P Mjo annai 6 7 6 5 4 3 2 1 E Z 3 Cascade Power NVCIP1600 16 15 14 1 3 12 9 B 7 6 5 4 3 2 innnnnnno innnnnnnn NV...

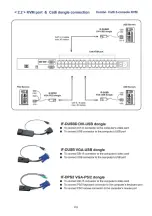
Страница 6: ...vers IF DUSB VGA USB dongle USB CAT 5 6 cable max 40 meters VGA i III IF DUSBD DVI USB dongle To connect DVI D connector to the computer s video card To connect USB connector to the computer s USB por...

Страница 7: ...KVM Local USB console M 32 31 30 S3 26 27 2 25 16 1 5 14 13 12 11 10 0 f Y Y Y Y Y Y irT L I I X J L X X U f Y Y Y Y Y Y T l i x x x x x xjn 24 23 22 21 20 19 18 17 8 7 6 5 4 3 2 t ter Network device...

Страница 8: ...reless LAN Configuration Wireless LAN ESSID LANWEPKey Enable WEP encryption Query Device Setup Device OK Cancel Help Status Ready 3 Click Refresh Device to search the connected IP KVM 4 Select the M A...

Страница 9: ...1 1 15 14 13 12 11 10 0 K i YYYYYYY i i YYYYYYY 1 I X I X I X J U U I I X X X X I X J E 24 23 22 21 20 19 18 17 0 7 0 5 Cascade To console VGA port Slave KVM level 2 NVC1600 Slave KVM level 3 m 4g NV...

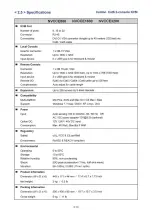
Страница 10: ...p to 256 servers by 8 level cascade Compatibility Multi platform Mix PCs SUN and Mac G3 G4 Mac iMac Support Windows 7 Vista 2003 XP Linux Unix Power Input Auto sensing 100 to 240VAC 50 60 Hz OR AC DC...

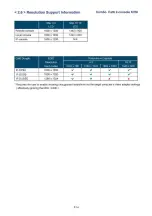
Страница 11: ...solution Hard coded Resolutions Capable Cat6 Dongle EDID Resolution Hard coded 4 3 16 10 Cat6 Dongle EDID Resolution Hard coded 1024x768 1280x1024 1600x1200 1440x900 IF DPS2 1600x1200 V V V V IF DUSB...

Страница 12: ...console x 1 Power adapter w power cord for receiver x 1 NE 6 6ft Combo KVM cable for receiver box x 1 Local Console NVCCE800 Lunnnt 8 7 6 5 3 2 1 Remote Cascade Power NVCCE1600 Hi IWPPII I I o o 16 15...

Страница 13: ...VGA BSss USB Servers IF DUSB VGA USB dongle USB CAT 5 6 cable max 40 meters VGA i III IF DUSBD DVI USB dongle To connect DVI D connector to the computer s video card To connect USB connector to the co...

Страница 14: ...console connection Combo Cat6 2 console KVM Remote Cat6 Console Local USB console n rrwn I I dlVoVojJV 32 31 3D 29 28 27 26 26 16 10 V V Y Y Y v n r r nrinrirr 22 21 20 13 is 17 7 6 S 4 3 2 CAT 5 6 ca...

Страница 15: ...n Button to to PC KVM switch A The receiver provides a hotkey function for remote console Please refer to P 20 III mis III i Local computer Optional setup NE 6 Combo KVM cable Monitor Z 17 X VGA cable...

Страница 16: ...ake all control of other slave KVM switches e g level 2 to 8 Master KVM in f Y Y Y Y Y Y n IAAAAAAA7 f Y Y Y Y Y Y H UIAAAAAA7 24 23 22 21 7 6 5 4 Cascade Slave KVM level 2 To console VGA port r i mm...

Страница 17: ...length Expansion Up to 256 servers by 8 level cascade Compatibility Multi platform Mix PCs SUN and Mac G3 G4 Mac iMac Support Windows 7 Vista 2003 XP Linux Unix Power Input Auto sensing 100 to 240VAC...

Страница 18: ...Resolution Hard coded Resolutions Capable Cat6 Dongle EDID Resolution Hard coded 4 3 16 10 Cat6 Dongle EDID Resolution Hard coded 1024x768 1280x1024 1600x1200 1440x900 IF DPS2 1600x1200 V V V V IF DU...

Страница 19: ...Power cord for KVM x 1 Local Console NVC800 IPWWI IPWWI o o p nnnnnnnn m 8 7 6 5 4 3 2 Power Cascade NVC1600 In ml In i ill c 16 15 14 13 12 11 10 9 8 7 6 5 4 3 2 innnnnnnni innnnnnnn NVC3200 32 31 30...

Страница 20: ...VGA BSBE USB Servers IF DUSB VGA USB dongle USB CAT 5 6 cable max 40 meters VGA i III IF DUSBD DVI USB dongle To connect DVI D connector to the computer s video card To connect USB connector to the c...

Страница 21: ...evel 2 to 8 Master KVM 32 31 30 29 26 27 26 25 16 15 14 13 12 11 10 f Y Y Y Y YY Y l IX X X XXX JO f Y Y Y Y Y Y Y l i x x x x x xjn 24 23 22 21 20 17 0 7 G 5 4 3 2 Cascade To console VGA port Slave K...

Страница 22: ...enu hotkey Expansion Up to 256 servers by 8 level cascade Compatibility Multi platform Mix PCs SUN and Mac G3 G4 Mac iMac Support Windows 7 Vista 2003 XP Linux Unix Power Input Auto sensing 100 to 240...

Страница 23: ...lution Hard coded Resolutions Capable Cat6 Dongle EDID Resolution Hard coded 4 3 16 10 Cat6 Dongle EDID Resolution Hard coded 1024x768 1280x1024 1600x1200 1440x900 IF DPS2 1600x1200 V V V V IF DUSB 16...

Страница 24: ...o o o o o o 11 12 13 14 15 16 TJ TJ TJ VJ TJ UOJCUCUCUIZ 32 ports fil 1 2 3 4 5 6 7 8 9 10 11 12 13 14 15 16 O O O O O O O O Online O O O O O O O O O O O O O O O O Active O O O O O O O O tUfZJtUtUfU...

Страница 25: ...ithout any change Remark a Blank has underscore while SPACE doesn t have b Press any alphanumeric key to move to next input item SPACE is treated as a valid character Change your password 1 Login the...

Страница 26: ...Logout the OSD menu Previous menu Cancel Quit Complete Switch to selected port Switch to previous or next port Switch to previous bank or next bank Display port 01 0 8 0 9 1 6 1 7 2 4 2 5 3 2 Remark D...

Страница 27: ...Lock R default Except User Security settings Scroll Lock Scroll Lock U Disable and enable password security Default security is ON To enable disable the screen saving Scroll Lock Scroll Lock L functio...

Страница 28: ...ut voltage 12 Volt 24 Volt 48 Volt Input range 9 18V 18 36V 36 75V Input current No load 50 mA 50 mA 50 mA Full load 4950 mA 2450 mA 1220 mA Output rating Output voltage 12 Volt 12 Volt 12 Volt Output...

Страница 29: ...I TECH COMPANV i Tech C o m p a n y LLC TOLL FREE 888 483 2418 EMAIL info iTechLCD com WEB www iTechLCD com...

Отзывы: