background image

A

DJUSTING THE MONITOR

The LCD monitor is designed to work with a range of compatible video adapters on the market. Due to 

the possible deviations between these video adapters, you may make some adjustment to fit the monitor 

for adapter used. 

ADJUSTMENT PROCEDURE 

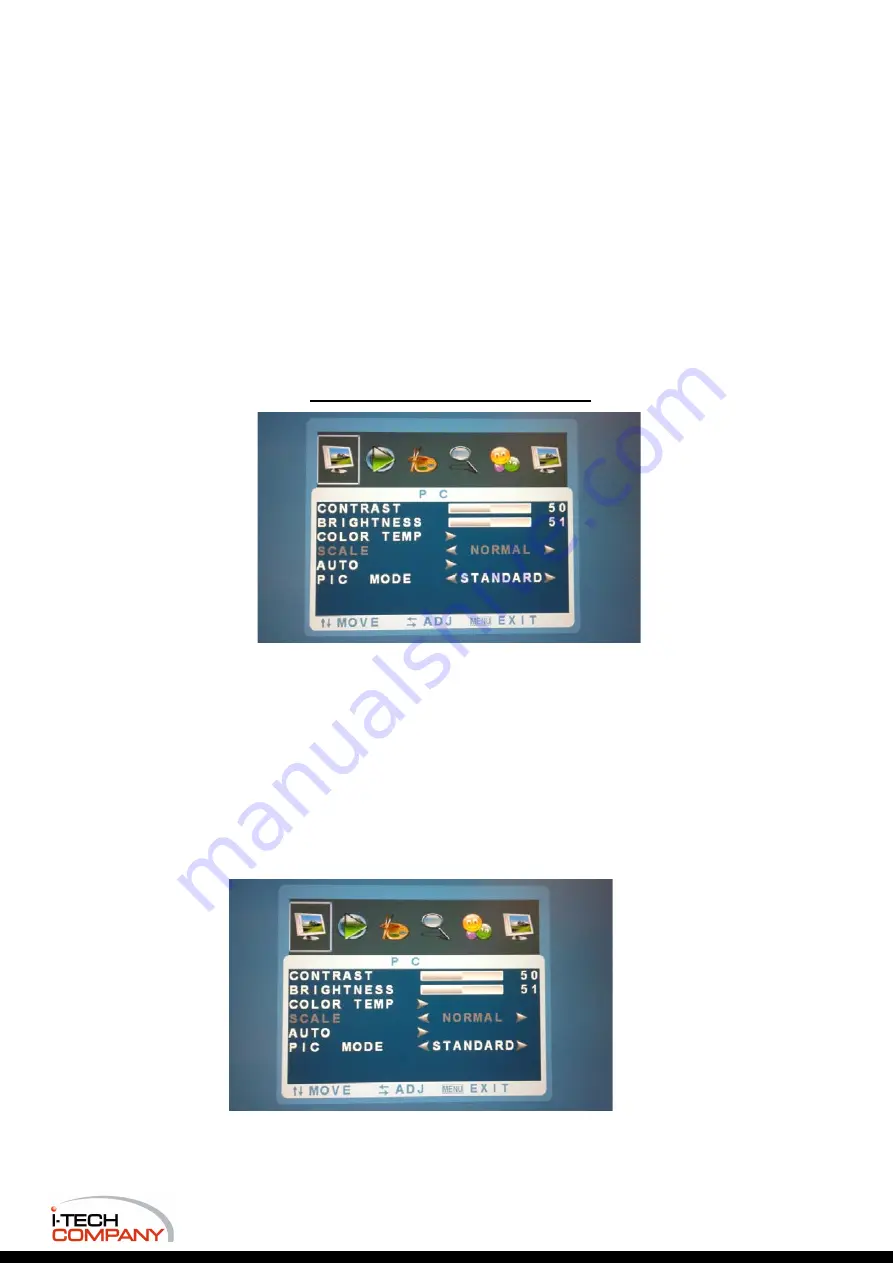
First, you must activate the OSD screen through pressing the MENU key, the screen will show in the 

center of screen as below:     

OSD SCREEN on PC /DVI/ HDMI 

PICTURE SETTING 

Picture Mode / Contrast / Brightness / Color Temp / Auto / PIC Mode 

Press Menu Key back to the tool bar.

Use Auto key to select the required adjustment item.

Use Up or Down key    to confirm required item.

Use Up or Down key to adjust the desired function or press Menu Key end..

i-Tech Company LLC 
EMAIL: 

[email protected]

  • WEB: 

www.iTechLCD.com


Modified: 08-17-2022 

Содержание EMCMW21500HD-PCT-H

Страница 1: ...1700 85 85 V 160 80 80 Light Source LED backlight Long life 35 000 hrs typ Input Sources PC System Signal Analog RGB 0 7 1 0 Vp p 75 ohms Sync Separate Sync Composite Sync Sync On Green Frequency Fh...

Страница 2: ...itechlcd com WEB www iTechLCD com Modified 08 17 2022 This is subject to change without Notice Final Drawings Will be Provided for Approval after Order Drawing No EMCMW21500HD PCT H 08172022 V1 TOUCHS...

Страница 3: ...lay Control Menu N Supporting HDCP Protocol OPTIONAL O Supporting DDC CI Protocol OPTIONAL P Supporting DCR function OPTIONAL Support PC Timing Item Description H Freq KHz V Freq Hz 1 VGA640 400 31 48...

Страница 4: ...D panel from various panel manufactures by Changing some jumpers setting and specified BIOS Maximum Resolution Up to 10 bits per color total 1000M Colors Vertical Refresh Rate VGA SVGA XGA AND UXGA VE...

Страница 5: ...1 12V Output 2 12V Output 3 GND 4 GND 5 VGA2_B Pb 6 VGA2_G Y 7 GND 8 GND 9 AUDIO_R input 10 AUDIO_L input 11 SDA_DDC 12 SCL_DDC 13 5V output 14 VGA2_R Pr 15 VGA2_Hsync 16 VGA2_Vsync 4 3 Key Input Conn...

Страница 6: ...ND Power DC CN10 WAFER 2pin 2 0mm PIN FUNCTION PIN FUNCTION 1 12V 2 GND 4 3 Power Input Location J1 DC JACK DC 2 0mm 12V 2A For 2 Light Inverter or 12V 3A for 4 Light Inverter 4 4 LVDS INPUT Location...

Страница 7: ...10 bit RE4 26 8 bit_REC 10 bit RE4 27 8 bit_RE3 10 bit RO0 28 _8 bit_RE3 10 bit RO0 29 GND 30 GND 31 10 bit RE0 32 10 bit RE0 33 10 bit RE1 34 10 bit RE1 4 6 Inverter Connector Location CN1 6 PIN WAF...

Страница 8: ...G04G 3P Green or equv Audio Input 1Vp p Max 4 8 Audio Intput 4 PIN WAFER PITCH 2 0mm 180D Audio Input 1 6W 1 6W at 8 Ohm Pin Signal 1 R 2 R 3 L 4 L i Tech Company LLC EMAIL info itechlcd com WEB www i...

Страница 9: ...DRAWN MODEL MATERIAL iTech Company LLC PART NAME PART NO SCALE 1 2 DATE 3 4 5 D C B A 1 2 3 4 5 AD BOARD INVERTER KEY PAD PANEL APPROVED C D B A REV DATE DESCRIPTION UNIT MM...

Страница 10: ...turn off 2 Select key The two keys have two sets of functions When OSD screen is not activated the two keys are used to adjust the Backlight When OSD screen is activated When Menu key is pressed the t...

Страница 11: ...e MENU key the screen will show in the center of screen as below OSD SCREEN Use the key to select the required adjustment item up or down Use Menu key to do the desired function or go into the second...

Страница 12: ...ntrast Select the Contrast item and Press Menu Key to do the further change Press key to adjust values Press Auto key back to the last menu Brightness Select the Brightness item and Press Menu Key to...

Страница 13: ...er change Press key to adjust value Press Auto key back to the last menu Color Temp Select the Color Temp item and Press Menu Key to get into selection Press key to select 9300 6500 5800 sRGB USER Pre...

Страница 14: ...urn off OSD Or after 30 sec idle time the OSD screen will automatically turn off OSD SETTING Press Menu Key back to the tool bar Use the key to select the required adjustment item up or down Use Menu...

Страница 15: ...sec idle time the OSD screen will automatically turn off AUDIO SETTING Press Menu Key back to the tool bar Use the key to select the required adjustment item up or down Use Menu key to do the desired...

Страница 16: ...item up or down Use Menu key to do the desired function or go into the second menu item to do the further change Press Auto key to turn off OSD Or after 30 sec idle time the OSD screen will automatic...

Страница 17: ...ss twice to turn off the OSD After 15 sec idle time the OSD screen will automatically turn off 2 UP Down Select key The two keys have two sets of functions When OSD screen is not activated the two key...

Страница 18: ...he OSD screen through pressing the MENU key the screen will show in the center of screen as below OSD SCREEN on PC DVI HDMI PICTURE SETTING Picture Mode Contrast Brightness Color Temp Auto PIC Mode Pr...

Страница 19: ...s Menu Key back to the tool bar Use Auto key to select the required adjustment item Use Up or Down key to confirm required item Use Up or Down key to adjust the desired function or press Menu Key end...

Страница 20: ...item Use Up or Down key to adjust the desired function or press Menu Key end OSD ADVANCE H START H SIZE V START V SIZE Press Menu Key back to the tool bar Use Auto key to select the required adjustme...

Страница 21: ...ol bar Use Auto key to select the required adjustment item Use Up or Down key to confirm required item Use Up or Down key to adjust the desired function or press Menu Key end i Tech Company LLC EMAIL...

Отзывы: