Rack-Mountable HDMI KVM Switch w/ Audio Mic & Hub
Quick Installation Guide
Rack-Mountable HDMI KVM
Switch w/
Audio, Mic & Hub
Introduction
R
ack-mountable KVM Switch with the
HDMI video interface.
User can manage multimedia computers via
this unique KVM Switch with its
simplicity.
It
can fully control 8 / 16
PCs from a single keyboard, mouse and
monitor console. It also provides multimedia
keyboard plus audible support. It can
connect to each of the computers audio input
and output through the microphone and the
set of speakers one at a time.
Package Contents
Please check whether you have all the
following items within this packing box.
1 x Switch Unit
1 x Quick Installation Guide
1 x Power Adapter DC 9V
Front-panel & Back-panel
The front-panel and back-panel are where
the various connectors are located on the
Units. Before you connect this unit to any
computer cabling accessories or peripherals,
you should get a glimpse of the main
connectors you are going to encounter when
setting up the system.
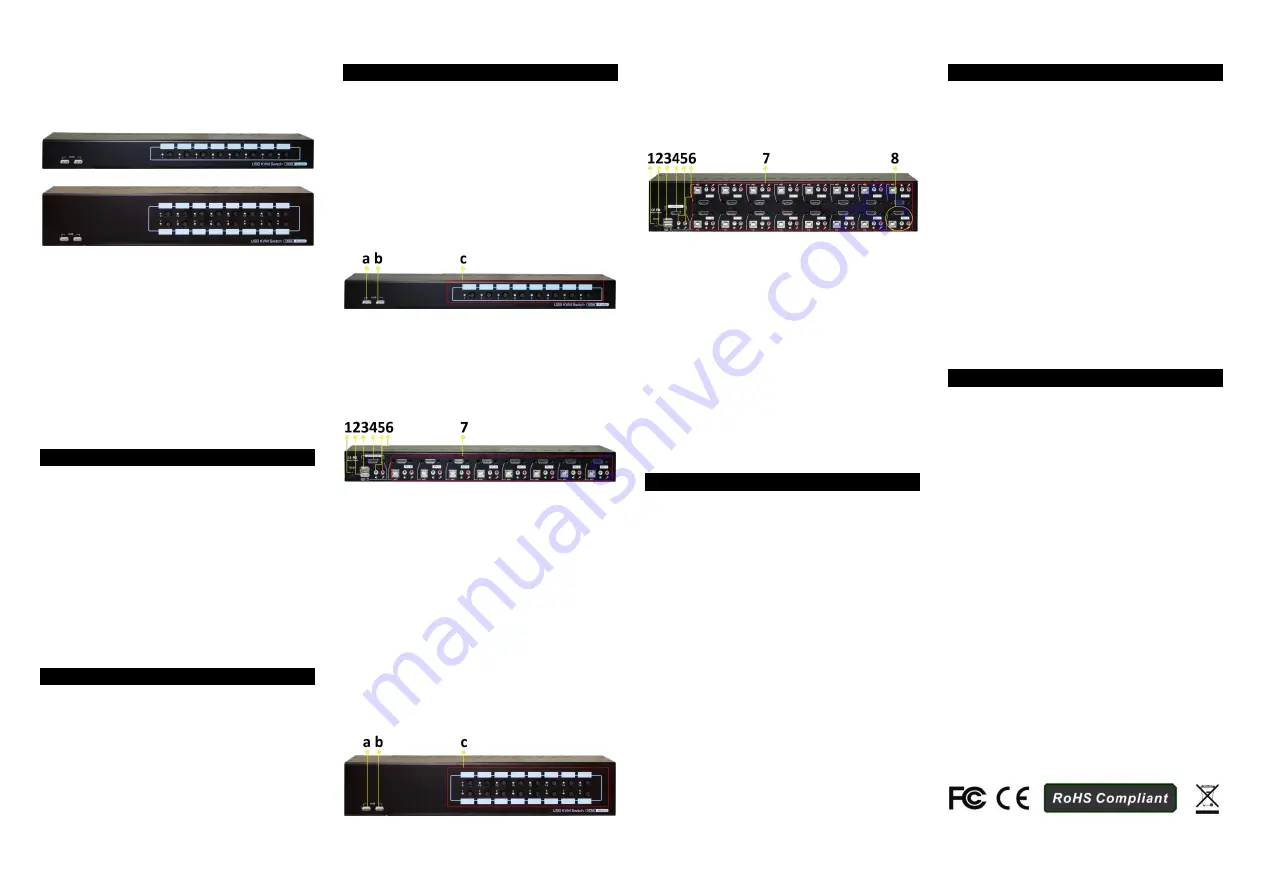
8 Ports
Front-panel and Back-panel
overview
8 Ports
Front-panel overview
a.
USB Device Port (Type A, Female)
b.
USB Device Port (Type A, Female)
c.
Computer port LEDs and push buttons
(1~8)
8 Ports
Back-panel overview
1.
Power Socket
2.
USB Port for Keyboard (Type A)
3.
USB Port for Mouse (Type A)
4.
HDMI Port connect to Monitor
(Console)
5.
Speaker jack (Console)
6.
Microphone jack (Console)
7.
PC1~PC8 (right to left as marked)
HDMI Port, USB Port (Type B),
Speaker and Mic jacks
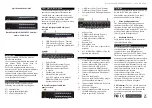
16 Ports
Front-panel and Back-
panel overview
16 Ports
Front-Panel overview
a.
USB Device Port (Type A, Female)
b.
USB Device Port (Type A, Female)
c.
Computer Port LEDs and push buttons
(1~16)
16 Ports
Back-Panel overview
1.
Power socket
2.
USB Port for Keyboard (Type A)
3.
USB Port for Mouse (Type A)
4.
HDMI Port connect to Monitor
(Console)
5.
Speaker jack
6.
Microphone jack
7.
PC1~PC16 (down row, right to left as
marked)
8.
PC1: HDMI Port, USB Port (Type B),
Speaker and Mic jacks.
Installation
1.
Please ensure that your KVM Switch,
monitor, and computers are power off.
2.
Connect keyboard to USB port
(2)
3.
Connect mouse to USB port
(3)
4.
Connect monitor to HDMI port
(4)
5.
Connect Speakers to Speaker jack
(5)
6.
Connect Microphone to Microphone
jack
(6)
7.
Power on the Monitor.
8.
Power on the KVM Switch by plug in
the External Power Adapter.
9.
Connect each KVM Switch PC port to
the Computers.
10.
Power on Computers.
11.
Connect each of your USB devices to
the USB Hub ports; you can now
begin to use the KVM Switch.
Operation
They are two methods to control your KVM
Switch for PC/Hub port / Audio &
Microphone ports selection: Front-panel
push buttons and Keyboard Hotkeys.
1.
Front-panel push buttons
The Front-panel push buttons allows you
can direct control over KVM Switching
operation. Simply push desired button to
switch rapidly to the respective PC port. For
more operation about push button, please
refer to “Quick Reference Sheet”
2.
Keyboard Hotkeys
For Keyboard Hotkeys, please refer to the
“Quick Reference Sheet”
.
FCC / CE Statements
FCC Statement: This equipment has been
tested and found to comply with the
regulations for a class B digital device,
pursuant to Part 15 of the FCC Rules. These
limits are designed to prove reasonable
protection against harmful interference when
the equipment is operated in a commercial
environment. This equipment generates, uses,
and can radiate radio frequency energy and,
if not installed and used in accordance with
this Quick Installation Guide, may cause
harmful interference to radio
communications. Operation of this
equipment in a residential area is likely to
cause harmful interference in which case,
the user will be required to correct the
interference at his/her own expense.
CE Statement:
This is a Class B product in
a domestic environment, this product may
cause radio interference, in which case the
user may be required to take adequate
measures.


