I-O DATA FIDATA HFAS1-S10U Скачать руководство пользователя страница 45

45

Go to [Table of Contents]

4. Troubleshooting

Artwork is not displayed / has stopped being displayed.

• 

From version 1.10 of this unit, the default setting for artwork has changed to high 
image quality.

Therefore, if you are using an audio device that does not support high-quality artwork, 

you may find that artwork is not displayed.

Please try the following actions.
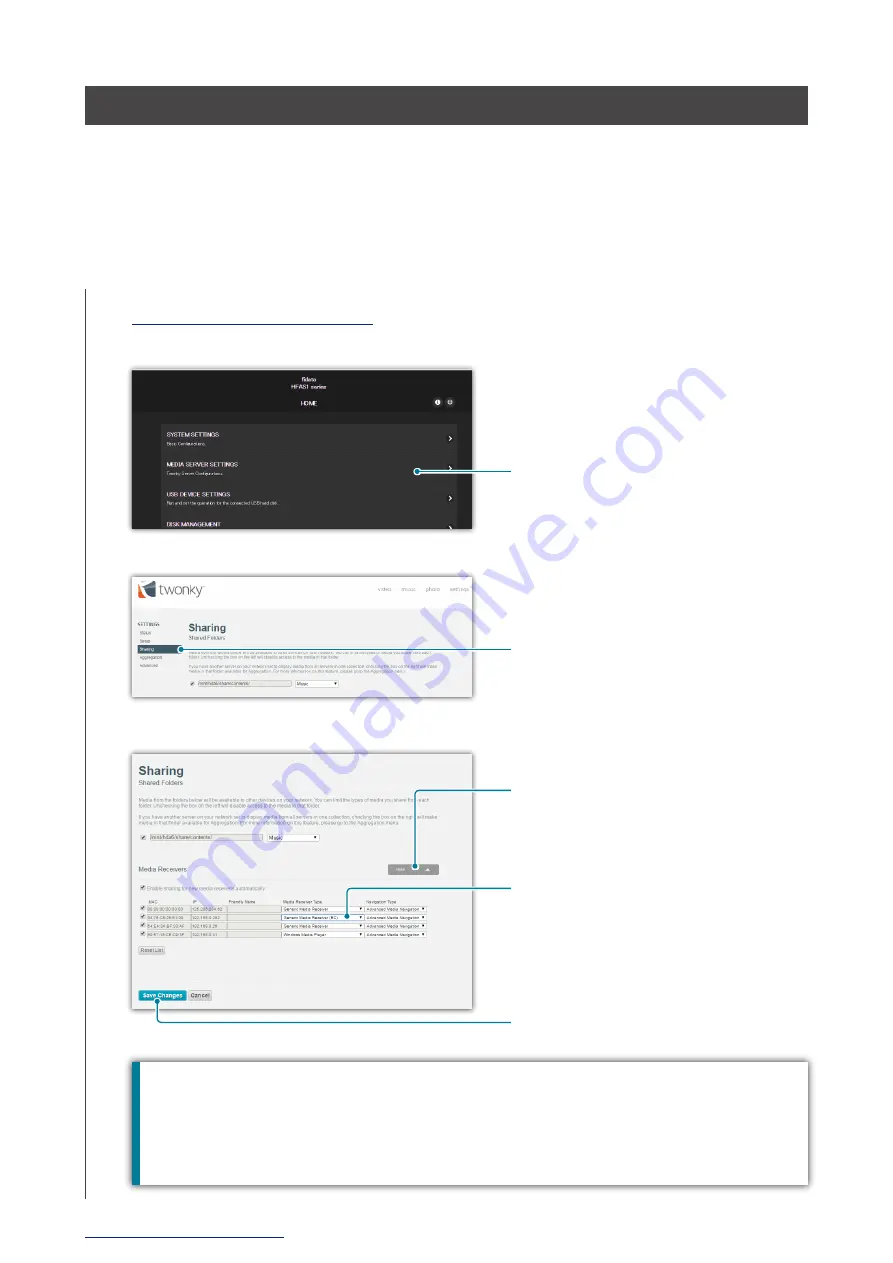
2.1. Open the Settings Screen

Click [MEDIA SERVER SETTINGS]

Click [Sharing]

Click [Show], and show the contents 
of the media receiver.

Set the [Media Receiver Type] of 
an audio device that does not show 
artwork to [Generic Media Receiver 
(BC)].

Click [Save Changes]

How to tell which audio device does not show artwork.

The list shows the [MAC] (MAC address), [IP] (IP address), and [Friendly Name] of the audio 

device. Please confirm these details of the audio device.
You can confirm the MAC address on a sticker that is attached to the audio device or on its 

Settings screen.

Содержание FIDATA HFAS1-S10U

Страница 1: ...2016 05 Edition 01 Setup Guide HFAS1 S10U Network Audio Server I O DATA DEVICE INC Before reading this Setup Guide please be sure to look at Quick Guide and Conformity Information and Warranty...

Страница 2: ...ting the Brightness and Colour of the Front Indicator 13 2 6 Not turning on the LAN Port indicator 15 2 7 Backing Up Music 17 2 8 Switching the Mode of the Built in Disk RAID 22 2 9 Setting the Time Z...

Страница 3: ...ormity Information and Warranty Provides guidance on the warranty and standards of this unit and contact information Setup Guide this document Describes detailed settings to this unit Twonky Server Re...

Страница 4: ...c on a USB HDD as it is 10 2 4 Confirming the Amount of Free Space 12 2 5 Adjusting the Brightness and Colour of the Front Indicator 13 2 6 Not turning on the LAN Port indicator 15 2 7 Backing Up Musi...

Страница 5: ...not correctly done the setting screen cannot be correctly opened by a browser Please set an IP address is displayed 1 Click OK to close that screen 2 Click IP settings 3 Set so that it is the same net...

Страница 6: ...nit Using a multi port card reader If you use a multi port card reader instead of a USB HDD please insert only one piece of media 2 2 2 Saving Audio Files from a USB HDD 3 Click USB DEVICE SETTINGS A...

Страница 7: ...om a USB HDD 4 Click Data import Click NEXT The front indicator flashes 5 6 Click IMPORT Click Yes If you click Yes audio files start to be copied and the front indicator flashes Please do not remove...

Страница 8: ...front indicator is lit Remove the USB HDD This completes the operation 7 2 2 3 Removing the USB HDD If you want to remove a USB HDD when the power to this unit is on please do so with the following o...

Страница 9: ...nfirm that the message Remove completed is displayed Remove the USB HDD This completes the operation 4 5 Click REMOVE When two USB HDD units are connected When you are using a USB hub and a USB HDD fo...

Страница 10: ...the USB HDD that is connected to this unit While referring to Saving Audio Files in the Quick Guide access this unit from a computer There is a usb1 folder in the same place as the contents folder The...

Страница 11: ...SB HDD page 8 Using a USB hub and two USB HDD units If you use a USB hub you can connect two USB HDD units one for shared use and one for backup use We recommend a type of USB HDD that is connected to...

Страница 12: ...irming the Amount of Free Space 1 2 1 Open the Settings Screen 2 3 Click Confirm the amount of free space on this unit Internal disk or a USB HDD USB disk SYSTEM INFORMATION opens When the amount of f...

Страница 13: ...ont Indicator You can adjust the brightness of the indicator which is mounted on the front of this unit in four stages It is set to the brightest setting at the time of purchase In addition you can ch...

Страница 14: ...djusting the Brightness and Colour of the Front Indicator 6 7 Click SET Please wait for a while until the setting has finished This confirms the settings The front indicator flashes Confirm that the f...

Страница 15: ...ning on the LAN Port indicator You can set it so that the LAN port indicator installed on this unit does not light up 1 2 1 Open the Settings Screen 2 3 4 Set LAN port Indicator to Off Click CONFIRM C...

Страница 16: ...16 Go to Table of Contents 2 Getting More out of this Unit 2 6 Not turning on the LAN Port indicator 5 The front indicator flashes Confirm that the front indicator is lit This completes the setting...

Страница 17: ...up to a USB HDD for backup Music stored on a USB HDD for backup is not deleted Add music Deleting music Is the music that is already stored on the USB HDD backed up After registering a USB HDD for ba...

Страница 18: ...T 1 Connect a USB HDD that has the same capacity as this unit or larger to a USB port on the back of this unit Please connect only one USB HDD A USB HDD for backup is registered as one for backup use...

Страница 19: ...ne for backup use From now the music will be backed up on the USB HDD Please wait until the USB HDD is registered 5 6 7 Click Yes Read the Caution items Click REGISTRATION Using a computer to confirm...

Страница 20: ...be able to use them Please see 2 3 Streaming Music on a USB HDD as it is page 10 for details of how to share a USB HDD 2 2 1 Open the Settings Screen 3 4 Click Restoration of backup data Click USB DE...

Страница 21: ...ts 2 Getting More out of this Unit 2 7 Backing Up Music Confirm that the front indicator is lit Remove the USB HDD This completes the operation 5 6 7 Click Yes Read the Caution items Click RESTORE The...

Страница 22: ...of music 2 Very good Read write speed 3 Good Very good Good 1 With mirroring music is written on each of the two internal disks and so the available capacity will be that of one built in disk Therefor...

Страница 23: ...this Unit 2 8 Switching the Mode of the Built in Disk RAID 3 4 5 Click on the format of the mode to switch to Click Yes Click Yes 2 8 3 Switching the Mode of the Built in Disk 1 2 1 Open the Settings...

Страница 24: ...ase see RAID status in 3 2 SYSTEM INFORMATION for the state of duplication Rebuilding complete is displayed and then the operation is finished when Normal is displayed The mode of the internal disk ha...

Страница 25: ...the time zone standard time zone of the clock of this unit Usually you do not need to change this but if you would like to change the time stamp of the music data stored on this item then please set...

Страница 26: ...26 Go to Table of Contents 2 Getting More out of this Unit 2 9 Setting the Time Zone 5 Click SET Please wait for a while until the setting has finished This confirms the settings...

Страница 27: ...an be updated the front indicator is lit in orange In this state this unit will be updated to the latest state when you turn off the power to it 2 10 1 Updating with the Automatic Update Function 2 10...

Страница 28: ...e of Contents 2 Getting More out of this Unit 2 10 Keeping the Firmware Software of this Unit up to Date Confirm that the front indicator is lit This completes the setting 4 5 Click Yes The front indi...

Страница 29: ...ble of Contents 3 Details of the Settings screen 3 1 HOME 30 3 2 SYSTEM INFORMATION 31 3 3 SYSTEM SETTINGS 33 3 4 USB DEVICE SETTINGS 38 3 5 DISK MANAGEMENT 39 3 6 SYSTEM INITIALIZATION 40 3 7 FIRMWAR...

Страница 30: ...S 33 3 4 USB DEVICE SETTINGS 38 3 5 DISK MANAGEMENT 39 3 6 SYSTEM INITIALIZATION 40 3 7 FIRMWARE UPDATE 41 On MEDIA SERVER SETTINGS you can make detailed settings for the Twonky Server For details of...

Страница 31: ...lick in the HOME It shows various pieces of information about this unit such as its free space RAID status Displays the status of this unit If an error such as RAID starting failed or Degraded is disp...

Страница 32: ...g used The following situations can be considered It is not a USB HDD for backup that is registered in this unit After the USB HDD for backup was registered this unit was formatted initialized Unknown...

Страница 33: ...ou can decide on a name for this unit AUTO Reverts to the name that was set at the time of purchase NETWORK In the default settings DHCP which is used to automatically obtain an IP address is set to O...

Страница 34: ...h you live and set the standard time there FRONT INDICATOR Specifies the brightness and color of this unit s front indicator Front Indicator Brightness Specifies the brightness of the front indicator...

Страница 35: ...registered USB HDD audio data is regularly backed up to the USB HDD AUTO UPDATE Specifies whether the function to automatically update firmware is On or Off If this unit is connected to the Internet...

Страница 36: ...Audio over PCM Frames you can set whether or not to play music with DoP When DoP is set to On you can use the DoP system to play back DSD content When using a USB DAC that does not support DoP this is...

Страница 37: ...e is applied to both the LAN port indicators You cannot set both LAN ports to Off at the same time LAN port Indicator When it is set to Off both the indicators above the LAN ports which are installed...

Страница 38: ...p data Returns backed up music to this unit 2 7 3 Restoring Music from a USB HDD for Backup 20 Data import Connect a USB HDD containing music to this unit with a computer or such like and then copy th...

Страница 39: ...ay take 20 or 30 hours In addition you cannot access this unit while Check Disk is running Spanning Format Striping Format Mirroring Format Deletes all the data on this unit and switches the mode of t...

Страница 40: ...state it was in at the time of purchase Returns all the settings of this unit to the default value and deletes data on this unit Regular format of internal disk When this is set to On the data in thi...

Страница 41: ...Table of Contents 3 Details of the Settings screen 3 7 FIRMWARE UPDATE 3 7 FIRMWARE UPDATE Update the firmware internal software of this unit and keep it up to date This unit must be connected to the...

Страница 42: ...d 43 I want to put this unit back into the state it was in at the time of purchase 43 Artwork is not displayed has stopped being displayed 45 I want to see the music that was backed up on a computer 4...

Страница 43: ...t is connected correctly there is a possibility that the USB HDD has failed In addition please use this unit to format the USB HDD when connecting it for the first time It is possible that a problem h...

Страница 44: ...ompletely deleted so that it cannot be restored Data will be written to all parts of the built in disk and so it will take a very long time For a guide to the time required please see here page 40 Cli...

Страница 45: ...s 1 2 1 Open the Settings Screen 2 3 4 Click MEDIA SERVER SETTINGS Click Sharing Click Show and show the contents of the media receiver Set the Media Receiver Type of an audio device that does not sho...

Страница 46: ...nload I cannot play music when I am using this unit as an audio player The type of controller app does not match the NETWORK RENDERER Please open the Settings screen and switch the NETWORK RENDERER se...

Отзывы: