background image

 23


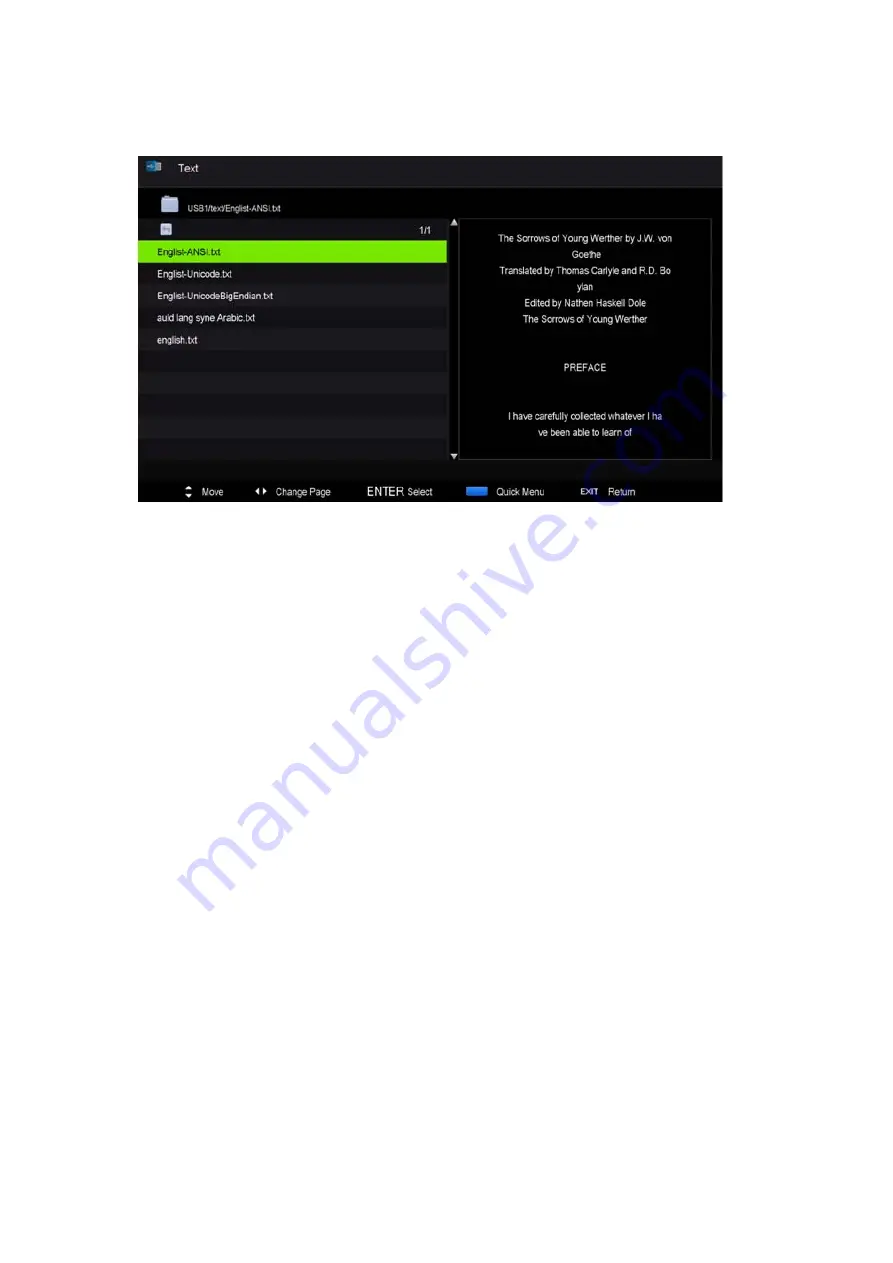
Texte 

1.


Appuyer sur la touche 

/

 pour sélectionner TEXTE dans le menu principal, puis sur la touche 

OK pour entrer. 
2. 

Appuyer sur la touche


/

 pour sélectionner le disque que vous souhaitez regarder, puis sur 

la touche OK pour entrer. 
3. Appuyer sur la touche "BLEUE" pour ouvrir le sous-menu. 
4. Appuyer sur la touche EXIT pour retourner au menu précédent. 


Содержание i-LED 39

Страница 1: ......

Страница 2: ...1 ndice Introducci n Advertencia Precauci n Descripci n de la unidad principal Mando a distancia Ajuste b sico OSD Funciones TDT Funciones USB PVR Opcional Especificaciones Soluci n de problemas...

Страница 3: ...dable Deje el espacio suficiente entre el receptor y la pared para permitir una buena ventilaci n Evite los lugares excesivamente c lidos para evitar posibles da os al mueble o una aver a prematura de...

Страница 4: ...s de Clase I del equipo deben estar conectadas a la salida de poder mediante un toma con protecci n a tierra en el enchufe Enchufe de alimentaci n del aparato descompuesto las instalaciones en mal est...

Страница 5: ...zca objetos en el chasis del televisor por las ranuras o aperturas No derrame nunca l quidos de ning n tipo sobre el receptor de televisi n Precauci n Evite exponer la unidad principal a la luz del so...

Страница 6: ...uede provocar graves da os personales y al televisor si ste cae Precauci n Cuando no se use el producto durante un periodo prolongado de tiempo se recomienda desconectar el cable de alimentaci n CA de...

Страница 7: ...al de entrada SCART 1 Terminal de entrada VIDEO 2 Terminal de entrada AUDIO 6 Antena TV 9 Terminal de entrada HDMI1 13 Terminal de entrada USB 12 Terminal de entrada CI Opcional VOL Bajar volumen CH S...

Страница 8: ...debe usar otra fuente de alimentaci n para el Mobile HD M vil en alta definici n Adem s de no utilizar el puerto de entrada USB al mismo tiempo Soporta Mobile HD M vil en alta definici n al conectars...

Страница 9: ...stablecer el temporizador de reposo FUENTE Pulsar para cambiar la fuente de se al ENTER Introduzca la opci n seleccionada o ejecute la operaci n NOTA presione este bot n para mostrar la lista de canal...

Страница 10: ...o en modelos con funci n MEDIA multimedia S P GINA Realiza la funci n de SUBP GINA en el texto cuando se est en modo de presentaci n de texto Pasar al cap tulo siguiente Utilizado solo en modelos con...

Страница 11: ...esione el bot n para seleccionar el idioma local 2 Presione el bot n para seleccionar el modo 3 Presione el bot n para seleccionar el pa s local deseado 4 Presione el bot n para seleccionar el modo A...

Страница 12: ...da automatica Presione el bot n para seleccionar B squeda autom tica Presione el bot n para seleccionar el pa s y presione el bot n para seleccionar el modo Presione el bot n y luego presione el bot n...

Страница 13: ...dit Editar canal y presione el bot n INTRO para ejecutar la funci n a ELIMINAR Presione el bot n para seleccionar el programa y presione el bot n RED ROJO una vez para eliminar el programa b SALTAR Pr...

Страница 14: ...l bot n para seleccionar Saturation Saturaci n y presione el bot n para ingresar al men de ajuste de la saturaci n y ajustar la funci n 5 Presione el bot n para seleccionar Hue Tono y presione el bot...

Страница 15: ...resione el bot n para ajustar 3 Presione el bot n para seleccionar Bass Bajos y presione el bot n para ajustar 4 Presione el bot n para seleccionar Balance Balance y presione el bot n para ajustar 5 P...

Страница 16: ...ocks Bloquear canales y presione el bot n para seleccionar el los canal es para bloquear 3 Presione el bot n para seleccionar Parental Rating Protecci n parental y presione el bot n para definir la fu...

Страница 17: ...to y presione el bot n para ingresar al submen 5 Presione el bot n para seleccionar Blue Screen Pantalla azul y presione el bot n para seleccionar On Off 6 Presione el bot n para seleccionar el ajuste...

Страница 18: ...rama Cuando se selecciona la fuente como DTV puede presionar el bot n DISPLAY MOSTRAR para mostrar la informaci n del canal La ventana PROGRAM INFORMATION INFORMACI N DEL PROGRAMA se ilustra de la sig...

Страница 19: ...bot n ROJO para ingresar al modo de grabaci n Presione el bot n VERDE para mostrar los detalles del programa Presione el bot n AMARILLO para ver los detalles sobre la introducci n de la lista de prog...

Страница 20: ...bot n e ingrese a la opci n PHOTO imagen y presione el bot n ENTER intro para ingresar 2 Presione el bot n para seleccionar la unidad de disco que desea ver y presione ENTER intro para entrar 3 Presi...

Страница 21: ...l bot n AZUL para ingresar al submen y ajustar 4 Presione el bot n EXIT Salir para regresar al men anterior Pel cula 1 Presione el bot n para seleccionar MOVIE Pel cula en el men principal luego presi...

Страница 22: ...ncipal luego presione INTRO para acceder 2 Presione el bot n para seleccionar la unidad de disco que desea ver luego presione INTRO para acceder 3 Presione el bot n AZUL para ingresar al submen y ajus...

Страница 23: ...Ajustes PVR y presione INTRO o el bot n para acceder a Presione el bot n para seleccionar presione INTRO para ver el sistema de b Presione el bot n para seleccionar INTRO para ingresar al submen c Pr...

Страница 24: ...est en ejecuci n no almacene archivos importantes dentro de esta unidad 2 Presione el bot n para iniciar la grabaci n por primera vez En la segunda grabaci n la se al de la grabadora de sonido tendr u...

Страница 25: ...720 x 576i 15 63 50 480p 720 x480p 31 47 59 94 60 576p 720 x 576p 31 26 50 720p 1280 x 720p 37 50 44 96 50 59 94 60 1080i 1920 x 1080i 28 13 33 75 50 59 94 60 1080p 1920 x 1080p 56 25 67 5 50 59 94 60...

Страница 26: ...ol remoto luego presione la tecla repetidamente para seleccionar la fuente del TV Mala imagen buen sonido Revise el cable entre su TV y antena dispositivo AV externo Pruebe otro canal la estaci n de d...

Страница 27: ...ras N mero de serie S N Especifique la incidencia de manera detallada ya que se testear lo descrito por Ud devolvi ndole el producto en caso de correcto funcionamiento con el cargo correspondiente inc...

Страница 28: ...u ocasionadas por el cliente NO POSEEN GARANT A Accesorios piezas sometidas a un desgaste por uso natural La garant a quedar anulada cuando el producto fuera objeto de una utilizaci n diferente para...

Страница 29: ...ESPA A TEL 34 91 551 1787 B86300548 Declaramos bajo nuestra exclusiva responsabilidad la conformidad del producto Nombre de Producto Televisi n Modelo original L39D9 Modelo i LED 39 Marca i Joy Pa s...

Страница 30: ...vicio postventa En caso de que cualquier problema se produzca probablemente un fallo mientras use su TV por favor p ngase en contacto con la tienda en donde compr esta unidad o con la agencia de servi...

Страница 31: ......

Страница 32: ...1 Contents Introduction Warning Caution Main Unit Description Remote Control OSD basic adjustment DTV Features USB Features PVR Operation Specifications Trouble Shooting...

Страница 33: ...viewing Allow enough space between the receiver and the wall to permit ventilation Avoid excessively warm locations to prevent possible damage to the cabinet or premature component failure This TV ca...

Страница 34: ...instructions in the literature accompanying the equipment Class I structures of equipment should be connected to the grid power output with a protective earth connection on the socket Power plug as a...

Страница 35: ...not drop or push objects into the television cabinet slots or openings Never spill any kind of liquid on the television receiver Caution Avoid exposing the main unit to direct sunlight and other sour...

Страница 36: ...n individual and damage to the television may result if it should fall Caution When the product is not used for an extended period of time it is advisable to disconnect the AC power cord from the AC o...

Страница 37: ...put terminal 3 SCART input terminal 1 VIDEO input terminal 2 AUDIO input terminal 6 TV antenna 9 HDMI input terminal 1 13 USB input terminal 12 CI slot VOL Volume up VOL Volume down CH TV channel up C...

Страница 38: ...Mobile HD works well you should use other power supply for the Mobile HD And do not use the USB jack in the same time It supports Mobile HD by connecting with USB jack must more than 2 GB The partitio...

Страница 39: ...ifferent colored subjects SLEEP Set the sleep timer SOURCE Press to change signal source ENTER Enter the selected option or execute the selected operation NOTE press this button to display channel lis...

Страница 40: ...MEDIA function only S PAGE Carry out the function of SUBCODE in the text while enter the text display mode Skip to next chapter Used for models with MEDIA function only TEXT Press to enter the Teletex...

Страница 41: ...will appear on the screen 1 Press the button to select the local language 2 Press the button to select mode 3 Press the button to select the local country you want to 4 Press the button to select Air...

Страница 42: ...in the main menu 1 Auto Scan Press button to select Auto Scan Press button to select country and press the button to select mode Press button and then press button to start scanning Press MENU or EXI...

Страница 43: ...TER button to enter a DELETE Press button to select the program and press RED button once to delete the program b SKIP Press button to select the channel which you want to skip and press the GREEN but...

Страница 44: ...the button to enter sharpness adjustment menu to adjust sharpness 4 Press button to select Saturation and press the button to enter Saturation adjustment menu to adjust saturation 5 Press button to s...

Страница 45: ...ect mode 2 Press button to select Treble and press the button to adjust 3 Press button to select Bass and press the button to adjust 4 Press button to select Balance and press the button to adjust 5 P...

Страница 46: ...ect On or Off 2 Press button to select channel locks and press the button to select channel s to lock 3 Press button to select Parental Rating and press the button to set 4 Press button to select Lock...

Страница 47: ...for DTV source 4 Press button to select Teletxt menu and press the button to enter sub menu 5 Press button to select Blue Screen and press the button to select On or Off 6 Press button to select Mode...

Страница 48: ...gram Information When the source is selected as DTV you can press display button to display the channel s information The program information window is illustrated as follows Audio When the source is...

Страница 49: ...ss GREEN button to display the program s detail Press YELLOW button to Check details at PVR s Schedule List introduction Press Blue button to enter remind setting 2 Press the button to select CH and p...

Страница 50: ...Photo 1 Press the button enter the PHOTO option and press enter button to enter 2 Press button to select drive disk you want to watch then press enter button to enter 3 Press BLUE button to enter the...

Страница 51: ...3 Press BLUE button to enter the sub menu to set 4 Press the exit button to back to the previous menu Movie 1 Press button to select MOVIE in the main menu then press enter button to enter 2 Press but...

Страница 52: ...in the main menu then press enter button to enter 2 Press button to select drive disk you want to watch then press enter button to enter 3 Press BLUE button to enter the sub menu to set 4 Press the EX...

Страница 53: ...Press button to select PVR Settings and press the ENTER or button to enter a Press button to select File Manager and press the ENTER button to check PVR file system b Press button to select Device Lis...

Страница 54: ...be formatted when in format please do not store important files in the U disk 2 Press button for the first time to start recording for the second time the sign of recorder will be slimmed down but it...

Страница 55: ...720 x 576i 15 63 50 480p 720 x480p 31 47 59 94 60 576p 720 x 576p 31 26 50 720p 1280 x 720p 37 50 44 96 50 59 94 60 1080i 1920 x 1080i 28 13 33 75 50 59 94 60 1080p 1920 x 1080p 56 25 67 5 50 59 94 60...

Страница 56: ...remote then press the button repeatedly to select the TV source Poor picture sound OK Check the cable between TV and antenna external AV device Try another channel the station may have broadcast diff...

Страница 57: ...caused by mis use modifications or damages caused by accidents of any nature of caused by the client The guarantee does not cover Accessories pieces exposed to normal wear and tea The Guarantee will n...

Страница 58: ...product Product TV Original model L39D9 Model Name i LED 39 Brand Name i Joy Manufacturing country China Is in compliance with the standards EN55014 1 2006 EN55014 2 1997 A1 2001 EN6100 3 2 2006 EN610...

Страница 59: ...After sale Service In case any problem mostly like a fault occurs while your using LED TV please contact the store where you purchased this unit or the service agency...

Страница 60: ......

Страница 61: ...Conte do Introdu o Avisos Precau es Descri o da Unidade Principal Controlo Remoto Ajustamento b sico OSD Caracter sticas DTV Caracter sticas USB Opera o PVR Opcional ESPECIFICA ES Resolu o de Problema...

Страница 62: ...mais confort vel Deixe um espa o suficiente entre o receptor e a parede para permitir a ventila o Evitar os locais excessivamente quentes para impedir poss veis danos no aparelho ou falhas prematuras...

Страница 63: ...ru es de manuten o importantes no manual de instru es que acompanha este equipamento As estruturas de Classe I de equipamento devem ser ligadas rede el trica com uma liga o de prote o terra na tomada...

Страница 64: ...objectos sobre a cobertura da televis o fendas ou aberturas Nunca deixe cair qualquer tipo de l quido sobre o receptor de televis o Cuidado Evite a exposi o da unidade principal luz solar directa e o...

Страница 65: ...tar em les es graves para as pessoas ou no aparelho de televis o se este ltimo vier a cair Cuidado Quando o produto n o for utilizado durante um per odo prolongado de tempo aconselh vel desligar o cab...

Страница 66: ...T 1 Terminal de entrada V DEO 2 Terminal de entrada AUDIO 6 Antena da TV 9 Terminal de entrada HDMI 1 13 Terminal de entrada USB 12 Terminal de entrada Cl VOL Aumentar o Volume VOL Baixar o Volume CH...

Страница 67: ...m vel funciona bem deve utilizar outra fonte de alimenta o para o disco r gido m vel E n o utilize a entrada USB em simult neo Suporta disco r gido m vel ao ligar atrav s da entrada USB deve ser super...

Страница 68: ...zador SOURCE Carregue para alterar a fonte do sinal ENTER Aceda op o selecionada ou execute a opera o selecionada NOTA pressione esta tecla para mostrar a channel list lista de canais na origem TV MEN...

Страница 69: ...s apenas com a fun o MEDIA S PAGE Realizar a fun o SUB C DIGO no texto enquanto entra no modo de apresenta o de texto Saltar para o cap tulo seguinte Utilizado para modelos apenas com a fun o MEDIA TE...

Страница 70: ...a de instala o 1 Pressione a tecla para escolher o idioma local 2 Pressione a tecla para escolher o modo 3 Pressione a tecla para escolher o pa s desejado 4 Pressione a tecla para escolher antena ou c...

Страница 71: ...l 1 Pesquisa autom tica Pressione a tecla para escolher o Auto Scan Pesquisa Autom tica Pressione a tecla para escolher o pa s e a tecla para escolher o modo Pressione a tecla e depois para come ar a...

Страница 72: ...selecionar o programa e prima uma vez a tecla VERMELHA para eliminar o programa b IGNORAR Pressione a tecla para escolher o canal que deseja saltar e pressione o bot o GREEN VERDE para saltar Pression...

Страница 73: ...itidez para ajustar a nitidez 4 Pressione a tecla para escolher Satura o e pressione a tecla para entrar no menu de Saturation adjustment ajuste de Satura o para a ajustar 5 Pressione a tecla para esc...

Страница 74: ...la para ajustar 3 Pressione a tecla para escolher Bass Baixos e pressione a tecla para ajustar 4 Pressione a tecla para escolher Balance Balanceamento e pressione a tecla para ajustar 5 Pressione a te...

Страница 75: ...hannel locks bloqueios de canal e a tecla para escolher o s canal ais para bloquear 3 Pressione a tecla para escolher Parental Rating Classifica o Parental e a tecla para ajustar 4 Pressione a tecla p...

Страница 76: ...p es relevantes como OSD language Idioma OSD country pa s e tuning ajuste 10 Pressione a tecla para escolher Reset Reinicializa o e pressione ENTER ENTRAR Pressione a tecla para escolher Yes Sim para...

Страница 77: ...Quando a fonte selecionada como DTV pode premir a tecla DISPLAY visualiza o para visualizar a informa o do canal A janela program information informa o do programa a seguinte Audio Quando estiver sel...

Страница 78: ...es do programa Pressione o bot o YELLOW AMARELO para mostrar as informa es da introdu o da Programa o do PVR Pressione a tecla Blue Azul para introduzir a configura o de lembran a 2 Pressione a tecla...

Страница 79: ...a a tecla para aceder op o PHOTO fotografia e prima a tecla ENTER para aceder 2 Prima a tecla para selecionar o leitor que pretende ver e prima ENTER para aceder 3 Pressione a tecla BLUE AZUL para ent...

Страница 80: ...AZUL para entrar no sub menu e ajustar 4 Pressione o bot o exit sair para regressar ao menu anterior Filme 1 Pressione a tecla para escolher MOVIE FILME no menu principal e depois na tecla enter para...

Страница 81: ...pal e depois na tecla enter para entrar 2 Pressione para escolher a unidade de disco que deseja ver depois pressione a tecla para entrar 3 Pressione a tecla BLUE AZUL para entrar no sub menu e ajustar...

Страница 82: ...O 1 Pressione a tecla para escolher PVR Settings Configura es PVR e em ENTER ENTRAR ou para entrar a Pressione a tecla para escolher Gest o de Ficheiros e pressione a tecla ENTER para verificar o sist...

Страница 83: ...ne a tecla ENTER ENTRAR para entrar Nota 1 O disco U ser formatado durante a grava o por favor n o guarde informa es importantes no disco U 2 Pressione a tecla pela primeira vez para iniciar a grava o...

Страница 84: ...576i 15 63 50 480p 720 x480p 31 47 59 94 60 576p 720 x 576p 31 26 50 720p 1280 x 720p 37 50 44 96 50 59 94 60 1080i 1920 x 1080i 28 13 33 75 50 59 94 60 1080p 1920 x 1080p 56 25 67 5 50 59 94 60 ENTRA...

Страница 85: ...rima repetidamente a tecla para selecionar a fonte de televis o Imagem fraca som OK Verifique o cabo entre a televis o e a antena dispositivo AV externo Tente outro canal pois a esta o pode ter dificu...

Страница 86: ...cobrir a danifica o causada por utiliza o errada modifica es nem danifica es causadas por acidente de qualquer natureza causada por cliente A garantia n o est cobrindo Acess rios peda os expostos par...

Страница 87: ...Servi o p s venda No caso de ocorrer algum problema principalmente uma avaria durante a utiliza o da sua televis o LED contacte a loja onde adquiriu o seu aparelho ou a ag ncia de repara es...

Страница 88: ......

Страница 89: ...Introduction Avertissement Attention Description de l unit principale T l commande R glage de base de l affichage l cran OSD Fonctions DTV Fonctions USB Fonctionnement du magn toscope num rique Sp ci...

Страница 90: ...espace entre le r cepteur et le mur afin de permettre l a ration du t l viseur viter des emplacements excessivement chauds afin d viter d endommager le bo tier ou de causer une panne pr matur e de l...

Страница 91: ...sse I la prise du r seau d lectricit et la prise doit tre munie d une connexion la terre de protection Connexion d un appareil cass les installations cass es doivent tre facilement accessibles ATTENTI...

Страница 92: ...duire d objets dans le bo tier du t l viseur par les fentes ou les ouvertures Ne jamais renverser de liquide quelconque sur le t l viseur Attention viter d exposer l unit principale aux rayons solaire...

Страница 93: ...tre caus es aux personnes et de s rieuses d t riorations au t l viseur en cas de chute de celui ci Attention Si l appareil reste inutilis pendant une longue p riode nous vous recommandons de d branch...

Страница 94: ...ritel 1 Entr e vid o 2 Entr e AUDIO 6 Antenne TV 9 Entr e HDMI 1 13 Entr e USB 12 Logement CI VOL Augmentation du volume VOL Baisse du volume CH Cha ne de t l vision suivante CH Cha ne de t l vision...

Страница 95: ...liser une autre alimentation lectrique pour celui ci En outre ne pas utiliser la prise USB en m me temps La prise en charge du disque dur mobile est assur e par la connexion avec la prise USB il doit...

Страница 96: ...ille programmable SOURCE Appuyer sur cette touche pour modifier la source du signal ENTER Entrer l option s lectionn e ou ex cuter l op ration choisie NOTE appuyer sur cette touche pour afficher la li...

Страница 97: ...a fonction SUBCODE dans le texte lorsque vous entrez en mode d affichage de texte Passe au chapitre suivant utilis pour les mod les dot s de la fonction MEDIA uniquement TEXT Appuyer sur cette touche...

Страница 98: ...Appuyer sur la touche pour s lectionner la langue locale 2 Appuyer sur la touche pour s lectionner le mode 3 Appuyer sur la touche pour s lectionner le pays 4 Appuyer sur la touche pour choisir Antenn...

Страница 99: ...utomatique Appuyer sur la touche pour s lectionner Recherche Automatique Appuyer sur la touche pour s lectionner le pays et sur la touche pour s lectionner le mode Appuyer sur la touche puis sur pour...

Страница 100: ...ectionner Gestion des cha nes et appuyer sur la touche ENTER pour acc der au menu a SUPPRIMER Appuyer sur la touche pour s lectionner le programme et appuyer une fois sur la touche ROUGE pour supprime...

Страница 101: ...image qui correspond le mieux votre visionnage Appuyer sur la touche MENU pour ouvrir le menu OSD Appuyer ensuite sur les touches et pour s lectionner le menu Image Appuyer sur la touche pour s lecti...

Страница 102: ...ectionner Format d cran et appuyer sur la touche pour faire la s lection 9 Appuyer sur la touche pour s lectionner Param tres Avanc s et appuyer sur la touche pour acc der au menu de r glage des Param...

Страница 103: ...0000 Remarque Le mot de passe administrateur est 8899 1 Appuyer sur la touche pour s lectionner Activer puis sur la touche pour s lectionner On ou Off 2 Appuyer sur la touche pour s lectionner verroui...

Страница 104: ...menu T l texte et appuyer sur la touche pour acc der au sous menu 5 Appuyer sur la touche pour s lectionner Ecran Bleu et appuyer sur la touche pour s lectionner On ou Off 6 Appuyer sur la touche pour...

Страница 105: ...uis appuyer sur pour lancer le r glage automatique 2 Appuyer sur la touche pour s lectionner Position H et appuyer sur la touche pour faire le r glage 3 Appuyer sur la touche pour s lectionner Positio...

Страница 106: ...ogrammes Lorsque la source DTV est s lectionn e vous pouvez appuyer sur la touche DISPLAY pour afficher les informations sur les cha nes L cran Information Programmes est illustr comme suit Audio Lors...

Страница 107: ...enregistrement Appuyer sur la touche VERTE pour afficher les d tails relatifs au programme Appuyer sur la touche JAUNE pour v rifier les d tails concernant l introduction de la Liste des enregistremen...

Страница 108: ...20 Interface commune Appuyer sur la touche pour s lectionner Interface Commune puis sur la touche ENTER pour entrer dans le sous menu Accessible uniquement avec une carte IC en DTV...

Страница 109: ...cc der l option PHOTO et appuyer sur ENTER pour valider 2 Appuyer sur la touche pour s lectionner le disque que vous souhaitez visualiser puis sur Fonctions USB la touche OK pour entrer 3 Appuyer sur...

Страница 110: ...la touche BLEUE pour ouvrir le sous menu 4 Appuyer sur la touche EXIT pour retourner au menu pr c dent Cin ma 1 Appuyer sur la touche pour s lectionner FILM dans le menu principal puis sur la touche...

Страница 111: ...incipal puis sur la touche OK pour entrer 2 Appuyer sur la touche pour s lectionner le disque que vous souhaitez regarder puis sur la touche OK pour entrer 3 Appuyer sur la touche BLEUE pour ouvrir le...

Страница 112: ...uite sur les touches pour s lectionner le menu Configuration 1 Appuyer sur la touche pour s lectionner PVR Settings param tres PVR puis appuyer sur ENTER ou pour entrer dans le menu a Appuyer sur la t...

Страница 113: ...Enregistrements Programm s et appuyer sur la touche ENTER pour faire votre s lection Remarque 1 Le disque externe sera format lors de l enregistrement veillez ne pas y stocker des fichiers importants...

Страница 114: ...5 63 50 480p 720 x480p 31 47 59 94 60 576p 720 x 576p 31 26 50 720p 1280 x 720p 37 50 44 96 50 59 94 60 1080i 1920 x 1080i 28 13 33 75 50 59 94 60 1080p 1920 x 1080p 56 25 67 5 50 59 94 60 ENTREE COMP...

Страница 115: ...la t l commande puis appuyer plusieurs fois sur la touche pour s lectionner la source du t l viseur Mauvaise qualit d image son correct V rifier le c ble entre le t l viseur et l antenne dispositif AV...

Страница 116: ...ble EAN ou code barres Num ro de s rie S N Pr cise en d tail L incidence Le produit sera test selon votre description Si le produit un bon fonctionnement il sera renvoy e au client avec les frais de g...

Страница 117: ...is pour mauvaise utilisation modification ou dommages physiques provoqu s par accident de quelque nature que se soit ou occasionn par le client La garantie ne couvre pas les accessoires et pi ces soum...

Страница 118: ...A TEL 34 91 551 1787 B86300548 D clarons sous notre seule responsabilit la conformit du produit Nom du produit TV Mod le original L39D9 Mod le i LED 39 Marque i Joy Pays de fabrication China Conformi...

Страница 119: ...e apr s vente Si vous rencontrez un probl me r sultant vraisemblablement d un d faut pendant l utilisation de votre t l viseur LED contactez le magasin dans lequel vous avez achet l appareil ou l agen...

Страница 120: ......

Отзывы: