background image

Ofrecido por www.electromanuales.com

27

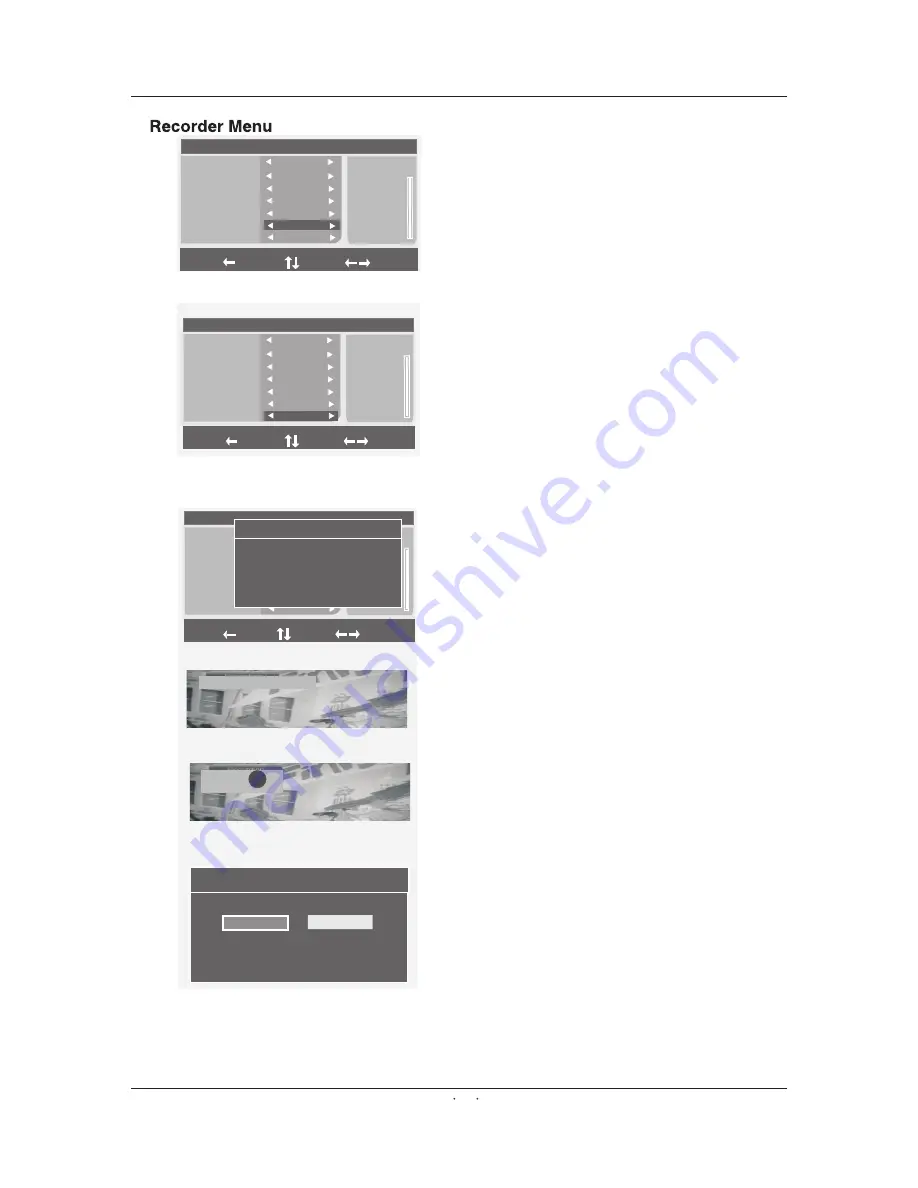
Recorder  operation

On Time 

Duration Time

( recording time)

Attention 

Prepare to record

Wakeup Timer

Timer NO

Timer Mode

Wakeup mode 

Wakeup channel

Wakeup date

On time

Duration time

Move 

Select 

1

Once 

Recorder 

SZTVM01

10/11/2008

08:09

08:20

Message

Successfully updated   

REC

Do you want to stop Recording  ?

Yes  

No  

Enter 

Wakeup Timer

Timer NO

Timer Mode

Wakeup mode 

Wakeup channel

Wakeup date

On time

Duration time

Move 

Select 

1

Once 

Recorder 

SZTVM01

10/11/2008

08:09

08:20

Confirm

Wakeup Timer

Timer NO

Timer Mode

Wakeup mode 

Wakeup channel

Wakeup date

On time

Duration time

Move 

Select 

1

Once 

Recorder 

SZTVM01

10/11/2008

08:09

08:20

Confirm

Confirm

(Begin Recording time)

Please select the time for


beginning 

of the recording

Please select how long time you want to record.

After the above steps please confirm all setting by 
pressing the ENTER


button on the remote control.


A


message


saying

 “

successfully updated

” 

will


appear


on


the


screen


to


confirm


the


settings


have


been


saved

The TV must be kept on or on

 standby mode.

Programmed Recording when TV is on:
One minute before the start of the programmed 
recording,


a


message


will


appear


on


the


screen


saying

 “ 

prepare


to


record

.”  

Please


check


that


the


USB


device


is


well


connected

otherwise


the


system


will


exit


the


recording


mode


after


two


minutes

.

Programmed Recording when TV is on Standby mode:
One minute before the start of the recording the Tv
 will automatically turn on.


Please


note


that


the


screen


will


be


blank

but


the


indicator


light


will


turn


green

Once the recording has started, the end user can
 press 

recording

” 

to


stop


the


current


recording

Содержание i-Display 8019 HDR

Страница 1: ...Ofrecido por www electromanuales com Digital LCD TV With DVB T USB CARD Combo PVR Model i Display HDR Elite USER MANUAL Read this manual carefully and retain for future reference 19 8019...

Страница 2: ...N 5 DRAWINGS Power Cord Connection 7 Antenna Connection 7 SCART Connection 8 AV INPUT Connection 8 S Video Connection 9 VGA Connection 9 HDMI Connection 10 6 REMOTE CONTROL Remote control instructions...

Страница 3: ...l search options 23 Time 23 Advanced setting 24 Recorder menu 25 Card Reader and USB Playback 30 TROUBLESHOOTING 12 AND ADVICE 31 13 SPECIFICATIONS 32 USB SD 10 OPERATION USB HOTKEY 28 MOVIE PLAYER me...

Страница 4: ...Ofrecido por www electromanuales com 3...

Страница 5: ...Ofrecido por www electromanuales com 4...

Страница 6: ...N THE BOX LCD TV SET Remote control 19 Digital LCD TV With DVB T USB CARD Combo PVR 1 5V Model i Display8019HDR Elite USER MANUAL Read this manual carefu lly and retain for future referen ce User Manu...

Страница 7: ...7 INPUT INPUT of of 6 4 1 Press POWER switch on the LCD TV when at standby mode 2 Press P or P to scan through channels 3 Press V or V to increase or decrease the sound level 4 Press MENU to bring up...

Страница 8: ...cord correctly as displayed below Press the POWER switch on the back to switch on the LCD TV The power indicator on the front panel lights up in green AC POWER SWITCH Antenna Connection VHF ANTENNA V...

Страница 9: ...UDIO IN TV Installation drawings SCART Connection NOTE To recorddigital signal please switch SCART adaptor to out AV Connection LCD TV Side 1 RCA Video Cable V L R DVD Back SCART S VIDEO VIDEO L R PC...

Страница 10: ...quality is improved compared to connecting a regular VCR video input Connect Audio output of the DVD or VCRtotheAudio input jacks on the set using the RCA cable Select S VIDEO input source with using...

Страница 11: ...DMI VGA SCART TV Installation drawings HDMI Connection LCD TV Side HDMI Cable HDMI OUT DVD o r VCRBack Connect HDMI output of the DVD to the HDMI input jack on the LCD TV set Select the HDMI input sou...

Страница 12: ...I PMODE Press repeatedlyto cycle through the avai labl e video picture modes SMODE Press tocycle throughthe different sound settings AUDIO I II Audio sel ect ion but ton SLEEP Lets you sel ect amount...

Страница 13: ...e on screen menus and adjust the system settings to your preference P Press to navigate through channels To scroll quickly through channels press and hold down either button V Pressto increase decreas...

Страница 14: ...mode Jump to previous track in USB mode Fast forward key mode Fast backward key in USB mode MIX TV and TXT pictures are mixed together on a transparent background 13 USB SD RECORDER STILL TV RADIO Req...

Страница 15: ...l not mix batteries OLD and NEW or CARBON and ALKALINE etc Remove batteries when the remoteisnot used for a long time ACCESSORIES One Remote Control 2 Batteries 1 5V OneUser Manual Battery usage cauti...

Страница 16: ...n use buttons to select the color temp such as cool standard warm Color Temp Press the button to select the Hue item and then use buttons to adjust hue of the image Hue Hue 50 Note This function only...

Страница 17: ...e 50 Treble Press the button to select the Treble item and then use buttons to adjust the treble Sound Bass 50 Bass Press the button to select the Bass item and then use buttons to adjust the Bass Pre...

Страница 18: ...AUTO Colour System Area Colour Syst em Sound Syst em Auto Sear ch Manual Sear ch Fine Tune Skip Channel Editor ATV Fran ce SECAM L 49 75 MHZ on Select Exit Men u Auto Seach Channel 15 49 75 MHz Main...

Страница 19: ...e control to enter the OSD menu the press button to select the setup menu 2 Press the button to enter the Setup menu setting use to move the menu bar and then press button to adjust the value of selec...

Страница 20: ...Auto Adjust H Position V Position Phase Cock PC Setup 0 0 31 0 Off Auto Adjust PC Setup V Position 3 Press the button to select the Phase item and then use buttons to adjust phase ratio Phase Phase 3...

Страница 21: ...nge is depend on the country AREA selected by user The system supports AREA country are Germany UK Italy France Spain Netherlands Sweden Finland Greece Norway China Taiwan Australia System automatical...

Страница 22: ...nage will followed DELETE LOCK SKIP FAVORITE Channel Organizer S No Channel name Fav Del Skip Lock Spain 474000KHz 8M Fav Del Move Lock 0007 0070 0071 0072 0073 0077 7 Digital 7HD Digital 7 Digital 1...

Страница 23: ...e programs The top left quarter displays the keyword for sorting The FIRST OPTION is sorted by country AREA The supported country AREA are Germany England Italy France Spain Neaderland Taiwan China No...

Страница 24: ...just the time by When Time Mode is set as Auto GMT Offset and Summer Time are available for adjust GMT Offset 1 Move cursor to GMT Offset key to the offset area to move 3 Use keys cursor to the ENTER...

Страница 25: ...ating OFF OFF 1 2 3 4 5 6 7 8 Enter password 57 30 10 03 2005 11 Daily Mode provides program information Electronic Program Guide which will be broadcasted now or in the future The system will display...

Страница 26: ...1 0002 USB2 0003 USB3 in all Note it does not support digital radio recording function USB response time depends on how large of the files in HDD if need more time Please wait patiently Press the reco...

Страница 27: ...an set up data You can set up timer mode channel wakeup date time and duration here Before the system starts recording it will enter the preparing mode switch to DTV mode and the message prepare to re...

Страница 28: ...elect the time for beginning of the recording Please select how long time you want to record After the above steps please confirm all setting by pressing the ENTER button on the remote control A messa...

Страница 29: ...MUSIC PHOTO end user can press hotkey to switch function among them Press key to browse files Select one file and press or ENTER key to play The user can play movie files via the movie player Movie U...

Страница 30: ...nnection of four partition disk 8 file list can display the file up to 9999 it is means user can record 9999 files in the same disk partition at most 9 Single file size of the FAT FAT32 system is rest...

Страница 31: ...MPEG 2 MP ML Video AVI ISO MPEG4 Xvid DivX 4 0 5 0 MP3 WAV Audio Photo JPEG Resolution size limit no limitation File size limit no limitation Media Type Format Remark USB SD operation Card Reader and...

Страница 32: ...vigate Input selections Select TV MENU on the RCU Adjust the contrast the colour and the brightness May be the result of an electrical wave disturbance from another TV Computer Gaming machine or Radio...

Страница 33: ...GB PC Audio SCART SCART Video SCART Audio L R Dimensions with stand Input Ouput SCART Video This manual is only for your reference any change to the design and specification will not be advised PAL SE...

Отзывы: