background image

8

1100T Black

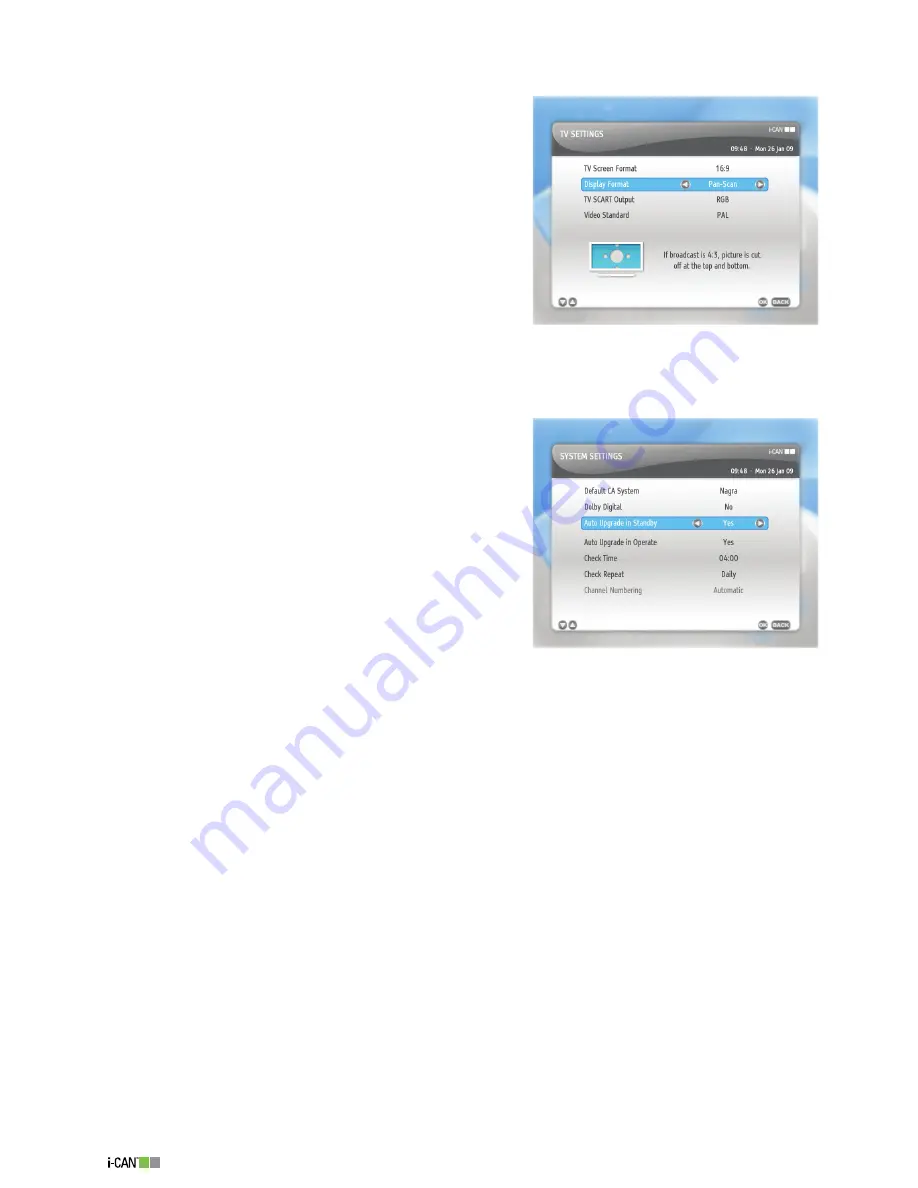
TV Settings

The 

TV Settings

 screen contains the following options:

TV Screen Format

 – The 

TV Screen Format

 option 

should be set to correspond with the format of your TV 

screen. The default TV Screen format is 4:. 

Display Format

 - If your TV screen format is different 

than the format of the program currently broadcast, you 

can choose the way the picture is ‘transformed’. You can 

choose between 

Full Screen

Letter-Box

 and 

Pan-Scan

.

TV SCART Output 

–  If your TV does not support the 

RGB

 color model, you can switch to 

CVBS

.

System Settings

The 

System Settings

 screen contains some of the con-

figuration parameters you may want to change. They are 

as follows:

Default CA System

 – This option is inactive.

Auto Upgrade in Standby

 – If this option is set to 

Yes

and you switch your decoder into standby mode, after 

about one hour, the decoder checks whether a new 

software version is available. If a new software version is 

detected, the upgrade is carried out automatically.
If you set the 

Auto Upgrade in Standby

 option to 

No

the upgrade process is not carried out automatically and 

you will be informed about the upgrade possibility once 

you have switched on your decoder.

Auto Upgrade in Operate

 – If this option is set to 

Yes

, the decoder checks for new versions of 

software also in operate mode. When the process of checking is initiated, you are informed about 

it by means of suitable messages appearing on the screen. You can define the time and frequency 

of these checks by means of the 

Check Time

 and 

Check Repeat

 options.

Check Time 

– This option allows you to specify the time when you want your decoder to check for 

upgrades in operate mode.

Check Repeat 

– This option allows you to choose how often you want your decoder to repeat the 

checks for upgrades in operate mode.

Channel Numbering


– Displays information about the way channels are numbered. This message 

is for the informative purpose only and it cannot be modified.

TV Settings

System Settings

Содержание 1100T ICE

Страница 1: ......

Страница 2: ...ding but not limited to merchantability accuracy completeness noninfringement or fitness for a particular purpose with respect to the software the accompanying product manual s and written materials a...

Страница 3: ...ector on the back panel of the decoder Never attempt to repair or reconstruct the decoder yourself A serious electric shock may occur if this decoder is repaired disas sembled or reconstructed by an u...

Страница 4: ...12 Welcome Screen 12 Select Language 12 Channel Numbering Method 12 Channel Search 13 TV Screen Format 13 Using Your Decoder 14 Turning Your Decoder On Off 14 Basic Rule Point Select 14 Selecting Cha...

Страница 5: ...annels 29 Rename Channels 30 Lock Channels 31 List Organization 32 For Parents 33 Receiver Lock 33 Parental Level 34 Change PIN Code 34 Your Preferences 35 Display Options 35 Language Options 36 Pay P...

Страница 6: ...opened from another one window screen used interchangeably About Your Decoder Set Top Box Your decoder will allow you to do the following prevent your children from viewing unsuitable programs display...

Страница 7: ...note that the look of your decoder s casing may differ from the one in the picture LED Indicator Green operating mode Red in standby low power consumption The LED indicator blinks when your de coder i...

Страница 8: ...In order to be able to watch TV channels and listen to Radio channels you need to connect your decoder to a TV set the mains power source an antenna 1 2 3 4 5 6 TV RF Signal Loop Through Antenna Sock...

Страница 9: ...mart Card you can view free to air channels If you have more questions about the card functioning contact your service provider Looking After Your Smart Card The card is fragile so bear in mind the fo...

Страница 10: ...sts and tune to a desired channel This button is inactive Displays the Electronic Program Guide Switches between the Channel Banner Channel Banner with Extended Information and viewing mode in a circu...

Страница 11: ...applications They are also used to perform a few additional functions in some screens Displays and hides the Applications window Used by some external applications Switches your decoder between the TV...

Страница 12: ...d on the TV screen In the Select Language win dow press to highlight the on screen language and then press to make a selection Once you have selected the language the Confirmation screen will appear P...

Страница 13: ...ck to the Select Language screen or enter the Main Menu by pressing the button In the Main Menu you will be able to access the Installation and Help submenus TV Screen Format When you are setting up a...

Страница 14: ...e arrow buttons on the remote control which moves the on screen highlight to different items Once you have pointed to an item highlighted an item on the screen select it by pressing the button on the...

Страница 15: ...e When the decoder is in the browsing mode the name of the channel is dark grey and the icon appears in the Channel Banner When the Channel Banner displays the information about the current channel or...

Страница 16: ...am Viewing Reminder has been set for a particular program The program is locked according to the parental settings defined in the For Parents submenu under the Main Menu External applications are avai...

Страница 17: ...e channels found are gathered in the All TV and All Radio lists You can however create additional six TV and six Radio lists where you can group channels you watch most often In order to access the li...

Страница 18: ...indow use buttons to highlight the available options and to change them Press to confirm your choice or to leave the Options menu without making any changes Audio Language If available you can select...

Страница 19: ...ss the Applications window with a list of the available applications press the button on your remote control Select an application using the buttons and confirm your selection by pressing the button I...

Страница 20: ...use the number buttons If you do not want to unlock the channel press to tune to the previous channel or press to tune to another channel Locked channels are marked by the icon and locked programs ar...

Страница 21: ...is carried out according to the Point and Select rule Main Menu Window For Parents List Organization Channel Manager Viewer Planner Your Preferences Installation Help Remote Control TV Settings System...

Страница 22: ...y settings Help Gives you access to the information concerning the basic functions of your decoder Viewer Planner When you select Viewer Planner from the Main Menu you get access to the list of Timers...

Страница 23: ...cording List of them available to see in Viewer Planner Viewer Planner Icon visible in the list in Viewer Planner Yes Yes Icon visible in the Channel Banner No Yes Will a window with the notification...

Страница 24: ...ing or recording Daily means that the timer is defined for each day from Monday to Friday Weekly means that the Timer is set to occur once a week In the Set a Timer window by pressing you move the hig...

Страница 25: ...the button Press to confirm To modify Reminders go to Viewer Planner under the Main Menu If the Receiver Lock option Main Menu For Parents is set to Yes you will be asked to enter the PIN code if the...

Страница 26: ...l Manager menu follow the procedure below Select Mode TV if you want to add channels to your favorite TV list s or Radio if you want to add channels to your favorite Radio list s Select the favorite l...

Страница 27: ...from the list press the button to save the information Move Channels You can change the order of channels within the All TV Radio and your favorite channel lists To move channels within All TV or All...

Страница 28: ...o the Channel Manager screen Please note that the selected channel the one you want to move is inserted in the chosen position and the channels are renumbered so that the numbering stays continuous Sk...

Страница 29: ...the channel you want to hide and press the button The confirmation window will appear Press the button to confirm your choice The channel you have selected will disappear from the list After you have...

Страница 30: ...ou want to rename from the Channel List option Set the Modify option to Rename Channels Press the button to display the channels of the chosen list Using the or number buttons select the channel you w...

Страница 31: ...e to enter the PIN code every time you attempt to watch this channel In order to select channels you want to lock follow the procedure below Set the Mode option to Radio if you want to lock channels f...

Страница 32: ...t will automatically appear in the List Organization window In order to change the order of channel lists Reorder follow the procedure below Using the buttons select the Reorder List command Highlight...

Страница 33: ...the Receiver Lock option is set to Yes In the For Parents menu you can activate or deactivate the blockade of the receiver set the age level according to which programs will be locked change your PIN...

Страница 34: ...y the PIN code In order to change Parental Level press the buttons until the age level you are interested in is displayed Then press the button to confirm your setting Change PIN Code To open the Chan...

Страница 35: ...ht corner of the screen the current time and date is also displayed No When the Channel Banner is displayed in the top right corner of the screen the current time and date is not displayed Channel Ban...

Страница 36: ...item under the Your Preferences submenu and press Using the buttons highlight the option you want to change Use the buttons to change values of the highlighted option To confirm the settings press th...

Страница 37: ...m EPG and modem settings update or reinstall channel lists check the signal quality get some basic information concerning the system and loader download new software versions if available restore all...

Страница 38: ...n is available If a new software version is detected the upgrade is carried out automatically If you set the Auto Upgrade in Standby option to No the upgrade process is not carried out automatically a...

Страница 39: ...buttons of your remote control and the buttons which are presented at the bottom of the screen The virtual keyboard can be opened by pressing the red button on your remote control If you want to delet...

Страница 40: ...o choose the way channels are to be numbered For more information see page 12 Receiver Status The Receiver Status submenu gives you access to CA Information System Information and Loader infor mation...

Страница 41: ...trol buttons as well as information concerning the overall functionality of the decoder If the upgrade of the decoder s software has been performed you can learn about the new features in the What is...

Страница 42: ...EPG menu you can use the following buttons to navigate through options and programs within the menus in the initial screen to switch between the next and current programs If lists for whole days are...

Страница 43: ...nect it again to ensure it is in place The standby indicator on the decoder s front panel is red Your decoder is in standby press the button on your remote control Your remote control fails to operate...

Страница 44: ...e control of your decoder and or your TV set to cancel the Mute function Check whether the volume on your decoder or TV is sufficiently high Press the volume buttons on the remote control of your deco...

Страница 45: ...specification is subject to improvement and change without notice Rev 1 3 IMPORTANT INFORMATION FOR THE END USER RELATEDTOTHEWEEEDIRECTIVE2002 96 CEAND 2003 108 ECOFTHEEUROPEANPARLIAMENTAND OF THE CO...

Отзывы: