background image

PART 3   

NAVIGATION SYSTEM

3-36 NAVIGATION SYSTEM

Setup and Information 

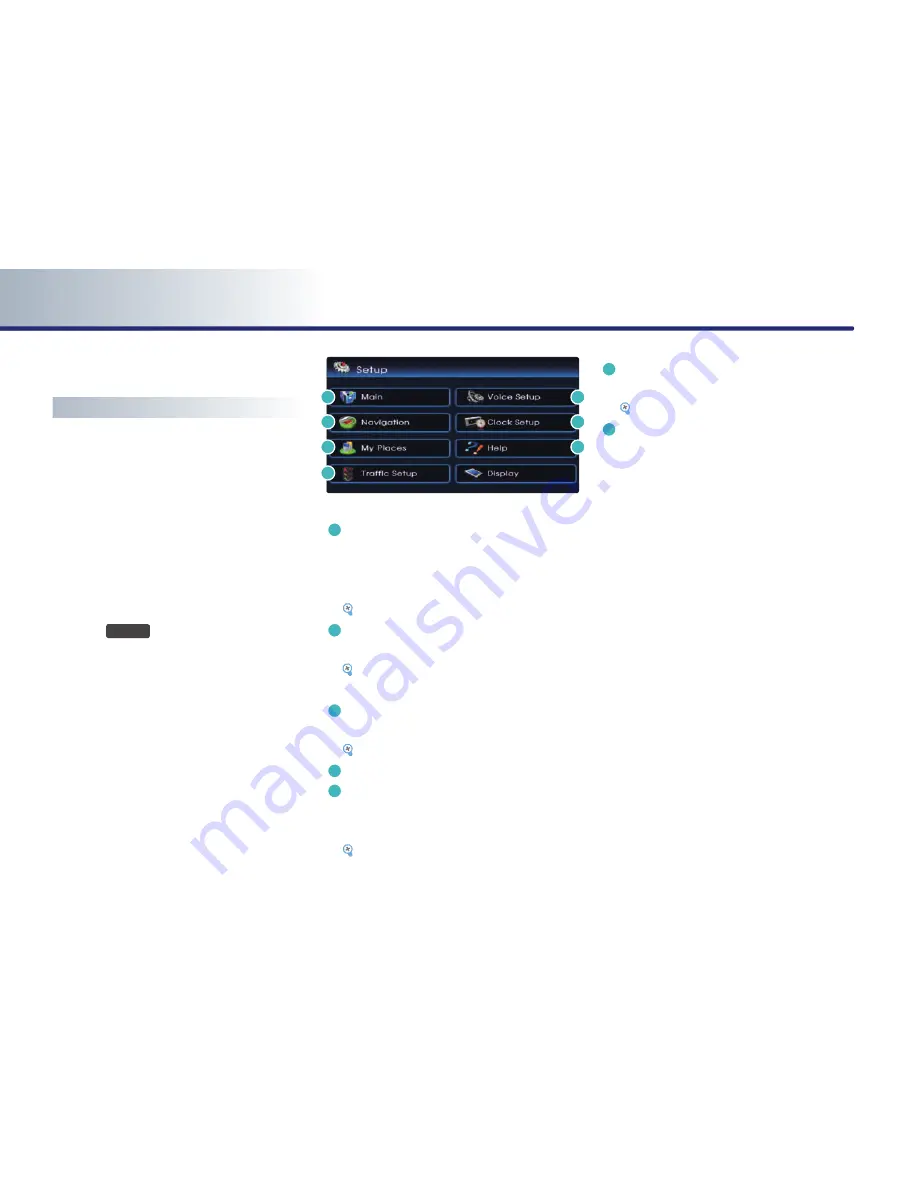
Setup menu screen and functions

Press the 

SETUP

 key on the control panel to 

display the setup menu screen.

a

 Main button : changes to the input key-
board type, voice command feedback ON/
OFF settings and system initialization can 
be made.  


[Main setting], page 3-36 .

b

 Voice Setup button : adjusts the Navigation 
guidance volume.  


[Voice guidance volume setting], page 

3-51.

c

 Navigation button : navigation related set-
tings can be set.    


[Navigation setting], page 3-38 .

d

 Clock Setup button

e

 My Places button : the Address book, Home 
address, Favorite places, Previous destina-
tion can be edited. 


[My places setting], page 3-43 .

f

  Help  button  :  the  help  contents  can  be 
viewed. 


  [Help], page 3-54 .

g

 Traffic Setup : sets to display traffic informa-
tion on map, or to provide upcoming traffic 
information voice guidance, and or to dis-
play  the  detour  route  popup  showing 
upcoming traffic information. 

a

b

c

d

e

f

g

Содержание TQ8-AN240DKAN

Страница 1: ...DIGITAL NAVIGATION SYSTEM User s Manual...

Страница 2: ...ned by Bluetooth SIG Inc and any use of such marks by Hyundai is under license A Bluetooth enabled cell phone is requi red to use Bluetooth wireless technology Bluetooth phone compatibility can be che...

Страница 3: ...1 10 Operating typical screen menu 1 10 Inputting letter by using screen keyboard 1 10 Displaying the list 1 10 Selecting an item in a list 1 11 Sorting items from list 1 11 Conditions for voice reco...

Страница 4: ...le or which are not permissible by law should never be used during operation of the vehicle Do not operate the Audio Navigation system while driving Do not disassemble assemble or modify the Audio Nav...

Страница 5: ...ally searches for broadcasts which can be received XM Mode quickly moves to the previous or next channel CD Mode REW FF the current playing track 5 MEDIA Each press will change the bands in the fol lo...

Страница 6: ...h for the desired file Press the key to play the selected file iPod Mode push the key to search for the desired song Press the key to play the selected song 12 SETUP Displays the Setup menu screen 13...

Страница 7: ...RT KEY less than 0 8 second FM AM receives the previous or next pre set frequency XM Mode receives the previous or next preset channel CD Mode plays the previous or next track MP3 USB Mode plays the p...

Страница 8: ...staurants etc Upon selecting this key you will be connected to IVR POI Re pressing the key will end the call The incoming POI information can be checked at INFO Downloaded POI This feature does not op...

Страница 9: ...OVERVIEW 1 7 PRE OVERVIEW When connecting a Blue Link call while on a Bluetooth call When connecting a Bluetooth call while on a Blue Link call When receiving a Bluetooth call while on a Blue Link ca...

Страница 10: ...turning on the system power 3 Once system booting is complete the most recent operated mode will be displayed For example turning on the system will display FM1 radio mode if the last operated mode p...

Страница 11: ...function within this user manual The current operated button will be high lighted upon display Buttons which cannot be operated under the current conditions will be displayed in disabled state Pressin...

Страница 12: ...to operate menu by voice command Conditions for voice recognition system Most of the functions within the Audio and Navigation system can be operated by voice Please follow the instructions below for...

Страница 13: ...by voice com mand page 5 19 INFORMATION Press the key shortly to input the desired voice command The system voice instruction comment will immediately terminate When the icon changes into the icon wit...

Страница 14: ...nce to changes in vehicle speed Touch screen beep ON OFF Each time the Touch screen beep button is pressed the beeping sound that follows each press on the screen will turn on or off Variable EQ Setup...

Страница 15: ...ccordance to the on off state of the vehi cle taillights Day The bright screen is always maintained regardless of the on off state of the vehicle taillights Night The dark screen is always maintained...

Страница 16: ...rt the time between 12 hour 24 hour systems Daylight Saving Time Turns the Daylight Saving Time function on or off INFORMATION Clock setting mode can be displayed while the clock is displayed on the s...

Страница 17: ...PRE OVERVIEW 1 15 PRE OVERVIEW...

Страница 18: ...Scanning XM broadcast channel 2 12 Operating the CD Player 2 13 Precautions upon handling discs 2 13 For safe and efficient operation 2 13 About CD Player 2 13 Supported disc formats 2 14 Disc Conten...

Страница 19: ...REW FF iPod song 2 28 Setting Repeat function for iPod song 2 28 Setting Random function for iPod song 2 28 USB MP3 related information and precaution 2 29 Precautions upon handling USB 2 29 Connectin...

Страница 20: ...sired broadcast frequency Selecting FM AM broadcast frequency page 2 3 Voice Command 1 Press the key on the steering wheel remote controller 2 After the beep sound say a command Radio Radio AM Radio F...

Страница 21: ...y not be displayed if text is not being received from the broadcast station c Auto Store button searches the 6 fre quencies with the most superior reception and automatically stores as preset buttons...

Страница 22: ...k Up Seek Down c Selecting a broadcast frequency through manual search Press the TUNE key to search for desired frequency Each click on the TUNE key will increase or decrease the frequency by 1 step F...

Страница 23: ...ler 2 After the beep sound say a command Scan PRESET SCAN over 0 8 second scans the 6 frequencies stored as delete this part in the current band for 5 seconds each Voice Command 1 Press the key on the...

Страница 24: ...If an HD Radio broadcast is received radio mode will switch from analog broad cast to HD Radio broadcast 2 Press the FM AM key will convert the mode in the order of FM1 FM2 AM and convert to HD Radio...

Страница 25: ...resets searching or meth ods of searching frequencies are identical However while the HD Radio reception is turned on the HD Radio related icon display will become active when within regions where an...

Страница 26: ...manually save the desired sub broadcast frequency within the currently playing HD Radio broadcast channel Method of saving is identical with the method of saving radio presets After saving is com ple...

Страница 27: ...display displays the XM1 XM2 XM3 modes 2 SCAN PRESET SCAN indicator if SCAN PRESET SCAN is operating the switch is displayed 3 Channel number displays the current playing channel 4 Channel mode indica...

Страница 28: ...d selecting through channel category list e selecting by directly inputting the channel number a Selecting a channel through preset Press the preset button of the desired chan nel INFORMATION Press th...

Страница 29: ...ch category is selected Category search d Selecting channel through channel category list 1 Press the List button If in category mode the all category list screen will be displayed Select the desired...

Страница 30: ...the Scan button SCAN under 0 8 second scans all channels for 5 seconds each if in channel mode If in category mode scans all channels within the current category for 5 seconds each Voice Command 1 Pre...

Страница 31: ...ed as there are no grooves for dust to get in as is the case with LPs Copy protected CDs such as S type CDs may not function in the device DATA CDs are not supported by the device However such discs m...

Страница 32: ...e as shown below CD R or CD RW DISC burned with a bulk CD without quality guarantees may not be rec ognized by the device Inserting an abnormal disc may result in faulty operation or recognition Disc...

Страница 33: ...ording a disc with a personal com puter even discs recorded in a format com patible with the formats described above may not operate on the device caused by software settings of the recording applica...

Страница 34: ...DISC mode screen and begin play ing If the operation mode had been Navigation mode then Navigation mode screen will remain and the disc play status will be dis played through the Audio bar Ejecting a...

Страница 35: ...urrent time displays the current time manually automatically according to the GPS time a Repeat buttons repeat the current play ing track Setting Repeat function for CD music page 2 18 b Random button...

Страница 36: ...aying REW FF CD track Press and hold the key on the con trol panel or steering wheel remote controller for over 0 8 second The track will play 20 times faster while hold ing the button and return to n...

Страница 37: ...the steering wheel remote controller 2 After the beep sound say a command Scan Say Normal Play in order to terminate the set Scan function 2 Press the Scan button again to continue listening to the t...

Страница 38: ...haracters for folder name file name Alphanumeric characters Korean standard character set 2350 characters Simplified Chinese 4888 characters Maximum number of folders which can be stored onto one disc...

Страница 39: ...Time displays the play time 4 Folder name displays the folder name 5 File name displays the file name 6 Current time displays the current time manually automatically according to the GPS time a Info O...

Страница 40: ...command Next File Previous File Next Folder Previous Folder b Selecting through search 1 Press the TUNE key to search for desired to display file Each click on the TUNE key will display the informati...

Страница 41: ...ter music channel etc Setting Repeat function for MP3 file Press the Repeat button Each press will change the function in the fol lowing order Repeat Folder Repeat Repeat Off Repeat Repeat repeats the...

Страница 42: ...and 1 Press the key on the steering wheel remote controller 2 After the beep sound say a command Scan Folder Scan Say Normal Play in order to terminate the set Scan function 2 Press the Scan button ag...

Страница 43: ...he device is set to lock release the lock before connecting For iPhones audio will not play if the audio system and BT are paired Disconnect the pairing before connecting When there are no songs in th...

Страница 44: ...ng the switch is dis played 3 Title name displays the title name of the playing file 4 Play Time displays the play time 5 Artist name displays the artist name of the playing file 6 Album name displays...

Страница 45: ...ress the key on the steering wheel remote controller 2 After the beep sound say a command Next Song Previous Song b Selecting song through search 1 Press the TUNE key to search for desired to display...

Страница 46: ...Each press will change the function in the following order Random Album Random Random Off Random Album Random plays the songs in the cur rent play list randomly in album units However songs within the...

Страница 47: ...mber of folders which can be stored onto one USB 2000 folders includ ing ROOT directory Maximum number of files which can be stored onto one USB 6000 files Precautions upon formatting USB down loading...

Страница 48: ...e may cause damage to the device When disconnecting the USB an abnormal sound may occur occasionally Abruptly disconnecting the external USB device while the USB is operating may cause the device to b...

Страница 49: ...y The device will not support files locked by DRM Digital Rights Management The device many not support normal opera tion if the proper connection with the USB memory fails due to vibrations caused by...

Страница 50: ...ode 2 Folder name displays the name of the folder where photo files are located 3 File name displays the file name of the current photo 4 File index displays the number of Image files within the USB c...

Страница 51: ...ideshow interval converts in time intervals of 5 seconds 10 seconds 20 seconds 5 seconds c Registering Frame 1 Press the Save button at the bottom of the Image screen The currently displayed image wil...

Страница 52: ...RMATION Connect only by using AUX terminals Playing AUX Connect an AUX or press the MEDIA key on the control panel if the AUX is already con nected Voice Command 1 Press the key on the steering wheel...

Страница 53: ...PRE OVERVIEW 2 35 PRE OVERVIEW MEMO...

Страница 54: ...earching from Address book 3 24 Searching for Emergency facilities 3 25 Searching your Home 3 25 Searching favorite places 3 26 Searching from MAP 3 26 Searching POI by local POI list 3 26 Operating a...

Страница 55: ...es setting 3 43 Registering new address in address book 3 43 Editing an address of address book 3 45 Deleting an address of address book 3 46 Deleting an address book 3 47 Registering home address 3 4...

Страница 56: ...satellite frequency is received transmitted in straight lines reception may not work if devices are placed on or near the GPS antenna or when traveling through the following locations Tunnels Basement...

Страница 57: ...with sharp turns or sudden brakes When entering a road after having been in an underground parking structure building parking structure or turntable with many rotations When the tires have recently be...

Страница 58: ...oute ex if a turn is made at an intersection while the navigation provided guidance to go straight Map Data may be missing or incorrect caus ing route guidance to not be given Route Re calculation The...

Страница 59: ...sition and the neighboring area 1 GPS signal state indicator displays the state of GPS signal reception Viewing GPS signal state page 3 7 2 Map scale level indicator displays the cur rent map scale Ch...

Страница 60: ...der shown below Heading Up North Up Heading Up INFORMATION All map screens map screen after setting des tination whole route display screen except the current position screen will always be dis played...

Страница 61: ...ion GPS information may not operate under thefollowing conditions When buildings tunnels or other obstruc tions block satellite signals When materials are placed above the GPS antenna and block satell...

Страница 62: ...indicates the current scale level while the orange color indi cates the selected scale level Press the or button for over 0 8 second The scale will continuously change If the scale range limit is rea...

Страница 63: ...setting can be changed in SETUP Setting Q POI icons page 3 42 2 Press the icon buttons to display or hide To turn off all POI icons displayed on the map press the ALL OFF button INFORMATION The curren...

Страница 64: ...ed menus will be displayed or hidden on the map screen Voice Command 1 Press the key on the steering wheel remote controller 2 After the beep sound say a command Show POI name ex Show ATM Hide POI nam...

Страница 65: ...authentication through Bluetooth or detailed information on conducting search refer to Pairing and connecting a Bluetooth phone page 5 4 Scrolling map Press the map area on the map screen The selected...

Страница 66: ...n sets the destination through intersection search Searching an Intersection page 3 17 d POI Search sets the destination through POI Category search Searching a POI page 3 20 e Address Book sets the d...

Страница 67: ...ate button to change the state 4 Input the State name and press the List button If the number of matches with the input is less than 4 results then the state list screen will be displayed automaticall...

Страница 68: ...he street list screen will be displayed automatically 9 If the desired street from the list is selected the corresponding position will be dis played on the map INFORMATION If more than 30 cities exis...

Страница 69: ...he House number had not been inputted and only one house numbers range exists Input the House number and press the Done button to complete The corresponding position will be dis played on the map b by...

Страница 70: ...ired street from the list and the corresponding position will be dis played on the map 11 This screen will be displayed if the House number had not been inputted during step 8 and more than 2 House nu...

Страница 71: ...vious start point page 5 25 Searching an Intersection There are two ways to set the destination through intersection search a by street b by city 1 Press the DEST key 2 Press the Intersection button 3...

Страница 72: ...m the list 9 Input the name of the 2nd street and press the List button If the number of matches with the input is less than 4 results then the street list screen will be displayed automatically 10 Se...

Страница 73: ...lect the desired city name 9 Input the name of the 1st street and press the List button If the number of matches with the input is less than 4 results then the street list screen will be displayed aut...

Страница 74: ...map Searching a POI There are 3 ways to set the destination through POI search a by category b by name c by phone number 1 Press the DEST key 2 Press the POI Search button 3 Press the State button 4 I...

Страница 75: ...nter button to search for facilities in the near city center a 1 Near current position Searches for facilities within a 50 mi 80Km radius of the current position 8 Press the desired main category menu...

Страница 76: ...hes with the input is less than 4 results then the city list screen will be displayed automatically 9 Press the desired city menu 10 Press the desired main category 11 Press the desired sub category 1...

Страница 77: ...d POI menu The corresponding position will be dis played on the map INFORMATION When necessary the search conditions for the city and category can be changed by pressing the Advanced button Changing C...

Страница 78: ...Searching from Address book 1 Press the DEST key 2 Press the Address book button 3 Select the desired address book user menu INFORMATION This system provides 5 address books Each addresses book can h...

Страница 79: ...ng wheel remote controller 2 After the beep sound say a command Find emergency Category Find emergency Category page 5 23 Searching your Home 1 Press the DEST key 2 Press the HOME button The Home posi...

Страница 80: ...ote controller 2 After the beep sound say a command Destination by memory point 1 to 5 Destination by memory point 1 to 5 page 5 25 Searching from MAP Position the scroll mark at the destination by sc...

Страница 81: ...way point Voice Command 1 Press the key on the steering wheel remote controller 2 After the beep sound say a command Start guidance Sets the position of the scroll mark as the destination and begins...

Страница 82: ...the MAP VOICE key on the control panel is pressed during route simulation then route simulation will be terminated Voice Command 1 Press the key on the steering wheel remote controller 2 After the be...

Страница 83: ...tion is com plete the screen will automatically disappear and the previous guidance screen will be restored Highway junction mode this route guid ance screen is automatically displayed dur ing guidanc...

Страница 84: ...the route option can be changed Changing Route option page 3 32 d Edit Waypoint waypoints can be added deleted and the order can be changed Editing waypoints page 3 32 e Detour searches detour routes...

Страница 85: ...d Cancel route Terminates route guidance and deletes the set destination and waypoints Route overview View Entire Route 1 Press the ROUTE key 2 Press the Route Overview button 3 Press the Turn by Turn...

Страница 86: ...he route with the selected guidance method Voice Command 1 Press the key on the steering wheel remote controller 2 After the beep sound say a command Replan recommended route Replan shortest route Edi...

Страница 87: ...oute button 5 Select the desired category 6 Select the desired sub category from list 7 Select the desired POI from the list The corresponding position will be dis played on the map 8 Press the Add as...

Страница 88: ...dit waypoint button 3 Select the waypoint and press the Delete button 4 Press the Yes button 5 After deleting press the Done button to complete Guidance will be restart after recalculating the route R...

Страница 89: ...1 Press the key on the steering wheel remote controller 2 After the beep sound say a command Detour 1 or 2 or 5 or 10 miles Detour 1 or 2 or 5 or 10 kilometers Setting avoid streets on route 1 Press...

Страница 90: ...n guidance volume Voice guidance volume setting page 3 51 c Navigation button navigation related set tings can be set Navigation setting page 3 38 d Clock Setup button e My Places button the Address b...

Страница 91: ...nputting letter Press the desired keyboard type button The selection will be highlighted Setting voice command feedback ON OFF Press the desired setting button Setting Language 1 Press the Change butt...

Страница 92: ...ing units mile km Select the desired distance unit Setting arrival time and distance display Select the desired setting button Registering avoid area 1 Press the Avoid Area button 2 Press the Add new...

Страница 93: ...oid area needs to be renamed press the Rename button 7 Rename the Avoid area and Press the Done button to complete 8 Each time the Avoid button is pressed the function will switch between avoid or all...

Страница 94: ...id area button 3 Select the Avoid area button to edit 4 If the Avoid area needs to be renamed press the Rename button 5 Rename the Avoid area and press the Done button to complete 6 Each time the Avoi...

Страница 95: ...s the Avoid area button 2 Press the Edit avoid area button 3 Select the Avoid area button to delete 4 Press the Delete button 5 Press the Yes button Deleting all avoid areas 1 Press the Avoid area but...

Страница 96: ...button to complete INFORMATION Q POI stands for Quick POI and refers to the function which turns POI icon display on or off on the map Setting estimate travel time 1 Press the Travel Time button 2 Pre...

Страница 97: ...esired method The search process is the same as the meth od for destination search Searching a destination page 3 13 3 Press the Add to Address Book button 4 Press the desired address book user but to...

Страница 98: ...the current position 7 Input the name and telephone information and press the Done button to complete Editing an address of address book page 3 45 c from map scroll 1 In the map screen scroll the map...

Страница 99: ...but ton 5 Select the desired address to edit 6 Press the Name button to input the address name 7 Input the address name and press the Done button to complete 8 Press the Address button to search the a...

Страница 100: ...umber and press the Done button to complete 11 Press the Done button to complete Deleting an address of address book 1 Press the SETUP key 2 Press the My Places button 3 Press the Address Book button...

Отзывы: