Hyundai HYbook HTLB144Z1 Скачать руководство пользователя страница 5

7

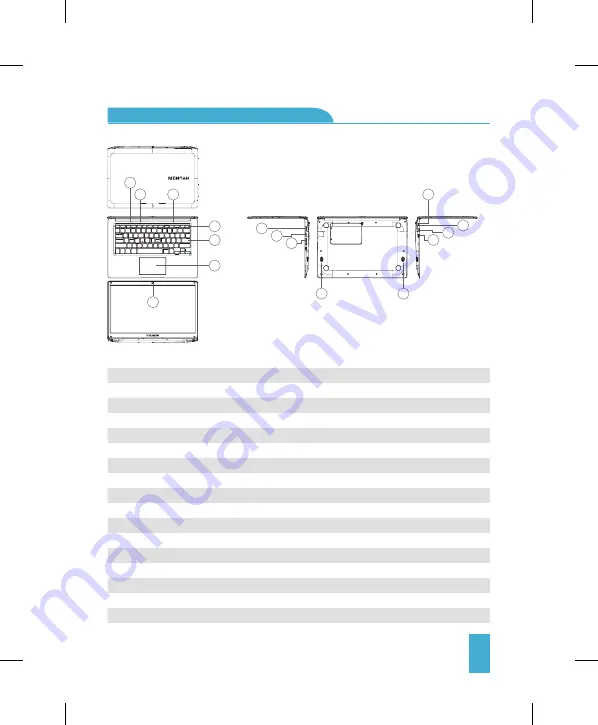
 1. Power Button: Press it down to start or close the touch screen panel. You can also let the computer to enter
    dormancy through this button or wake from the dormacy mode.
 2. Front Camera: Take pictures, shoot video. 
 3. Touchpad: The device can be operated directly. 
 4. Keyboard Board: The device can be operated directly. 
 5. Indicators: a) Is the green light when the Caps Lock indicator Caps Lock; 
                        b) charging indicator, red when charging connector adapter; 
                        c) work light, bright green when the machine starts to work. 
 6. Microphone: It can transmit audio signals to a device at work. 
 7. Charge Indicator: Red light when plug adapter. 
 8. DC Charging Base: Use the built-12V / 2A charger. 
 9. USB Interface: You can insert U disk, mouse, keyboard directly. 
10. Mini-HDMI Interface: High-Definition Multimedia Interface. 
11. USB 2.0: You can insert U disk, mouse, keyboard directly. 
12. RJ-45: Physical Interface to Connect Computer Networks
13. USB 2.0: You can insert U disk, mouse, keyboard directly. 
14. Speakers: The built-in speaker lets you hear the sound of work without additional connected devices

Key Layout And Definitions:

2

1

5

6

6

4

3

11

13

12

8

10

9

7

14

14

Содержание HYbook HTLB144Z1

Страница 1: ...USER MANUAL 14 1 Windows Laptop...

Страница 2: ...external causes including accident problems with electrical power abnormal electrical mechanical or environmental conditions usage not in accordance with product instructions misuse neglect alteratio...

Страница 3: ...an environment where the air is too hot 35o C too humid or with too much dust Do not expose the Hybook directly to sunlight 3 Avoid using in strong magnetic or strong static environment as much as po...

Страница 4: ...the right to warranty 9 Quick Start Guide and relevant software shall be updated at any time Please visit www hyundaitechnology com to check for avilable software updates 10 Replacement with incorrec...

Страница 5: ...ht green when the machine starts to work 6 Microphone It can transmit audio signals to a device at work 7 Charge Indicator Red light when plug adapter 8 DC Charging Base Use the built 12V 2A charger 9...

Страница 6: ...og in with your Micosoft account before the application will run Interface Introduction Applications Introduction In addition to being available on the start screen you can also open all applications...

Страница 7: ...9...

Страница 8: ...ows home button to appear on the menu bar Conversely if you want to change or delete an application from the startup screen 1 Right click 2 and then select the undocked from the start page Search Menu...

Страница 9: ...ice Here you can manage your files and applications on the device Here you can set up and customize the settings on your device Here you browse and choose more applications Search Menu After you login...

Страница 10: ...12 Device menu Click on the notification menu Multitasking Operation Interface...

Страница 11: ...13 Basic Operations Sleep Restart Power Off Short press the power button Hibernation...

Страница 12: ...e este equipo est sujeta a las siguientes dos condiciones 1 es posible que este equipo o dispositivo no cause interferencia perjudicial y 2 este equipo o dispositivo debe aceptar cualquier interferenc...

Страница 13: ...and found to comply with the limits for a Class B digital device pursuant to part 15 of the FCC Rules These limits are designed to provide reasonable protection against harmful interference in a resid...

Отзывы: