background image

10 


3.6 


Place the generator on a flat level surface in a well-ventilated area. 

3.7 


Ensure fuelling takes place away from any possible sources of ignition. 

3.8 


Allow the engine to cool completely before fuelling. 

3.9 


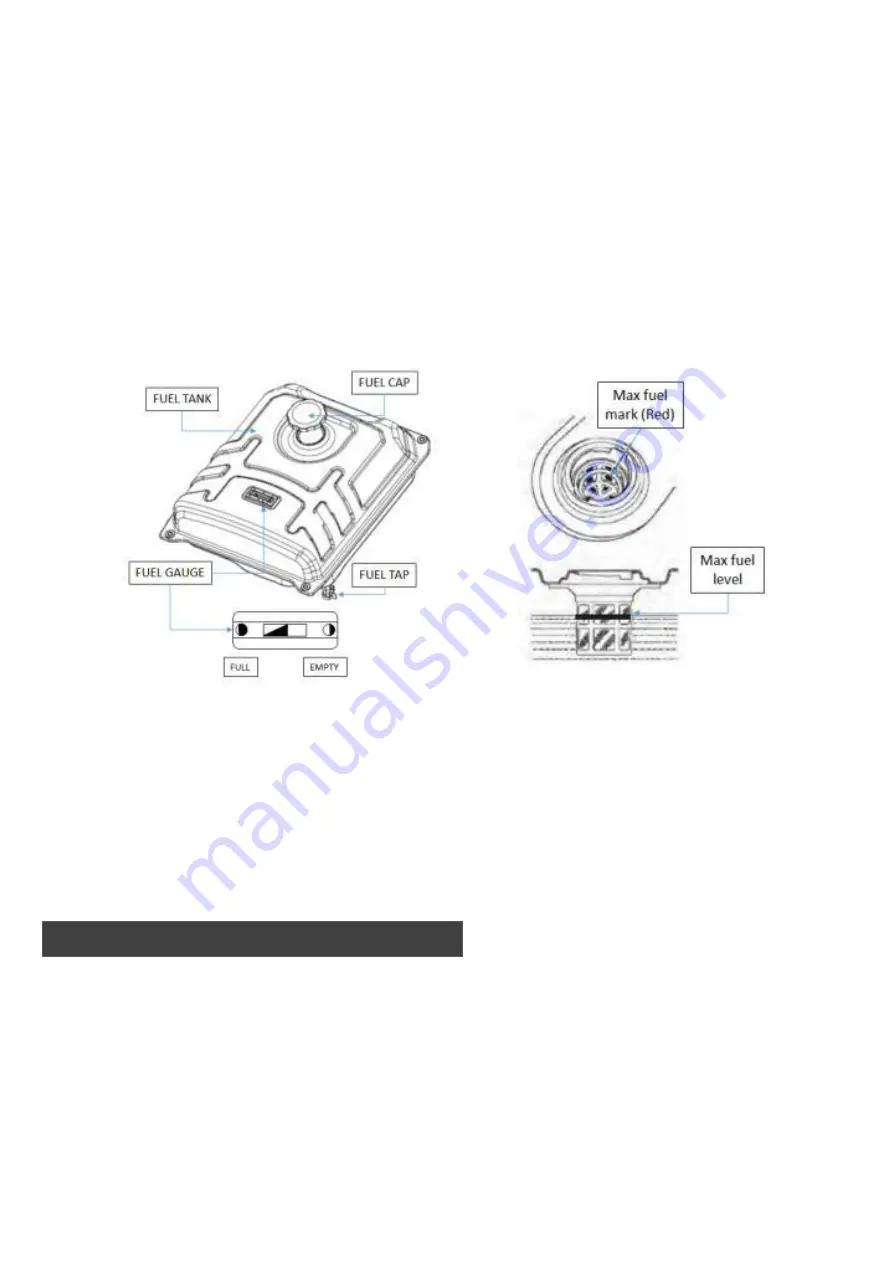
Clean the area around the fuel filler cap and remove the cap. 

3.10   

Slowly fill the engine with fresh unleaded petrol. 


DO NOT mix fuel with oil. 

3.11   

Allow a 25mm gap between the top of the fuel and the top of the fuel tank to allow 


for fuel expansion. 

3.12   

Once fuelling has finished, refit the fuel cap and tighten securely. 


Wipe up any spilled fuel before starting the machine. 


3.13   

To prevent gum deposits from forming in fuel system parts such as the carburettor, 


fuel hoses or tank during storage. Alcohol blended fuels, ethanol or methanol can 


attract moisture, which leads to separation and formation of acids during storage. 


Acidic gas can damage the fuel system. 


Fuel should be emptied before storage for 30 days or longer. 


See the Storage section. 


Never use engine or carburettor cleaning products in the fuel tank as permanent  


damage may occur. 


3.14   

The requirement for Electrical installations BS7971:2008 requires that the frame and 


external electrically conductive part of this generator be properly connected to an 


approved earth ground. 

3.15   

Proper grounding of the generator will prevent electric shock in the event of ground 


fault condition in the generator or in connected electrical devices. 

3.16   

Proper grounding also helps dissipate static electricity, which often builds up in 


underground devices. 

        GROUNDING / EARTHING 

Содержание HY10000LE-LPG

Страница 1: ...1 ...

Страница 2: ...ING THE MACHINE 11 15 6 STOPPING THE MACHINE 16 7 USING THE MACHINE 16 17 8 MAINTENANCE 18 20 9 STORAGE 21 10 TRANSPORTATION 22 11 SPECIFICATION 22 12 PRODUCT DISPOSAL RECYCLING 23 13 DECLARATION OF CONFORMITY 24 14 CONTACT DETAILS 25 15 WARRANTY REGISTRATION 25 16 MANUAL UPDATES 25 INDEX ...
Страница 3: ...e following warning signs symbols and or PPE pictograms may ap pear throughout this manual You MUST adhere to their warnings Failure to doso may result in personal injury to yourself or those around you DANGER Indicates a hazard which if not avoided could result in serious injury or death WARNING Indicates a hazard which if not avoided could result in serious injury CAUTION Indicates a hazard whic...

Страница 4: ...se 1 14 To avoid carbon monoxide poisoning DO NOT use Petrol Diesel powered equipment inside any of the following Home garage tent camper van mobile home caravan or boat This is not exhaustive and if you are in any doubt contact your dealer 1 15 If you think you have or someone around you has been affected by carbon monoxide poisoning 1 16 Get them fresh air immediately by leaving the affected are...

Страница 5: ...s are but not limited to safety gloves overalls 1 33 When fueling de fueling ALWAYS avoid inhaling fumes 1 34 When de fueling ALWAYS use a proper fuel retriever 1 35 ALWAYS carry fuel in the correct and clearly marked container 1 40 Electrical Safety where applicable 1 41 Electricity can kill NEVER work on LIVE ENERGISED equipment 1 42 Prior to carrying out any maintenance work you MUST identify e...

Страница 6: ...to another part of your face or body 1 59 Gasses from charging batteries are highly flammable and great care should be taken to charge in well ventilated areas 1 59 1 There is an explosion risk if the battery terminals are short circuited when connecting disconnecting ALWAYS exercise great care so that the terminals or battery leads are NOT allowed to touch and cause a spark ALWAYS use suitable in...

Страница 7: ...sers are advised to have hearing checked regularly Be especially vigilant and cautious when hearing ear protection because your ability to hear alarm warnings will be reduced 1 72 Noise emissions for this equipment is unavoidable Carry out noisy work at approved times and for certain periods Limit the working time to a minimum For your personal protection and protection of people working nearby it...

Страница 8: ...8 1 Control Panel 6 Oil Drain Plug 2 Fuel Gauge 7 Fuel Valve 3 Fuel Filler Cap 8 Recoil Start Handle 4 LPG Connector 9 Air Filter 5 Oil Filler Dipstick 2 PART LOCATIONS ...

Страница 9: ... remove the oil filler cap dipstick 3 2 Slowly fill the engine with oil through the oil filler until it reaches the upper thread of the filler hole or the upper limit level mark on the dipstick 3 3 Stop filling occasionally to check the level DO NOT overfill 3 4 Refit the oil filler cap and tighten securely 3 5 You MUST check the engine oil level before starting every session CAUTION ALL FUELS ARE...

Страница 10: ...rettor fuel hoses or tank during storage Alcohol blended fuels ethanol or methanol can attract moisture which leads to separation and formation of acids during storage Acidic gas can damage the fuel system Fuel should be emptied before storage for 30 days or longer See the Storage section Never use engine or carburettor cleaning products in the fuel tank as permanent damage may occur 3 14 The requ...

Страница 11: ...S II equipment DOES NOT have GREEN YELLOW earth wire connected inside the plug 3 21 CLASS II equipment will have the following symbol embossed or printed on the casing WARNING NEVER start or stop the engine with electrical devices plugged in to the power outlets and devices turned on Unplug all electrical loads from the unit s power outlets or make sure that the main breaker is OFF down position b...

Страница 12: ...ns smoothly and then move to the RUN position If the engine falters move the choke lever back to the position until the engine runs smoothly and the back to the RUN position WARNING Starter cord kickback rapid retraction will pull your hand and arm towards the engine faster than you can let go which could cause injury When starting the engine pull the cord slowly until resistance is felt and then ...

Страница 13: ...se the manual starting instructions above 4 7 Move the fuel selector switch to the petrol position 4 8 Turn the fuel tap down to the ON position 4 9 Turn the ignition switch to the ON position 4 10 Move the choke lever to the START position ELECTRIC START ...

Страница 14: ...RUN position WARNING Before running the generator on LPG you MUST drain all the petrol from the fuel tank 4 13 Drain all the petrol from the fuel tank and turn the petrol fuel tap to the closed position 4 14 Move the fuel selector switch to the LPG position 4 15 Connect the LPG hose to the LPG inlet on the generator and tighten the connection securely using a spanner 4 16 Connect the other end of ...

Страница 15: ...p back Electric Start 4 22 Turn the ignition hey to the START position and hold there for 3 to 5 seconds Once the engine fires release the key and it will automatically return to the ON position DO NOT hold the ignition key in the start position for periods of over 5 seconds as this may cause damage to the machine If the generator fails to start release the key wait 60 seconds and try and again 4 ...

Страница 16: ...ating of any circuit breaker is exceeded that breaker will open and the electrical output to that socket will be lost 6 2 DO NOT place the LPG bottle on the exhaust side of the generator 6 3 Connecting Electrical Loads 6 4 Let the engine run until the rpm is stable and has been allowed to warm up for a few minutes after starting 6 5 Plug in an electrical load and turn on 6 6 Add up the rated watts...

Страница 17: ...ting You must make sure you allow for high starting wattage when selecting electrical devices to connect to the generator 6 13 Calculate the watts needed to start the largest motor Add that figure to the running watts of all the other connected loads Start the largest motor first and only one motor at a time 6 14 The AC switch breaker will turn OFF automatically when the load exceeds the generator...

Страница 18: ...s not cover items that have been subjected to operator abuse or negligence To receive full value from the warranty the operator must maintain the generator as instructed in this manual Some adjustments will need to be made periodically to properly maintain the generator 7 2 All adjustments in the Maintenance section of this manual should be made at least once each session 7 3 Generator maintenance...

Страница 19: ... occasionally to check the oil level 7 11 Once full refit the dipstick and tighten securely 7 12 Wipe up any spills and dispose of the waste oil at a proper collection centre 7 13 Remove the spark plug HT lead cap from the spark plug 7 14 Clean the area around the spark plug to reduce the risk of dirt or debris entering the cylinder 7 15 Using a spark plug wrench undo and remove the spark plug 7 1...

Страница 20: ...fit the spark arrestor 7 28 The engine will not run properly and may be damaged if you use a dirty air filter Replace the air filter once a year Clean or replace more frequently if operating under dusty conditions 7 29 Undo the air filter cover screw and remove the air filter cover 7 30 Remove the sponge air filter element 7 31 Clean the sponge air filter element in a warm soapy solution and allow...

Страница 21: ... device drain all the fuel from the fuel tank in to a suitable container 8 2 Run the generator until it runs out of fuel to remove any remaining fuel from the fuel lines and carburettor 8 3 Replace the engine oil by following the maintenance procedure in this manual 8 4 Clean the generator using a moist cloth DO NOT use a pressure washer or hose pipe to clean the machine as water may penetrate com...

Страница 22: ...generator Even with an empty fuel tank fuel vapours can accumulate and become a risk Model Number HY3800LE LPG HY10000LE LPG Engine Hyundai Euro 5 OHV 4 Stroke Hyundai Euro 5 OHV 4 Stroke Engine Displacement cc 223 458 Engine Power hp 7 5 18 Engine Speed rpm 3000 3000 Start Method Recoil Electric Recoil Electric Fuel Type Unleaded Petrol LPG Fuel Tank Capacity L 18 28 Oil Type Semi Synthetic SAE 1...

Страница 23: ...ank Drain the fuel tank and carburettor and replace with fresh fuel Spark plug gap incorrect Remove the spark plug and adjust the plug gap Engine overheating Cooling fins are blocked Remove any dirt and debris from the cooling fins Dirt in the air filter Remove the air filter and clean or replace No voltage from the generator Circuit breaker is active Reset the circuit breaker Connected cables are...

Страница 24: ...r recycling centre 12 4 Certain products contain batteries which should not be disposed of in your domestic waste 12 5 You MUST recycle batteries in accordance with your local authority or recycling centre 12 6 Unwanted packaging and materials should be stored and taken to a recycling centre so it can be disposed of in a manner which is compatible with the environment 12 7 The following symbol mea...

Страница 25: ...et Installed Power HY3800LE LPG 3 3kW HY10000LE LPG 6 0kW The technical document is kept by Roland Llewellin Genpower Ltd Isaac Way Pembroke Dock Pembrokeshire SA72 4RW The conformity assessment procedure followed was in accordance with the annex V of the Directive Notified Body AV Technology AVTECH House Arkle Avenue Stanley Green Trading Estate Handforth Cheshire SK9 3RW UK Certification No GB 1...

Страница 26: ...daipowerequipment co uk warranty For full Warranty terms and conditions please visit https hyundaipowerequipment co uk support warranty information 16 0 Our manuals are constantly being reviewed and updated However if you find and error omission or something you find unclear please contact your dealer for assistance 16 1 Our latest manuals are also placed online 16 2 We reserve the right to make a...

Страница 27: ...27 ...

Страница 28: ...28 ...

Отзывы: