Hyundai H-TV1403 Скачать руководство пользователя страница 12

12

Basic Operation

Power ON/ OFF

Connect to the mains

Insert the mains plug of the unit into 110~240V AC mains outlet, unplug it when the unit will not be used for a long period of time.

How to power on/off

1. Press the main power switch, the image or snowy picture will display.
2. In case of the screen no snowy or picture, press POWER button on the remote control to exit Standby status.
3. If you want to turn off the unit temporarily during watching, press down POWER button on the remote control.
4. Press down the POWER switch on the unit to power off completely.

Non-signal automatic power-off in 10 minutes

In case the unit under non-signal screen saver state, TV will enter standby status automatically 10 minutes later, to turn it on again, please press down
POWER button on the remote control or PROG. button on the unit.

Memory Function Before Power off

The setting of picture, sound and the preset channels will be memorized before turning off the unit. When being started up again, the unit will work
according to your preset settings before being turned off. But please note that if the mode is AV before being turned off, it will work under AV mode
when being started again.
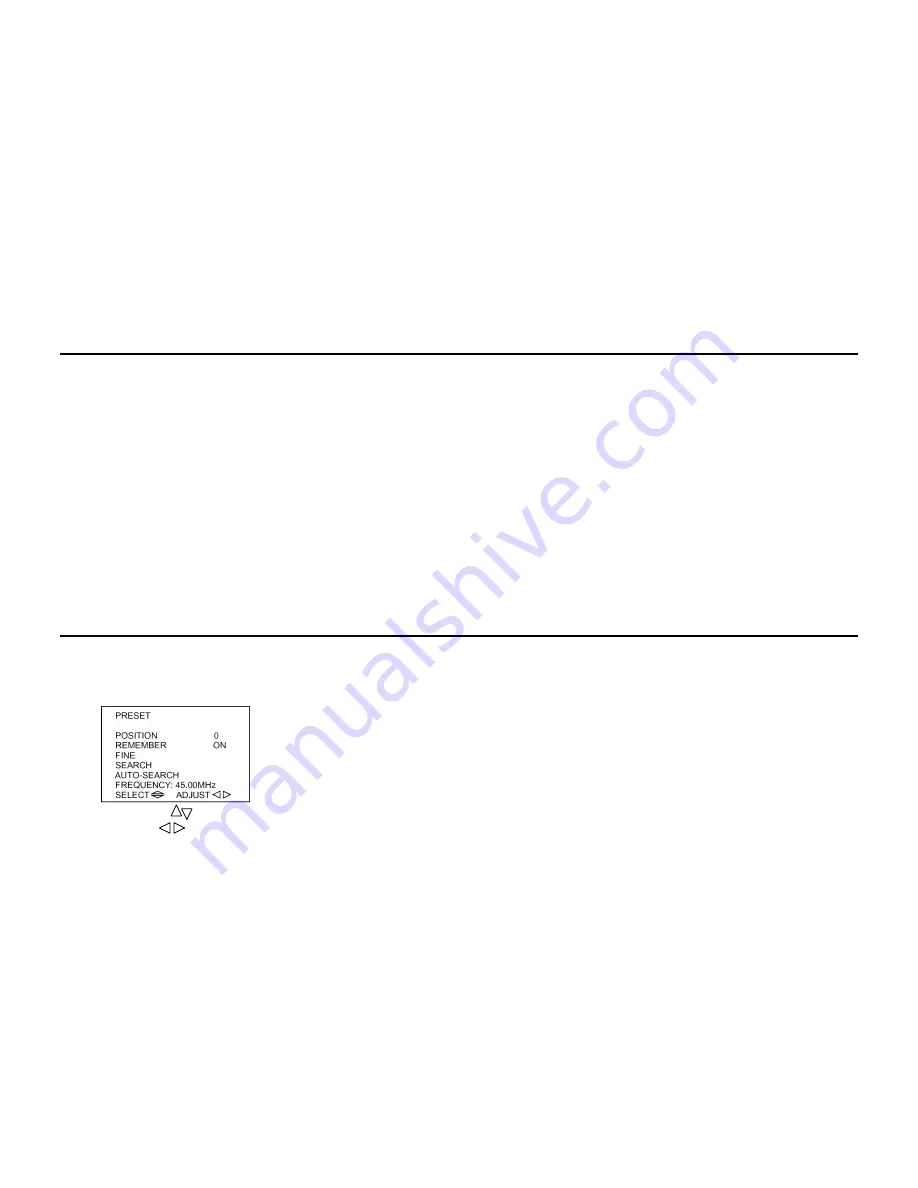
Preset menu

Presetting the channels

This unit being offered automatic and semi-automatic preset way to preset channel, select one to set channels.

Auto Search preset

1.  Press MENU button six times to enter PRESET menu as the figure shown:

2.  Press PROG.        button to select AUTO-SEARCH.
3.  Press VOL         button to start AUTO-SEARCH, and the program will return to program 0 at the end of searching.
4.  Press MENU button again to stop searching at any time.

Содержание H-TV1403

Страница 1: ...H TV1403 COLOUR TELEVISION Instruction manual...

Страница 2: ...e Table of contents Table of contents 2 Important safeguard 3 Colour TV features 4 Preparation 4 Control location 7 External connection 8 Remote control 9 Basic Operation 12 Preset menu 12 Picture men...

Страница 3: ...where ventilation may be impeded Place the appliance on a flat level surface avoiding anywhere which may be subject to strong vibration The appliance should be moved with care as the weight balance i...

Страница 4: ...lescopic antenna to a 75 Ohm 300 Ohm converter and plug the converter into the antenna socket on the rear of the unit Adjust the antenna length angle and direction until optimum reception is achieved...

Страница 5: ...end to use the remote controller for a long period of time remove them to avoid damage due to leakage 3 Do not mix the old batteries with new one Use of Remote control Point the remote towards the sen...

Страница 6: ...6 Input and output terminals Side AV jacks...

Страница 7: ...7 Rear AV jacks Control location 1 Remote Sensor 2 Power Indicator 3 AV TV Button 4 Menu Button 5 Volume Down Button 6 Power Switch 7 Volume Up Button 8 Program Down Up Buttons...

Страница 8: ...unit has AV inputs AV IN on the rear Cabinet are for VIDEO mode using As this unit has AV output terminal for storing TV program you can connect a set of cables between the AV out jacks on the TV and...

Страница 9: ...9 Remote control...

Страница 10: ...G PROG button Press the PROG button to select the program forwards Press the PROG button to select the program backwards VOL Volume buttons Press these buttons to decrease or increase the volume P P P...

Страница 11: ...has not changed If channel or AV is locked a small lock figure will appear on channel AV OSD 2173 is the default password for unlocking the LOCK menu TV AV TV AV button Press this button to select TV...

Страница 12: ...inutes later to turn it on again please press down POWER button on the remote control or PROG button on the unit Memory Function Before Power off The setting of picture sound and the preset channels w...

Страница 13: ...need to preset other channels just repeat step1 to step 6 7 You can adjust all your desired channels to your desired program with this function Fine tune preset FINE 1 Press PROG button or number but...

Страница 14: ...REMEMBER should be OFF instead of ON Picture menu Picture control Selection of Picture Effect Press P P button on the remote control to select four preset image effects and one custom effect Adjust p...

Страница 15: ...ntrol 1 Press MENU button two times to enter AUDIO menu as shown ITEM VOL VOL VOLUME WEAK STRONG TREBLE WEAK STRONG BASS WEAK STRONG BALANCE L STRONG R STRONG MODE MEMORY MUSIC MOVIE NEWS SURROUND ON...

Страница 16: ...set time to turn off TV at preset time 6 ALARM set time to make your alarm at preset time and when the time is up one flickering clock figure will display on the screen till you press any button to ex...

Страница 17: ...e moneybag or coin your score will be added one moneybag will add 10 scores and one coin add 5 scores all moneybags and coins you have got will be counted automatically when the game over When the gam...

Страница 18: ...und system 4 5M 5 5M 6 0M 6 5M 5 Color system and Sound system will be stored separately for every program 6 SYSTEM menu would not be displayed under AV mode please press SYSTEM button to change color...

Страница 19: ...radio equipment DIATHERMY Herringbone pattern and partial picture loss can result from the operation of diathermy equipment from a nearby doctor s surgery or hospital SNOW Weak TV signals from long di...

Страница 20: ...ning control Check if system switch is correct Poor picture sound OK Try different channel if OK probably station trouble Check aerial connections on back of set Check aerial for broken wires Re orien...

Страница 21: ...on some channels Try different channel if OK probably station trouble Check aerial connections on back of set Check aerial for broken wires Re orient aerial if indoor type Probably local interference...

Страница 22: ...Adjust fine tuning control Check if station is broadcasting color Adjust color control Check if system switch is correct Malfunctions of Remote control Check batteries in Remote control No remote cont...

Страница 23: ...o side input AV Stereo Audio Video back input output AV Stereo Sound Power 2 x 1 5 W Operating temperature 5 C 40 C Operating humidity 35 80 Power supply 150 240V 50 60Hz Power 60W Net Weight 11 kg Di...

Страница 24: ...24 HYUNDAI 24 25 26 27 30 31 32 35 35 37 38 39 39 41 42 43 45 46...

Страница 25: ...25 5 40 10 10 10...

Страница 26: ...26 14 37 PAL SECAM BG DK NTSC 3 58 4 43 2 1 5 255 4 AV...

Страница 27: ...27 300 75 300 75 300 75 300...

Страница 28: ...28 1 2 A 1 5 3 1 1 2 3 1 2...

Страница 29: ...29 AV AV...

Страница 30: ...30 1 2 3 AV TV 4 5 6 7 8...

Страница 31: ...31 DVD AV AV AV AV...

Страница 32: ...32...

Страница 33: ...33 POWER MUTE SYSTEM 0 9 0 9 PROG PROG PROG VOL P P 4 STANDART SOFT VIVID LIGHT PERSONAL MENU RECALL 3 16 3 16 SLEEP 10 20 30...

Страница 34: ...34 LOCK AV AV 2173 TV AV TV AV TV AV DISPLAY AV 5 PICTURE PICTURE OPTION ZOOM...

Страница 35: ...35 110 240 1 2 POWER 3 POWER 4 10 10 POWER PROG AV 1 MENU 6 PRESET 2 PROG AUTO SEARCH 3 VOL 4 MENU...

Страница 36: ...36 PROG SYSTEM SYSTEM 1 PROG 2 MENU 6 PRESET 3 PROG SEARCH 4 VOL VOL 5 MENU 6 MENU 1 6 7 1 PROG 2 MENU 6 PRESET 3 PROG FINE 4 VOL VOL VOL VOL 5 MENU 1 6 6 AFT 1 PROG 2 MENU 6 PRESET...

Страница 37: ...37 3 PROG REMEMBER ON 4 VOL REMEMBER OFF 5 MENU 6 REMEMBER ON P P 5 1 MENU PICTURE 2 PROG PICTURE VOL...

Страница 38: ...38 ITEM VOL VOL 3 4 MENU 1 MENU 2 VOL VOL 2 PROG VOL 3 MENU 4 VOL...

Страница 39: ...39 1 MENU 4 2 PROG VOL VOL VOL 3 4 5 6 7 8 9 MENU 1 MENU OPTION...

Страница 40: ...40 2 PROG VOL 3 4 5 PROG VOL DISPLAY 6 MENU 7 1 VOL RECALL VOL RECALL DISPLAY POWER 10 5 5 8 2 888 2 RECALL DISPLAY 8 8 2 2 3 123 321 4...

Страница 41: ...41 3 5 9 1 MENU 5 SYSTEM 2 PROG VOL 3 PAL N3 58 N4 43 SECAM 4 4 5M 5 5M 6 0M 6 5M 5 6 AV SYSTEM 7 VOL 8 MENU...

Страница 42: ...42...

Страница 43: ...43...

Страница 44: ...44...

Страница 45: ...45 1 2 3...

Страница 46: ...46 37 14 PAL SECAM BG DK NTSC 3 58 NTSC 4 43 75 V stereo V stereo 2 1 5 40 35 80 150 240 50 60 60 11 412 370 331...

Отзывы: