background image

5

Connection

Connection

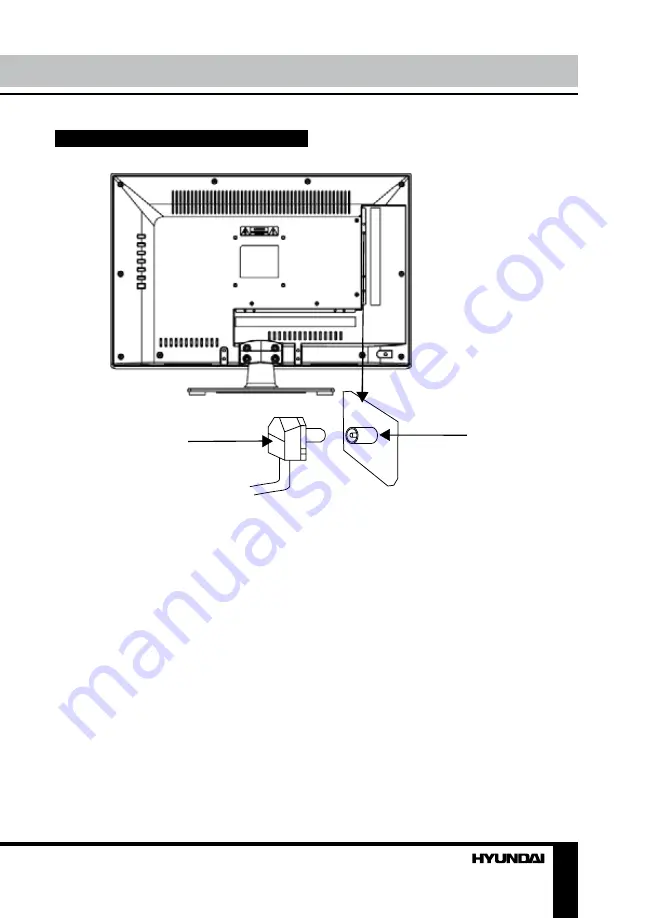
Outdoor Antenna Connection

Use 75

Ω

 coaxial cable plug or 300-75

Ω


impedance converter to plug in antenna input 
terminal on the rear of the cabinet.

Other connections

•  Connect a TV or CATV antenna to the 

antenna jack.

•  Connect a video source to the Composite 

video input jack with RCA cable.

•  Connect an audio source to the proper 

Audio input jacks (left and right).

•  Connect PC audio input to PC main unit 

with related audio cable in PC mode.

•  When using the unit as a computer screen, 

connect the PC to the PC jack of the unit by 
the relevant cable.

•  If the video source has a HDMI output 

jack, you can connect the signal to the unit by 
HDMI cable (not included).

•  Component input is intended for receiving 

component video signal if connected to the 
component output of external signal source. To 
receive audio signal for component video, please 
use Left and Right audio inputs of this unit.

•  Connect your headphones or earphones 

(not included) to the headphone socket of this 
unit. When headphones are connected, the 
sound output through the built-in speakers of 
this unit is mute.

75 Ohm co-axis cable

TVRF antenna jack

Antenna cable connector

Содержание H-LED22V9A

Страница 1: ...LED TV Instruction manual H LED22V9A LCD ME61 23...

Страница 2: ...nel setting Picture setting Sound setting Timer setting Option setting USB operation Background information Operatoins of file playback General information Troubleshooting Causes of interference Acces...

Страница 3: ...twist pull or roast the power cord Please contact the service center immediately if you found that the core is showed in the air or has been broken Please replace the AC outlet if the metal bolt cann...

Страница 4: ...t If it moves or is tipped over it may be damaged Do not place any fire source such as candlelight close to this product or place it on this product If it is tipped over or fallen down it may cause da...

Страница 5: ...nit as a computer screen connect the PC to the PC jack of the unit by the relevant cable If the video source has a HDMI output jack you can connect the signal to the unit by HDMI cable not included Co...

Страница 6: ...H buttons 2 VOL VOL button 3 MENU button 4 TV AV button 5 POWER button 6 Earphone output 7 RF antenna jack 8 USB port 9 HDMI input 10 PC VGA input 11 PC audio input 12 Composite video input 13 Stereo...

Страница 7: ...button button 23 Blue button button 24 E W button 25 SUBPAGE button Changing the battery 1 Remove the battery compartment cover on the back of the RC 2 Insert the batteries into the battery compartme...

Страница 8: ...display the preset TV channel play information Press ZOOM button repeatedly to select an aspect ratio 4 3 14 9 16 9 Zoom1 Zoom2 The set of available aspects can vary depending on the current signal so...

Страница 9: ...channel Press green button then press UP DOWN buttons to select a symbol Press LEFT RIGHT buttons to select the next symbol Press green button to confirm Move Highlight the needed channel Press yello...

Страница 10: ...ot available in USB mode Off time set the time for the TV to switch off On time set the time for the TV to switch on The TV must be in standby for the On timer to work Sleep select the period until au...

Страница 11: ...ou want to go back to the previous menu In the content menu press cursor buttons to select folder press ENTER button on the RC or press and hold CH CH button on the unit to enter it then press cursor...

Страница 12: ...nect the audio signal cord properly Set the sound system properly The RC does not work Batteries are improperly installed or exhausted Make sure the positive and the negative polarities are correct Re...

Страница 13: ...o and audio support Power supply 100 240 V 50 60 Hz Power consumption 35 W Electric shock protection class II Unit dimensions with stand 531 x 39 9 x 349 mm without stand 531 x 178 x 382 mm Net Gross...

Страница 14: ...14 USB 14 15 15 15 17 17 17 18 18 18 18 19 19 19 19 20 20 21 21 22 22 23 23 23 24 24 24 24 26 26 26 27 28...

Страница 15: ...15 220...

Страница 16: ...16 LCD 10 18 2...

Страница 17: ...17 4 4 75...

Страница 18: ...18 75 RCA VGA VGA PC HDMI HDMI HDMI 75...

Страница 19: ...19 1 2 1 2 1 CH CH 2 VOL VOL 3 MENU 4 TV AV 5 POWER 6 7 8 USB 9 HDMI 10 PC VGA 11 12 13 RCA 14 1 2 3 4 5 6 7 8 9 10 11 12 13 14...

Страница 20: ...8 19 21 20 22 23 24 25 1 POWER 2 3 SOURCE REVEAL 4 SIZE ZOOM 5 MENU 6 ENTER 7 VOL VOL 8 SLEEP 9 REPEAT 1 2 3 10 11 12 TEXT 13 HOLD STILL 14 INFO INDEX 15 16 AUDIO 17 RECALL 18 EXIT 19 CH CH 20 CANCEL...

Страница 21: ...EEP 240 SLEEP AUDIO TV Stereo Mono Dual I Dual II Dual I II SOURCE TV AV AV YPbPr HDMI PC USB 5 PC RGB 30 TV CH CH 0 9 1 235 RECALL INFO ZOOM 4 3 14 9 16 9 1 2 TEXT TEXT HOLD INDEX SIZE REVEAL SUBPAGE...

Страница 22: ...22 1 MENU 2 VOL 3 CH 4 CH 5 VOL CH 6 MENU EXIT ENTER PAL SECAM NTSC BG DK I M ATV...

Страница 23: ...23 NTSC 4 3 14 9 16 9 1 2 PC RGB...

Страница 24: ...24 USB USB 5 c USB 3GP ASF AVI MKV MPG DAT M2TS MP4 TS VOB WMV V9 DIVX H263 MPEG 4 MPEGII XVID PCM WAV WMA MP3 DD AC3 576x720 USB USB 2 0 500 NTFS FAT16 FAT32 USB 5 500 USB USB USB USB ENTER CH CH USB...

Страница 25: ...25 ENTER ENTER CH CH ENTER CH CH ENTER CH CH INFO VOL VOL ENTER CH CH ENTER REPEAT H CH EXIT...

Страница 26: ...26...

Страница 27: ...27 1 1 2 1 3 2 4 1 5 3 6 1 7 1 8 1 9 1...

Страница 28: ...28 21 5 55 5 1920 x 1080 16 9 PAL SECAM NTSC B G DK I NICAM 2 x 2 RCA USB VGA HDMI 3D 236 1000 USB 220 50 60 100 240 35 II 531 x 39 9 x 349 531 x 178 x 382 4 1 5 1...

Страница 29: ......

Отзывы: