5
Installation way (method 2)
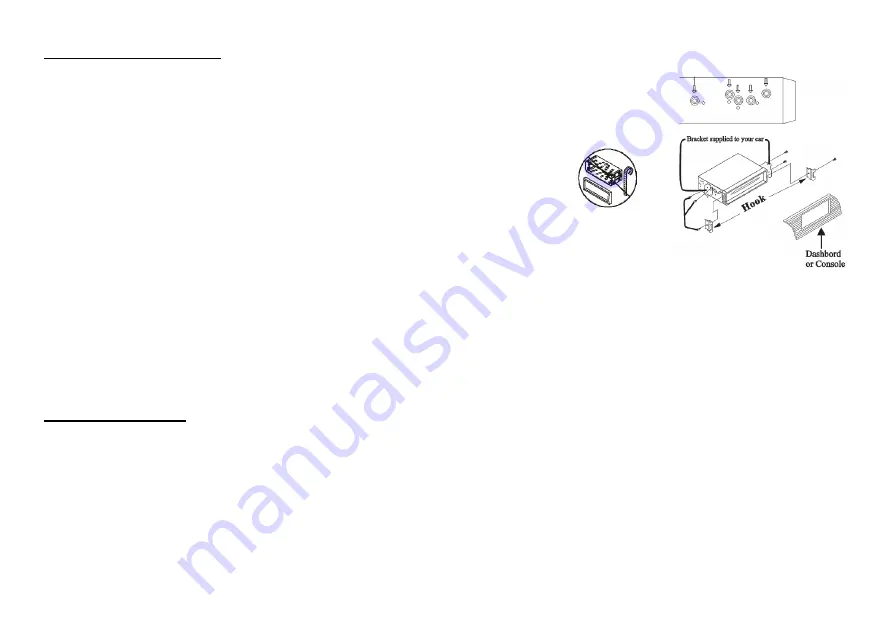
Installation using the screw holes at both sides of the unit.
1. Select a position where the screw holes of the main unit are fitted for aligned, and tighten the
screws at 2 positions at each side.
Use either truss screws (5 x 8mm) or flush surface screws (4 x 8mm), depending on the shape of
the screw holes in the bracket.
2. Screw.
3. Factory radio mounting bracket.
4. Dashboard or Console.
5. Hook (Remove this part).
Note:
The mounting box, outer trim ring, and the Half-sleeve are not used for this method of
installation.
Caution:
The control panel can easily be damaged by shocks. After removing it, place it in a protective case and be careful not to drop it or
subject it to strong shocks.
The rear connector that connects the main unit and the control panel is an extremely important part. Be careful not to damage it by
pressing on it with fingernails, pens, screwdrivers, etc.
Note:
If the control panel is dirty, wipe off the dirt with soft, dry cloth only. And use a cotton swab soaked in isopropyl alcohol to clean the
socket on the back of the control panel.
Electrical connections
Speaker wiring notes
Follow the above wiring diagram to install the head unit with new or existing speakers.
This unit is designed for use with four (4) speakers with an impedance between 4 Ohms to 8 Ohms.
An impedance load of less than 4 Ohms could damage the unit.
Never bridge or combine the speaker wire outputs. When not using four speakers, use electrical tape to tape the ends of the
unused speaker outputs to prevent a short circuit.
Never ground the negative speaker terminals to chassis ground.
Содержание H-CMD7075
Страница 1: ...H CMD7075 DVD MP3 CD RECEIVER DVD MP3 CD Instruction manual ...
Страница 6: ...6 Connection scheme ...
Страница 30: ...30 30 31 32 36 40 42 46 54 61 62 63 64 ...
Страница 31: ...31 12 CD 0 75 AWG18 ...
Страница 32: ...32 ...
Страница 33: ...33 1 5 8 4 8 2 3 4 5 ...
Страница 34: ...34 4 ...
Страница 35: ...35 ISO 1 ISO 2 ISO A B 1 2 3 4 12 5 6 7 ACC 8 ...
Страница 36: ...36 1 OPEN SD EJECT 2 TA TA 3 SCAN 4 PTY CLK PTY RDS 5 1 6 6 OSD 7 RPT ...
Страница 38: ...38 20 21 22 USD SD AUX 23 EJECT 24 AF AF OPEN 1 LED 2 RESET 3 ...
Страница 40: ...40 RESET OPEN RESET POWER POWER 3 VOL MUTE MOD AUX RADIO DISK USB CARD USB CARD DISK ...
Страница 42: ...42 RDS RDS BAND NP SUB BND TA SYS FM1 FM2 FM3 AM1 AM2 2 SEEK SEEK 6 5 SEEK 1 6 1 6 ...
Страница 44: ...44 TA ON OFF 2 BND TA SYS PTY FM RDS PTY CLK PTY PTY 2 ...
Страница 45: ...45 PBC PBC 1 3 1 2 3 ...
Страница 48: ...48 SD MMC PLAY PAUSE PLAY PAUSE PLAY PAUSE STOP STOP REVERSE 1 DVD VCD SLOW 1 2 1 3 1 4 1 5 1 6 1 7 2 ENTER ...
Страница 49: ...49 R AMS RPT RDM LOC AF RDM Intro 10 INT OSD ZOOM X2 X3 X4 1 2 1 3 1 4 AUDIO DVD DVD DVD ANGLE 1 ...
Страница 50: ...50 DVD 1 SUBTITLE 2 ENTER DVD 1 TITLE 2 3 ENTER PBC VCD VCD PBC 1 2 3 4 ENTER 5 STOP VCD 6 GOTO GOTO ...
Страница 52: ...52 3 3 3 MPEG 3 3 CD ROM CD R CD RW 3 ISO 9660 3 3 mp3 3 mp3 MP3 PC 8 256 3 8 VBR VBR ...
Страница 53: ...53 CD R CD RW MP3 3 44 1 128 256 3 ISO 9660 8 CD R MP3 CD R CD RW 3 3 3 CD R CD RW CD R CD RW 16 1 ID3TAG ...
Страница 54: ...54 SETUP ENTER 3 ...
Страница 55: ...55 INTERLACE YUV 4 3 PS 4 3 4 3 LB 4 3 16 9 16 9 0000 ...
Страница 56: ...56 1 8 1 8 8 ...
Страница 57: ...57 DVD DVD DVD ...
Страница 58: ...58 SPDIF RAW SPDIF PCM ...
Страница 59: ...59 ...
Страница 60: ...60 LINE OUT RF REMOD line out Full Off ...
Страница 61: ...61 1 PWR 2 OPEN 3 4 1 2 1 2 3 1 1 ...
Страница 62: ...62 CD 3 8 CD 3 CD ...
Страница 63: ...63 RESET 30 30 ...


