background image

3

Instruction manual

Utilization of the product


If you want to dispose this product, do not 

mix it with general household waste. There is a 
separate collection system for used electronic 
products in accordance with legislation that 
requires proper treatment, recovery and 
recycling.

Please contact your local authorities for 

the correct method of disposal. By doing so, 
you will ensure that your disposed product 
undergoes the necessary treatment, recovery 
and recycling and thus prevent potential 
negative effects on the environment and 
human health.

Important safeguards


•  The instruction manual contains important 

operating and maintenance instructions. For 
your safety, it is necessary to refer the manual. 
Keep the manual for use in future.

•  Do not hit or drop the unit.
•  Do not expose the unit to vibration, direct 

sunlight, too high or low temperature or humidity.

•  Do not disassemble the unit yourself. 

Refer servicing to qualified service personnel.

Power supply


•  Before the first connecting of the appliance 

check that voltage indicated on the rating label 
corresponds the mains voltage in your home.

•  Insert the plug into power supply.
Caution: Always unplug the appliance from 

power supply, when no use long time.

General operations

Power on/off

When the unit is connected to the current 

supply mains, slide POWER switch to ON 

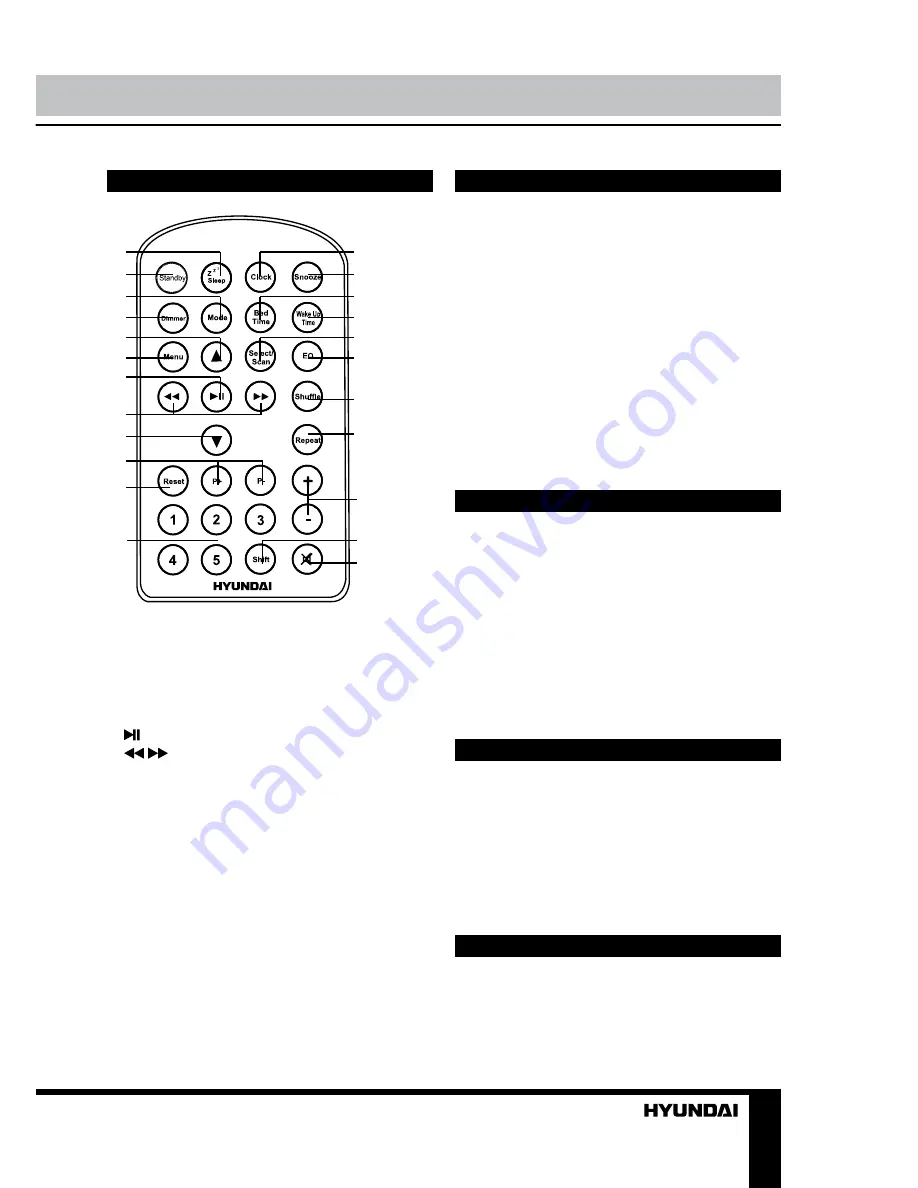
Remote controller


1
2
3
4
5
6
7

8
9

10
11

12

13
14
15
16

17
18

19

20

21

22
23

1. SLEEP button
2. STANDBY button
3. MODE button
4. DIMMER button
5. The button is not operable for this model
6. The button is not operable for this model
7.   button
8. 

/

 buttons

9. The button is not operable for this model
10. P+/P- buttons
11. RESET button
12. Number buttons
13. CLOCK button
14. SNOOZE button
15. BED TIME button
16. WAKE UP TIME button
17. SELECT/SCAN button
18. EQ button
19. SHUFFLE button
20. REPEAT button
21. +/- buttons
22. SHIFT button
23. MUTE button

Содержание H-AS1203U

Страница 1: ...АУДИОСИСТЕМА С USB SD И САБВУФЕРОМ USB SD AUDIO SYSTEM WITH SUBWOOFER Руководство по эксплуатации Instruction manual H AS1203U ...

Страница 2: ...l for reference in future Description Front panel 1 STBY MODE button 2 SLEEP CLOCK button 3 P button 4 Display 5 P button 6 button 7 PRESET button 8 IR sensor 9 EQ button 10 VOL ALARM2 button 11 VOL ALARM1 button 12 button Back panel 13 FM antenna 14 Power cord 15 POWER switch 16 Line input Not shown memory card slot top panel USB port top panel speakers left and right panel 1 2 3 4 5 6 7 8 9 10 1...

Страница 3: ...high or low temperature or humidity Do not disassemble the unit yourself Refer servicing to qualified service personnel Power supply Before the first connecting of the appliance check that voltage indicated on the rating label corresponds the mains voltage in your home Insert the plug into power supply Caution Always unplug the appliance from power supply when no use long time General operations P...

Страница 4: ...cept adjusting the volume Volume Press VOL ALARM2 and VOL ALARM1 buttons on the panel or buttons on the RC to adjust the sound volume level Press MUTE button on the RC to mute the sound press this button again to resume the sound Equalizer Press EQ button repeatedly to select an equalizer mode ROCK CLASS FLAT POP JAZZ Modes Press MODE button on the RC or STBY MODE button on the panel repeatedly to...

Страница 5: ...ard standard formats a small percentage of USB flash drives and SD cards might not be readable due to those device manufacturers non compliance with the full official USB and SD card standards FAT32 file system is supported by USB and SD of this unit According to the USB 1 1 2 0 Standard usage of a USB device with power current consumption exceeding 500 mA is not recommended without supplementary ...

Страница 6: ...l be placed on the unit Normal ventilation of the unit shall not be impeded for intended use Accessories Audio system 1 pc Audio cable 3 5 3 5 mm 1 pc Instruction manual 1 pc Warranty card 1 pc Consumer information 1 pc is set as alarm sound but no USB SD is connected the alarm sound is buzzer by default The alarm will sound for 60 minutes the alarm icon flashes during this period To stop the alar...

Страница 7: ...руководство для использования в будущем Описание Передняя панель 1 Кнопка STBY MODE 2 Кнопка SLEEP CLOCK 3 Кнопка P 4 Дисплей 5 Кнопка P 6 Кнопка 7 Кнопка PRESET 8 ИК датчик ПДУ 9 Кнопка EQ 10 Кнопка VOL ALARM2 11 Кнопка VOL ALARM1 12 Кнопка Задняя панель 13 FM антенна 14 Шнур питания 15 Переключатель POWER 16 Линейный вход Не показано на рисунке слот для карты памяти на верхней панели USB порт на...

Страница 8: ...ования Не наносите ударов по устройству не роняйте его Не подвергайте устройство вибрации воздействию прямых солнечных лучей вы соких или низких температур и влажности Не включайте радиоприемник в ванных комнатах около кухонных плит отопитель ного оборудования Не разбирайте корпус устройства само стоятельно Доверяйте ремонт устройства только квалифицированным специалистам В приборе находятся оголе...

Страница 9: ...кнопку CLOCK на ПДУ или кнопку SLEEP CLOCK на панели чтобы подтвердить установку часов В режиме настройки времени если никакая кнопка не будет нажата в течение 5 секунд устройство автоматически перейдет в режим часов Входной разъем AUX Вы можете прослушивать внешнее ау диоустройство через встроенные динамики данной аудиосистемы подключив внешнее устройство к приемнику при помощи линей ного разъема...

Страница 10: ...ок SHIFT 1 SHIFT 2 SHIFT 3 SHIFT 4 SHIFT 5 tдля ввода цифр 6 7 8 9 0 соответственно Для вызова сохраненной станции на жимайте кнопки P P Операции с USB SD Подсоединение USB SD Вставьте USB накопитель в USB порт данного устройства вставьте карту памяти в слот для карт памяти Устройство авто матически переключится в соответствую щий режим работы Начнется считывание подсоединенного носителя на диспле...

Страница 11: ...ку BED TIME VOL ALARM1 чтобы подтвердить установку будильника Нажимайте кратко кнопку BED TIME VOL ALARM1 для выбора звука сигнала будильника встроенный сигнал гудок радио USB SD На дисплее рядом с пиктограммой выбранного сигнала загорит ся синий индикатор Если в качестве сигнала будильника выбрано радио то при срабатывании бу дильника воспроизводиться будет послед няя прослушанная радиостанция Ес...

Страница 12: ...тийном талоне и на корпусе изделия Шестая седьмая и восьмая цифры обозначают год в интервале 2010 2019 и месяц производства Пример R31982101 01792 год производства 2011 месяц производства январь Технические характеристики FM диапазон радиочастот 87 5 108 MГц Поддержка носителей USB SD Дисплей Светодиодная подсветка высота симво лов 0 6 1 5 см Номинальное напряжение 220 В 50 60 Гц Номинальная потре...

Страница 13: ......

Отзывы: