


4
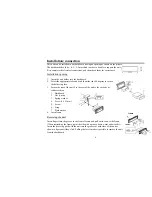
Installation/ connection
This unit can be installed in any dashboard having an opening as shown on the picture.
The dashboard should be ~ 4.5 – 5.5 mm thick in order to be able to support the unit.
First complete the electrical connections, and then check them for correctness.
Installation opening
1. Insert the unit holder into the dashboard.
2. Select the appropriate tabs and bend them the tabs 90 degrees to secure
the holder in place.
3. Secure the rear of the unit. Fix the rear of the unit to the car body by
rubber cushion.
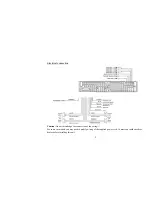
1. Dashboard
2. Nut (5 mm)
3. Spring
washer
4. Screw (5 x 25 mm)
5. Screw
6. Strap
7. Plain
washer
4. Insert
frame.
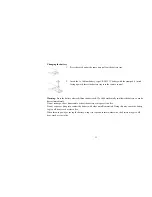
Removing the unit
Insert fingers into the groove in the front of frame and pull out to remove the frame.
(When reattaching the frame, point the side with a groove down wards and attach it.)
Insert the levers supplied with the unit into the grooves at both sides of the unit as
shown in figure until they click. Pulling the levers makes it possible to remove the unit
from the dashboard.
frame
lever
Содержание Excellence H-CDM4007
Страница 38: ...38 38 39 40 43 49 53 56 57 3 66 68 72 73 74 75...
Страница 39: ...39 10...
Страница 40: ...40 4 5 5 5 1 2 3 1 2 5 3 4 5 x 25 5 6 7 4...
Страница 41: ...41...
Страница 42: ...42...
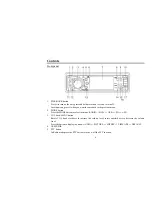
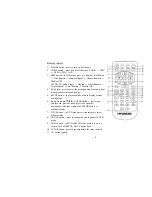
Страница 43: ...43 1 PWR B CK SETUP 2 MODE MODE RADIO DISK USB SD AUX 3 MENU VOL MENU...
Страница 45: ...45 12 LOUD LOUD 13 TA RADIO TA TA 14 EQ 15 AUX 16 MUTE 17 USB 18 SD MMS 19 20 EJECT 21 RESET...
Страница 48: ...48 Radio 27 BAND P N DVD VCD PAL MULTI NTSC 28 ST AUDIO FM DVD VCD 1 2 CR 2025 3V 3 6...
Страница 49: ...49 RESET PWR BACK VOL VOL VOL VOL 0 63 Mute MUTE...
Страница 52: ...52 14 1 4 DVD DISP VCD CD DISP...
Страница 53: ...53 RDS RDS BND P N BND PLAY PAUSE FM1 FM2 FM3 AM 24 18AM 6AM BND FM AM 1 6 1 6...
Страница 54: ...54 AMS RPT PROG AMS 5 AMS RPT 6 AMS RPT LOC SUB T ST AUDIO RDS PI PS TP PTY TA AF DATA PI PS...
Страница 56: ...56 PBC PBC 1 3 1 2 3...
Страница 59: ...59 4 5 MODE DVD DVD MP3 PLAY 6 REL 7 EJECT 8 11 SD MMC USB SD MMC USB SOURCE MODE PLAY PAUSE PLAY BND...
Страница 60: ...60 STOP PLAY STOP x2 x4 x8 x16 x32 DVD VCD SLOW 1 2 1 4 1 8 1 16 NORMAL SEEK RPT AMS RPT...
Страница 61: ...61 A B DVD VCD 1 0 A B 2 0 A B 3 CD VCD MP3 RDM SEEK DVD P N BAND NTSC PAL AUTO DVD DVD ANGLE DVD DVD ST AUDIO...
Страница 63: ...63 3 ENTER PBC VCD VCD PBC 1 1 PBC 2 3 ENTER 4 STOP VCD 5 PBC 1 AMS PROG 2 ENTER 3 4 ENTER 5 PLAY GOTO DVD VCD...
Страница 65: ...65 MP3 MP3 MP3 MP3 MP4 WMA Divx MP3 MP3 Divx MP4 WMA MP3 PREV NEXT...
Страница 67: ...67 ISO 9660 8 CD R MP3 CD R CD RW 3 CD R CD RW CD R CD RW 16 1 ID3TAG...
Страница 68: ...68 1 SETUP 2 3 ENTER PLAY 4 5 SETUP T 4 3 PS 4 3LB 16 9 4 3 4 3 DVD DVD 16 3 4 3 DVD DVD...
Страница 69: ...69 LT RT PRO LOGIC Dolby 5 1 5 1 CH SPDIF SPDIF SPDIF L R LS RS SPDIF RAW...
Страница 70: ...70 SPDIF PCM DVD Dolby Digital LPCM PAL NTSC Multi Multi NTSC PAL NTSC PAL SETUP NTSC PAL DVD MULTI PAL NTSC...
Страница 71: ...71 AUDIO SUBTITLE 8 DVD 5 1 6 136900...
Страница 72: ...72...
Страница 73: ...73...
Страница 74: ...74 POWER 10 30 30...
Страница 76: ...76 2 RMS 3 20 20 A vtd 55 30 65 1 CD 2000...


