background image

ADDITIONAL INFORMA

TION

OPERATIONS

How to use buttons & adjustment on the unit

Communicating Function

Turn power switch ON. Use the slide switch for volume and brightness controls.

1. Visitor presses the “Call” button on the outside camera unit.

The monitor’s speaker will sound a “chime” tone to announce that a visitor is at
the door.

2. Upon viewing the monitor’s CRT screen and the visitor’s image, you have two choice ;

A. You can choose to “not respond” (by not lifting the handset) The visitor’s

image will disappear from the monitor’s CRT screen within 30 seconds

B. You can choose to “respond” by lifting the handset and talking to the visitor as if

using a telephone. The visitor’s image will remain on the CRT screen for 180
seconds, or until the handset is replaced back into the cradle.

3. After speaking with the visitor, and if you have installed an electronic door locking

system, you can push the “Open” button(        ) to electronically unlock the door.

4. Press the call button(        ) to call the additional monitor as an intercom.

BUTTON

DESCRIPTION

Monitor

ON/OFF of screen, talk through door camera

Intercom

Activate an talk with the intercom

Door Door 

release

Time

Time Adjustment (Enter or Move: Use Time button, 

:Use Record

button,   

:Use Review button)

Rec

Record manually. Automatic recording in case of the “Absence”

mode

Review

Review recorded pictures

Away

Set or Reset “Absence” mode or quit the review

ADJUSTMENT

DESCRIPTION

Brightness adjustment. (In the hook) After pick up the handset,

user can adjust the brightness of screen (Mode: Normal/ Brighter)

Volume adjustment. (In on hook) After placing the handset, user

can adjust the volume of sound (Mode: Normal/ Louder)

Содержание HA-200

Страница 1: ...tion Please read these instructions completely and keep it for future reference HA 200 HAC 200 Hanmi Building 45 Pang E Dong Songpa Ku Seoul 138 724 Korea Tel 82 2 2240 9234 9271 9273 Web site www hyundaitel com 6320000026H Hyundai Telecom Printed in Korea ...

Страница 2: ... installed and used in accordance with the instructions may cause harmful interference to radio communication However there is no guarantee that interference will not occur in a particular installation If this equipment does cause harmful interference to radio or television reception which can be determined by turning equipment on and off the user is encourage to try to correct the interference by...

Страница 3: ...e unit by battery or other power source consult the operating instructions 10 Grounding and Polarization This unit may be equipped with either a polarized 2 wire AC line plug a plug having one blade wider than the other or a 3 wire grounding type plug a plug having a third grounding pin The 2 wire polarized plug will fit into the power outlet only one way This is a safety feature If you are unable...

Страница 4: ...el 6 Parts Enclosed 8 INSTALLATION WIRING Installation 10 Wiring 11 OPERATIONS How to use Buttons and adjustment on the unit 14 Communication function 14 ADDITIONAL INFORMATION Troubleshooting Guide 16 Specifications 17 Warranty Condition 19 UNIT COMPONENTS ...

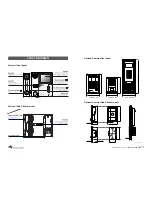
Страница 5: ...AI Video Door Phone HA 200 HAC 200 06 07 UNIT COMPONENTS Main unit Front panel Main unit Side Bottom panel Optional Cameras Front panel Optional Cameras Side Bottom panel HCB HCC 300 HCB HCC 500 HCB HCC 600 ...

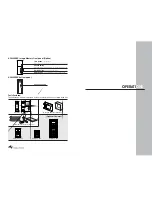
Страница 6: ...andset Cable Screw Wrench Manual HCB HCC 300 HCB HCC 500 HCB HCC 600 Main Mounting Bracket Flush Box Optional Cameras Time Button Time Adjustment Record Button Record manually Automatic recording in case of the Absence mode Review Button Review recorded pictures Away Button Set or Reset Absence mode quit the review Time Record Review Away Connecting Part OPERATIONS ...

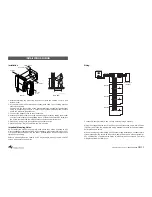
Страница 7: ...otes Do not install the monitor and camera units where they will be exposed to dirt direct sunlight or other strong light direct moisture high temperature over 40 C or high humidity conditions Do not select an installation location subjected to vibration or pounding Select a mounting location close to an AC outlet where it is easy to view the CRT screen and operate the monitor INSTALL WIRING Wirin...

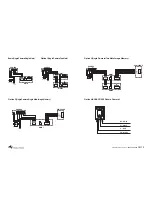
Страница 8: ... V DP V0 V V DP V0 V V DP 1 2 3 4 5 6 1 2 3 4 1 2 HVM 200C B 1 2 3 4 5 6 1 2 3 4 1 2 MONITOR INTERCOM HVM 200B C INT V INT V V0 V V DP V0 V V DP MONITOR HVM 200B C 1 2 3 4 5 6 V V VIN VOUT MON CALLD CAMERA MAIN1 MAIN2 Power Door Release 1 2 3 4 5 6 1 2 3 4 1 2 HVM 200C B 1 2 3 4 5 6 1 2 3 4 1 2 MONITOR INTERCOM HVM 200B C V0 V V DP V0 V V DP V0 V V DP INT V INT V MONITOR DP White V Black V Red V0 ...

Страница 9: ... seconds or until the handset is replaced back into the cradle 3 After speaking with the visitor and if you have installed an electronic door locking system you can push the Open button to electronically unlock the door 4 Press the call button to call the additional monitor as an intercom BUTTON DESCRIPTION Monitor ON OFF of screen talk through door camera Intercom Activate an talk with the interc...

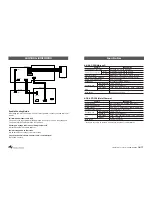
Страница 10: ...th of camera on the table indicates from wall surface after installation Remark Specification Voltage Requirements 90 250V AC 50 60 Hz Smps Power Consumption B W Maximum 30VA Stand by 5VA Color Maximum 28VA Stand by 5VA Monitor Screen B W Flat 4 Flat type Color 4 TFT LCD Maximum Wiring Distance 50m 165 feet 22 AWG 0 65mm 4wire Audio Communication Duplex handset Extensions Monitor or Image memory E...

Страница 11: ...nt Type HYUNDAI Video Door Phone HA 200 HAC 200 18 19 Warranty Conditions Products are supplied with one 1 year return to base warranty From the date of purchase We will repair or replace the defective item with a new or factory rebuilt replacement Condition 1 This warranty applies to the original purchaser only 2 All warranty will be invalid if unauthorized repair or modification are made to the ...

Страница 12: ...Memo ...

Отзывы: