


58
www.hyundaipowerproducts.co.uk
01646 687 880
Spare Parts
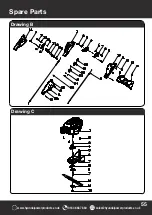
Drawing B
Drawing Number
Spare Part Name
Part Number
HYM510SPE-B1
Upper Cover of Left Panel
1149019
HYM510SPE-B2
Screw
1149020
HYM510SPE-B3
Spring
1149021
HYM510SPE-B4
Handle Assy
1149022
HYM510SPE-B5
Cable
1145023
HYM510SPE-B6
Nut
1290064
HYM510SPE-B7
Bolt
1149025
HYM510SPE-B8
Screw
1149026
HYM510SPE-B9
Screw
1149027
HYM510SPE-B10
Lower Cover of Left Panel
1149028
HYM510SPE-B11
Screw
1290070
HYM510SPE-B12
Screw
1149030
HYM510SPE-B13
Handle panel
1149031
HYM510SPE-B14
Upper Cover of Right Panel
1149032
HYM510SPE-B15
Bush
1149033
HYM510SPE-B16
Fixed Plate
1149034
HYM510SPE-B17
Plastic Grip
1001019
HYM510SPE-B18
Operating Grip
1149036
HYM510SPE-B19
Spring
1149037
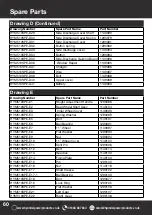
Drawing Number
Spare Part Name
Part Number
HYM510SPE-C1
Engine
1143045
HYM510SPE-C2
Screw
1149046
HYM510SPE-C3
Flat Key
1149047
HYM510SPE-C4
Blade adapter
1149048
HYM510SPE-C5
Screw Cap
1290042
HYM510SPE-C6
Belt Cover
1143050
HYM510SPE-C7
Screw
1290044
HYM510SPE-C8
Belt Cover Plate
1149052
HYM510SPE-C9
Belt Cover Plate
1149053
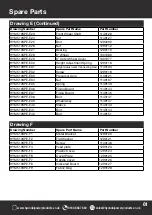
HYM510SPE-B20
Key
1149038
HYM510SPE-B21
Key Holder
1149039
HYM510SPE-B22
Screw
1149040
HYM510SPE-B23
Button
1149041
HYM510SPE-B24
Cable Holder
1290028
HYM510SPE-B25
Cable
1149043
HYM510SPE-B26
Lower Cover of Right Panel
1149044
Drawing C