Hytera BD61 Series Скачать руководство пользователя страница 5


Documentation Information 

This section describes the conventions and revision history of this document.   

Documentation Conventions 

Instruction Conventions 

Icon 

Description 


Indicates information that can help you make better use of your product. 


Indicates references that can further describe the related topics. 


Indicates situations that could cause data loss or equipment damage. 


Indicates situations that could cause minor personal injury. 


Indicates situations that could cause major personal injury or even death. 

Notation Conventions 

Item 

Description 

Example 

Boldface 

Denotes menus, tabs, parameter names, 

window names, dialogue names, and 

hardware buttons. 

To save the configuration, click 

Apply

The 

Log Level Settings

 dialogue box appears. 

Press the 

PTT

 key. 

" " 

Denotes messages, directories, file names, 

folder names, and parameter values. 

The screen displays "Invalid Battery!". 

Open "PDT_PSS.exe". 

Go to "D:/opt/local". 

In the 

Port

 text box, enter "22". 

Directs you to access a multi-level menu. 

Go to 

File

 > 

New

Italic


Denotes document titles. 

For details about using the DWS, refer to 

Dispatch Workstation User Guide

Courier New 

Denotes commands and their execution 

results. 

To set the IP address, run the following 

command: 

vos-cmd - m name IP


Содержание BD61 Series

Страница 1: ...BD61X Digital Portable Radio User Manual Hytera Communications Corporation Limited...

Страница 2: ...escription of the functions and step by step procedures for use To avoid bodily injury or property loss caused by incorrect operation please carefully read the Safety Information Booklet before use Th...

Страница 3: ...y rights to the purchaser regarding the Company s computer programs The Company s computer programs may not be copied modified distributed decompiled or reverse engineered in any manner without the pr...

Страница 4: ...Clip 6 3 5 Attaching the Audio Accessory 6 3 6 Checking the Battery Power 6 4 Basic Operations 7 4 1 Turning the Radio On or Off 7 4 2 Adjusting the Volume 7 4 3 Selecting a Zone 7 4 4 Selecting a Cha...

Страница 5: ...n death Notation Conventions Item Description Example Boldface Denotes menus tabs parameter names window names dialogue names and hardware buttons To save the configuration click Apply The Log Level S...

Страница 6: ...2 Revision History Version Release Date Description R2 0 November 2018 Updated the version R1 0 September 2016 Initial release...

Страница 7: ...maged contact your dealer Item Quantity PCS Item Quantity PCS Radio 1 Antenna 1 Battery 1 Belt Clip 1 Charger 1 Strap 1 Power Adapter 1 Documentation Kit 1 Figures in this manual are only for referenc...

Страница 8: ...gnable radio features 2 3 LED Indicator LED Indicator Radio Status Flashes green The radio is being turned on Glows green The radio is receiving Glows red The radio is transmitting Flashes orange slow...

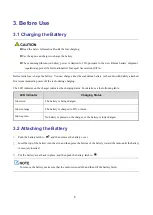
Страница 9: ...e LED indicator on the charger indicates the charging status For details see the following table LED Indicator Charging Status Glows red The battery is being charged Glows orange The battery is charge...

Страница 10: ...e and then use the screwdriver to tighten them 3 5 Attaching the Audio Accessory Rotate the screws on the accessory connector cover counterclockwise to open it Plug the accessory into the accessory co...

Страница 11: ...nob clockwise or counterclockwise 4 3 Selecting a Zone A zone is a group of channels within the same operational area The radio supports up to three zones each of which contains up to 16 channels To s...

Страница 12: ...b to select the required channel and then press and hold the PTT key to initiate a call to the private group all call contact preset on the channel If the One Touch Call feature is configured by your...

Страница 13: ...itiate an emergency call whenever your radio is transmitting or receiving Press the preprogrammed Emergency On key to initiate an emergency call to the preset contact With the Alarm w Call to Follow f...

Страница 14: ...In this way the feature prevents a channel from being occupied for an extended period and avoids potential radio damage caused by overheating The feature is enabled by default Keypad Lock The feature...

Страница 15: ...transmitted audio signals Only the receiving radio with the same scrambler setting can restore the audio signals This prevents eavesdropping and ensures communication privacy Press the preprogrammed S...

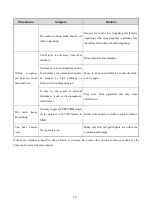
Страница 16: ...e the volume The antenna may be loose or may be installed incorrectly Turn off the radio remove and reattach the antenna The speaker may be blocked Clean the surface of the speaker You cannot communic...

Страница 17: ...ngs or blocked in an undergound area Move to an open and flat area restart the radio and try again It may be the result of external disturbance such as electromagnetic interference Stay away from equi...

Страница 18: ...tor cover when no accessory is in use 8 2 Product Cleaning Turn the product off and remove the battery before cleaning Clean up the dust and fine particles on the product surface and charging piece wi...

Страница 19: ...ontact your dealer for the optional accessories of the product Use the accessories specified by the Company only Otherwise the Company shall not be liable for any losses or damages arising out of use...

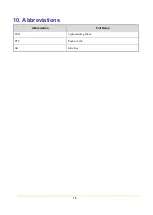
Страница 20: ...16 10 Abbreviations Abbreviation Full Name LED Light emitting Diode PTT Push to Talk SK Side Key...

Страница 21: ...unications Corporation Limited 2021 Hytera Communications Corporation Limited All Rights Reserved Address Hytera Tower Hi Tech Industrial Park North 9108 Beihuan Road Nanshan District Shenzhen People...

Отзывы: