HYPE 018-1560 Скачать руководство пользователя страница 10

Seite 10

Best.-Nr. / Item-No. / art. 018-1570/1560

Setzen Sie den LiPo-Akku in den vorderen Teil des 

Rumpfes, wie dargestellt. / Put the LiPo-Battery in the 

nose of the fuselage as shown below. / Inserire la batteria 

LiPo nella parte anteriore della fusoliera come mostrato 

in foto.

Abschließend wird die Kabinenhaube auf den vorderen 

Teil des Rumpfes aufgesetzt, wie dargestellt. / Put the 

canopy on the front part of the fuselage as shown below. 

/ Ora montare la cabina di pilotaggio sulla parte anteriore 

della fusoliera come mostrato in foto.

Prüfen Sie nun, ob sich alle Ruder korrekt bewegen. 

Sender einschalten und den geladenen Antriebsakku 

im Modell anschließen. Betätigen Sie der Reihe nach 

alle Funktionen am Sender. Vorsicht im Umganmg mit 

der drehenden Luftschraube! / Check the function of all 

rudders. Switch on the transmitter and connect the LiPo-

Battery to the controller in the model. Move all rudders 

one by one. Attention! Be careful with the rotating pro-

peller! / Verificate ora che tutte le parti mobili si muovano 

correttamente: accendere la trasmittente e collegare al 

batteria caricata nel modello. Ora provare tutte le funzioni 

radio. Attenzione a non ferirvi con l'elica in rotazione!

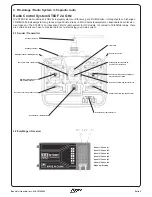
Stellen Sie die maximalen Ruderausschläge gemäß der 

nachfolgenden Werte ein. / Adjust the maximum travel of 

the control flaps according to the sketch below. / regolare 

le escursioni massime dei piani mobili come segue:

Höhenruder / Elevator / piano di quota

ziehen / pull / tirare

Höhenruder / Elevator / piano di quota

drücken / push / spingere

Seitenruder links

Rudder left

timone sx

Seitenruder rechts

Rudder right

timone dx

Motor / Motor / motore

Aus / Idle / minimo

Motor / Motor / motore

Vollgas / Full Power / massimo

Querruder links

Aileron left

alettoni sx

Querruder rechts

Aileron right

alettoni dx

SEITENRUDER

RUDDER

TIMONE

HÖHENRUDER

ELEVATOR

PIANO DI QUOTA

QUERRUDER

AILERON

ALETTONI

Abschließend muss der Schwerpunkt am Modell über-

prüft werden. Dazu werden alle Komponenten (auch der 

Akku!) im Modell montiert. Der Schwerpunkt liegt 

46 mm


hinter der Nasenleiste. Unterstützen Sie das Modell ex-

akt im Schwerpunkt und beobachten Sie, wie das Modell 

auspendelt. Die Nase des Modell sollte sich leicht nach 

unten neigen. Dann ist der Schwerpunkt optimal justiert. 

/ Before the first flight you have to check the center of 

gravity. For doing so you have to mount all components 

(also the battery!) in to the model. The CG is placed 

46 

mm

 behind the nose cone of the main wing. Support the 

model exactly in the CG and watch the fuselage. The 

nose should point slightly to the ground. Then the CG is 

placed correctly! / Ora verificate il baricentro del modello. 

A questo scopo dovete montare tutti i componenti nel 

modello, anche la batteria. Il baricentro si trova 

46 mm


dietro il bordo d'entrata. Sostenete  il modello esattamen-

te nel baricentro tre due dita e fatelo bilanciare. Dovreb-

be risultare leggermente picchiato.

Schwerpunkt

Center Of Gravity

baricentro

46mm

Содержание 018-1560

Страница 1: ...vata robustezza con un peso molto ridotto Ali e coda sono rinforzate con un tondino in carbonio Il modello è motorizzato con un motore elettrico brushless con batterie LiPo Grazie all alto grado di prefabbricazione l assemblaggio del modello si termina in poco tempo Best Nr 018 1570 RTF Best Nr 018 1560 ARF Wichtiger Hinweis Bitte bewahren Sie diese Dokumentation für Ersatzteilbestellungen auf FOX...

Страница 2: ...y paesi di distribuzione Der Verkauf und Betrieb dieser Systeme ist in folgenden Ländern möglich AT BE DE DK IT NL In nicht EU Mit gliedsstaaten müssen die dort geltenden Zulassungsvorschriften beachtet werden The radio system is allowed to be used and sold in the following contries AT BE DE DK IT NL In other countries you have to check the legal regulations L impianto radio è omologato per essere...

Страница 3: ... points you have to consider before you start using your radio system 2 1 Sender Transmitter 2 2 Empfänger Receiver Kanal 1 Channel 1 Kanal 2 Channel 2 Kanal 3 Channel 3 Kanal 4 Channel 4 Kanal 5 Channel 5 Kanal 6 Channel 6 Bindung Binding Antenne Antenna Tragebügel Holder Motor Trimmung Motor Trim Querruder Gas Knüppel Aileron Motor Stick Querruder Trimmung Aileron Trim Hauptschalter Main Switch ...

Страница 4: ... outside of the model Make sure that the last 30mm of the antenna are 100 straight At the thicker part of the antenna the antenna can be secured with glue to the model Achten Sie darauf dass das aktive Ende der Empfängerantenne mindestens 25mm von Metall oder Carbon Teilen entfernt ist Make sure that there are no metal or carbon parts closer than 25 mm to the active part of the RX antenna 2 5 Betr...

Страница 5: ...lten Sie gleichzeitig den Sender ein Die gründe LED am Sender fängt an zu blinken Push and hold the bind switch while you switch on the transmitter The green LED on the transmitter starts flashing Nach ca zwei Sekunden erlischt die LED im Empfänger After about two seconds the LED in the receiver is off Lassen Sie den Bind Switch am Sender los und entfernen Sie das Jumper Kabel vom Empfänger Releas...

Страница 6: ...fully and disconnect the plug from the battery box Überprüfen Sie auf welcher Seite die Ratsche für die Gas Funktion liegt Ggf müssen die Ratsche und die Feder nebst Rückholhebel an den Knüppelagregaten getauscht werden Abschließend das Batterie Anschlusskabel wieder auf der Platine einstecken und das Gehäuse mit den Schrauben schließen Afterthat reconnect the battery box with the mainboard close ...

Страница 7: ...omatische Voll Erkennung des Akkus und schaltet bei Erreichen der Ladeschluss Spannung automatisch ab Wenn die grüne LED erlischt ist der Ladevorgang abgeschlossen Plug the balancer connector of the LiPo Battery into the charging port The green LED indicates the charging process The charger s delta peak detection iterrupts the charging process automatically when the battery is fully charged The gr...

Страница 8: ...me mostrato in foto nella guiana in carbonio 4 Die Montage des Modells The Assembly L assemblaggio Nehmen Sie den Rumpf und das Höhenleitwerk zur Hand und hängen Sie das Höhenrudergestänge im Ruderhorn ein Take the fuselage and the horizontal stabilizer in hand Connect the elevator linkage to the elevator horn Prendere fusoliere e impennaggi agganciare le aste di comando del piano di quota nella s...

Страница 9: ... cavi dei servi degli alettoni con la ricevente come mostrato in foto Fate attenzione ai segni sulle spinette Abschließend auf beiden Seiten die Schrauben des Tragflächenverbinders festziehen um die Tragflächen zu verriegeln Tighten on both sides the screws of the wing joiner to lock the wing halfs securely Ora serrare le viti della baionetta da entrambi lati per bloccare le ali Empfängerantenne a...

Страница 10: ...rsioni massime dei piani mobili come segue Höhenruder Elevator piano di quota ziehen pull tirare Höhenruder Elevator piano di quota drücken push spingere Seitenruder links Rudder left timone sx Seitenruder rechts Rudder right timone dx Motor Motor motore Aus Idle minimo Motor Motor motore Vollgas Full Power massimo Querruder links Aileron left alettoni sx Querruder rechts Aileron right alettoni dx...

Страница 11: ... to idle the motor has to stop completely Putting the throttle stick to full power the motor has to reach its maximum rpm Portando lo stick motore in posizione minimo il motore si deve fermare in posizione massima invece deve andare ai massimi giri 5 2 Startvorgang Take Off partenza Starten Sie prinzipiell immer gegen den Wind Alwas start the model against the wind Partite sempre contro il vento Ü...

Страница 12: ...ie Ursache falls Sie keine Kontrolle mehr über das Modell haben Berühren Sie keine rotierenden und oder heißen Motorteile während des Betriebes oder der Abkühlphase Warten Sie Ihr Modell nach jedem Einsatz und ersetzen Sie Verschleißteile um einen sicheren Betrieb zu gewährleisten Fassen Sie das Modell während und nach dem Betrieb stets so an daß Sie keinesfalls mit Teilen des Antriebs in Berührun...

Страница 13: ... Do not touch any moving or hot motor parts during action Let all components cool down before you handle them Check your model carefully after each flight Replace parts if they are worn out or if they are defective Keep your hands out of reach from rotating or hot parts of the model Keep in mind that plastic parts easily break under cold temperature conditions If you are a novice in flying you sho...

Страница 14: ...i a non toccare parti calde motore silenziatore batteria motore o parti rotanti del modello controllate tutte le parti del modello dopo ogni uso e sostituite parti che mostrano segni di logoramento assicuratevi di non venire a contatto durante e dopo l uso con parti della propulsione e trasmissione a temperature basse le parti in plastica perdono di resistenza e diventano più fragili se siete un n...

Страница 15: ...äre der Akku unbrauch bar und zu entsorgen 5 Beschädigte Zellen Keine Weiterverwendung von beschädigten Zellen Kennzeichen beschädigter Zellen Verformung beschädigte Folie Geruch oder Auslauf von Elektrolyten Gesetzliche Entsorgungsvorschriften Akku Sondermüll beachten 6 Warnhinweise Nicht ins Feuer werfen Nicht in Flüssigkeiten jeglicher Art eintauchen jeglichen Kontakt mit Flüssigkeiten vermeide...

Страница 16: ...s unattended Charge in an isolated area away from flammable materials Let the battery cool down to ambient temperature before charging Do not charge battery packs in series Charge each battery pack individually Overcharging of one or the other battery may occur resulting in fire When selecting the cell count or voltage for charging purposes select the cell count and voltage as it appears on the ba...

Страница 17: ...ola se la pellicola è danneggiata non usare più la batteria montare la batteria in maniera tale che non si deforma temperature sopra 70 C possono danneggiare la cassa in quest caso smaltire la batteria e non usarla più 5 batterie danneggiate non usare batterie danneggiate come si riconoscono celle danneggiate deformazione pellicola rotta odore strano fuoriuscita dell elettrolyt smaltire secondo le...

Страница 18: ...uselage with servos fusoliera con servi 018 1552 Tragflaechen mit Servos wings with servos ala con servi 018 1553 Hoehenruder elevator piano di quota 018 1554 BL Motor brushless motor motore brushless 018 1555 Brushless Regler speed controller regolatore di giri 018 1556 Servo 9g servo 9g servo 9g 018 1557 Balancer Ladegerät balancer charger caricatore balancer 018 1558 LiPo Akku 11 1V 1300mAh LiP...

Страница 19: ...gerte Geltendmachung der Garantie zurückzuführen sind übernehmen wir keine Garantie 2 Zur Geltendmachung der Garantie ist die Vorlage eines Garantiebelegs und des beanstandeten Modells oder Bauteils erforderlich Als Garantiebeleg gilt der Servicebegleitschein sowie auch der Verkaufsbeleg wenn auf dem Verkaufsbeleg der Modelltyp mit der Bestellnummer vom autorisierten Hype Fachhändler vermerkt ist ...

Страница 20: ...onti di KYOSHO Deutschland GmbH ai sensi della presente garanzia sussistono in aggiunta ai diritti spettanti per legge e non limitano in alcun modo questi ultimi 4 Durata della garanzia 1 La garanzia ha una durata di due anni a decorrere dalla data dell acquisto presso il rivenditore autorizzato KYOSHO 2 L esecuzione di prestazioni in garanzia non comporta una nuova decorrenza del termine né una p...

Страница 21: ...derungen in Bezug auf Gesundheit und Sicherheit gemäß Artikel 3 1 a Protection requirements concerning health and safety requirements pursuant to Article 3 1 a Angewendete Normen EN60950 1 2006 Standards applied Schutzanforderungen in Bezug auf die elektromagnetische Verträglichkeit gemäß Artikel 3 1 b Protection requirements concerning electromagnetic compatibility pursuant to Article 3 1 b Angew...

Страница 22: ...Seite 22 Best Nr Item No art 018 1570 1560 Für Ihre Notizen ...

Страница 23: ...Seite 23 Best Nr Item No art 018 1570 1560 Für Ihre Notizen ...

Страница 24: ...romotoren Zubehör Best Nr 018 1570 03 2010 Copyright by Hype D 24568 Kaltenkirchen Technische Änderungen sind ohne vorherige Ankündigungen möglich Jeder Nachdruck auch auszugsweise bedarf unserer ausdrücklichen schriftlichen Genehmigung Hype Nikolaus Otto Str 4 D 24568 Kaltenkirchen helpdesk hype rc de www hype rc de Helpdesk 04191 932678 ...

Отзывы: