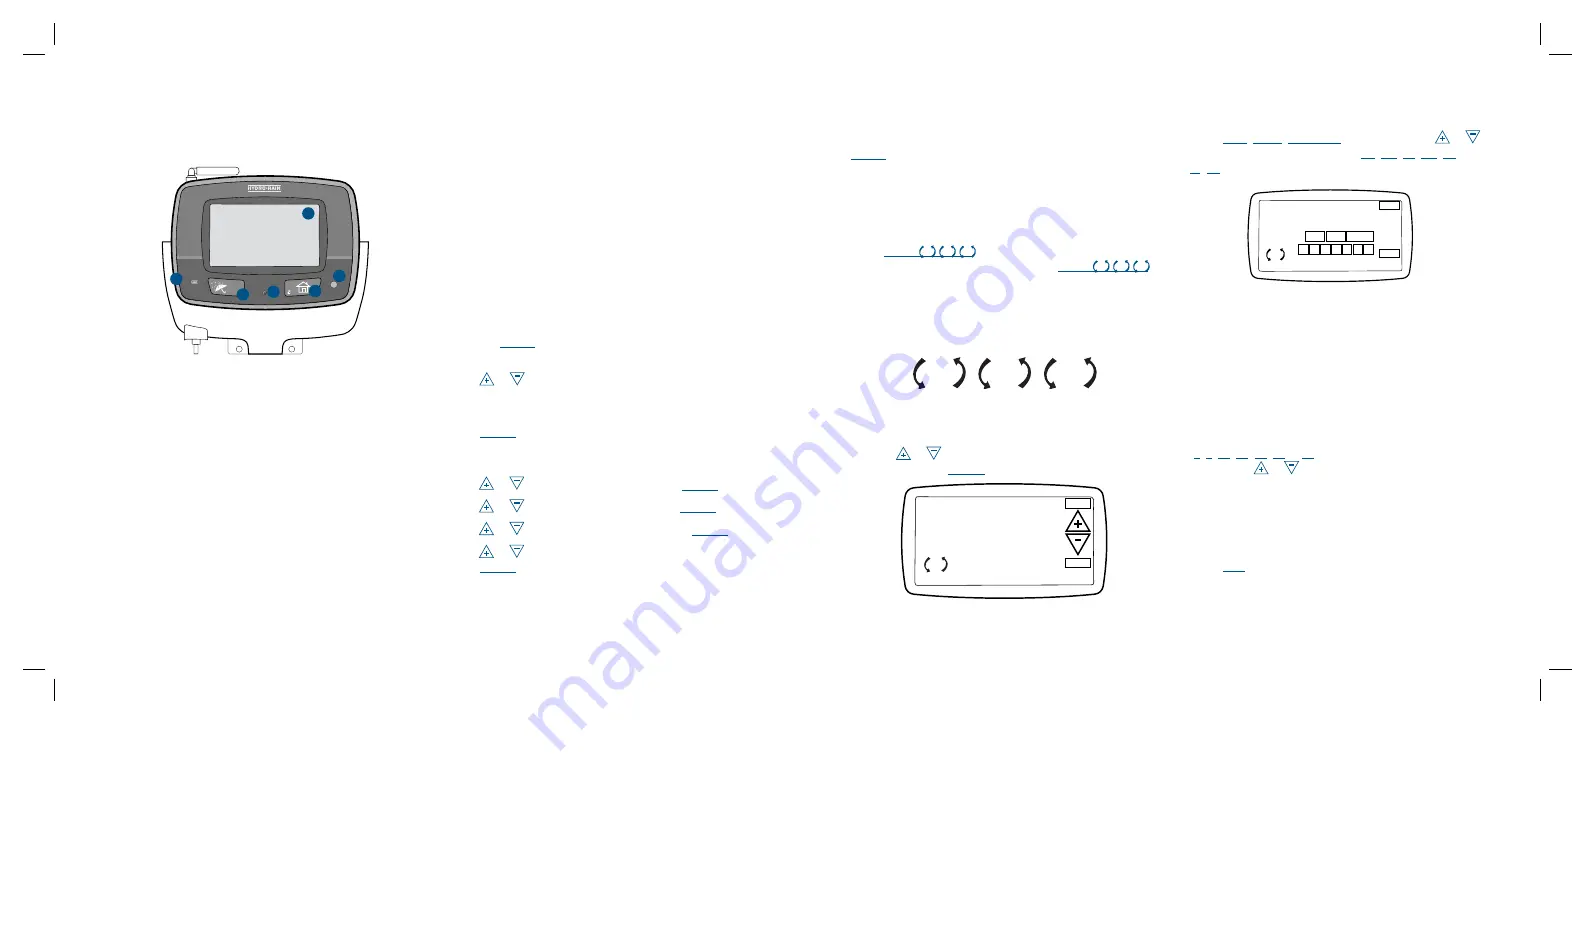
HYDRO-RAIN HRC-300 Series Скачать руководство пользователя страница 3

Push Buttons

These push buttons on the controller are used for pro-
gramming and other operations:

1  home/Lock

         used to exit settings; to go into auTo ModE, or to  
 

lock the touch screen.


2  System Off 
 

a single push will open the rain delay screen. a  


second push of the button will place the entire  


system in off mode. 


3  reset (pin hole)  

       resets the HrC 300 to factory default settings.


4  rF Sync  

       allows the HrC 300 to synchronize with a remote  
 

transmitter or wireless rain sensor (HrC-300-12-rS)  


sensor.


5  rain Sensor  


In “active” position the controller will monitor the  


rain sensor, in “Bypass” position the HrC 300    


sprinkler controller will ignore the rain sensor. (This  


switch is for hard wired sensors only and does not  


effect wireless rain sensors. for wireless rain sensor  


bypass refer to section 4.) 

6  Touch Screen  


use stylus or finger to set programming.

Section 2:

 GETTInG STarTEd

Set Language

•  Press the 

rESET

 button. The controller will now take  

    you through a step by step programming process.

•  Press      or      on the touch screen to set the language  

    of your choice (English, Spanish, french, German,  
    Italian).

•  Press 

EnTEr

.

Set current Time and Date

•  Press      or      to set the current time. Press 

EnTEr

•  Press      or      to set the current year. Press 

EnTEr

•  Press      or      to set the current month. Press 

EnTEr

•  Press      or      to set the current day of the month. 


    Press 

EnTEr

.

Determine a Watering Plan

See page 13 for instructions.

Section 3:

 ProGraMMInG Your ConTrollEr

Walk through programming is available after pressing the  

rESET

 button. (If you began the programming sequence 

with Section 1 do not press “reset” again.)

Program Toggle Feature

The Program Toggle feature allows you to switch back 
and forth between Program a, Program B and Program C. 
Press 

ProG.  a    B    C

  on the touch screen to select Pro-

gram a (“a” is larger than “B”) or Press 

ProG.  a    B    C 


on the touch screen to select Program B (“B” is larger than 
“a” etc.). You can change the watering start times, watering 
days, and watering durations for each program.

Set Start Times 

•  Press      or      to set the start time for the selected  

    program. Press 

EnTEr

.

Set Water Days

•  Press 

odd

EvEn

InTErval

  (1-32 days using      or      )  

    or the specific days of the week (

Su

Mo

Tu

We

Th

,  


fr

Sa

) you want the selected program to water. Press  


EnTEr

.

Set Station Watering Durations 

•  Select the first station to be watered by pressing the  

    station number (1 should be flashing) on the bottom  
    of the touch screen or press 

EnTEr

 to advance to the  

    desired station. 

note: The active station, being    

    programed, is flashing. 

•  Set the watering duration for each station by either: 


    1. Selecting one of the preset watering duration minutes  
    (

0

5

10

15

20

30

 or 

45

) on the bottom of the lCd. 

    2. using the      or      to enter the desired minutes.

note: a watering duration must be entered for each water-
ing station or the station will not water. 

•  Follow the same procedure to set the watering durations  

    for all other stations.

•  Press 

EXIT

.

at this point you will see the 

ProGraMMInG CoMPlETE


screen. If you wish to go back and change any of the set-

RF SYNC

HRC 300

RESET

RAIN SENSOR

ACTIVE | BYPASS

RF SYNC

SYSTEM

OFF

Figure 1:

 front view of touch-screen controller

SET START TIME

12:00

AM

ENTER

BACK

PROG.

A

Figure 3:

 Set Start Times

PROG.

A

PROG.

B

PROG.

C

Figure 2:

 Program Toggle feature

Figure 4:

 Set Watering days

SET  

ENTER

BACK

PROG.

A

ODD

Su Mo Tu We

Th

Fr

Sa

EVEN

INTERVAL

  WATERING DAYS

1

2

3

4

5

n


04


n

n


05


n

6

Содержание HRC-300 Series

Страница 1: ...nting PMS 2955 PMS color non printing PMS Registration BLACK Printers are responsible for meeting print production requirements Any changes must be approved by the client and Fluid Studio Printed piece must meet designated specifications on this form dimensions flat w 13 76 h 5 7 finished w 6 88 d NA h 5 7 hrc 300 Series Indoor Touch Screen Controller I n st r u cti o n M a n ua l RF SYNC HRC 300 ...

Страница 2: ... In order to ensure sufficient available flow for the A and B programs the C program should be reserved for low flow zones such as drip zones Docking Port Mounting your HRC 300 to the wall is easy and convenient The HRC 300 s docking port is affixed to the wall and all wires are connected to it The controllers programming unit is then conveniently slid in to the docking station This feature allows...

Страница 3: ...in Program Toggle Feature The Program Toggle Feature allows you to switch back and forth between Program A Program B and Program C Press PROG A B C on the touch screen to select Pro gram A A is larger than B or Press PROG A B C on the touch screen to select Program B B is larger than A etc You can change the watering start times watering days and watering durations for each program Set Start Times...

Страница 4: ...s of the activation of valves in se quence inside of a specified watering program A B or C Using multiple watering cycles is ideal for reducing runoff and standing water This sprinkler controller allows program A B or C or all to be repeated on the days programed When extra watering is needed all programs can be set to repeat the set watering durations up to 10 times a day In order to maximize abs...

Страница 5: ...king port labeled 24VAC See Figure 6 Insuring the transformer is not plugged in insert one of the two power leads from the transformer into each terminal socket using the phillips screwdriver to depress the terminal button this allows for wire insertion or removal Plug in the transformer WARNING Do not link two or more sprinkler controllers together with one transformer 4 Connect Valve Wires to Co...

Страница 6: ...cluded through each of the two holes Slide the remote control device into the sleeve Section 5 Diagnostics Circuit Breaker Smart Scan Diagnostic Fault Sensing A diagnostic fault sensor will automatically scan for the presence of a faulty solenoid or wiring short in a valve during each watering sequence If a faulty station is detected the sprinkler controller will move to the next working station S...

Страница 7: ...ering the first station An area where the watering irrigation is all controlled by a single control valve The connection point on the docking port where a wire is inserted See Program A B or C Used in conjunction with sprinkler controllers a device used to control the delivery of water to lawns plants and gardens Section 6 Glossary of Terms n 12 n n 13 n Determine a Watering Plan 1 For each wateri...

Страница 8: ...to Part 15 of the FCC Rules This Class B digital apparatus complies with Canadian ICES 003 These limits are designed to pro vide reasonable protection against harmful interference in a residential installation This equipment generates uses and can radiate radio frequency energy and if not installed and used in accordance with the instructions may cause harmful interference to radio communications ...

Страница 9: ...www hydrorain com 2 5 U n i o n A v e n u e N o r t h S a l t L a k e U T 8 4 0 5 4 1 888 HYDRORAIN ...

Отзывы: