


C:\TEMP\ml59101.doc | Revised: 20JUN18 | Page 23 of 39
MP44.3500
04JUN18
TIFFIN MOTOR HOMES WITH SINGLE STEP AIR LEVELING
FRONT AIR MANIFOLD PRESSURE REGULATOR ADJUSTMENT
DO NOT CRAWL UNDER THE VEHICLE WHEN SUPPORTED WITH THE SUSPENSION AIR BAGS.
PROPERLY SUPPORT THE VEHICLE FRAME BEFORE CRAWLING UNDER THE VEHICLE TO ADJUST THE FRONT
WARNING:
MANIFOLD AIR REGULATOR OR TO PERFORM OTHER WORK.
NOTE: It is best if the vehicle is on a flat level surface when adjusting the regulator.
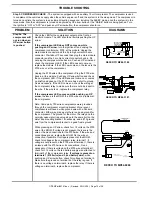
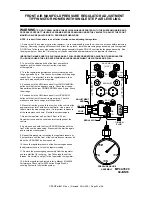
1. Remove the 1/8 inch pipe plug from the regulator. It is recommended to drain the air from the air tanks before removing
the plug. Removing the plug will exhaust the air from the air tanks. Install the pressure gauge assembly onto the regulator.
IMPORTANT: MAKE SURE THE AIR TANKS ARE AT FULL PRESSURE BEFORE ADJUSTING THE REGULATOR.
YOU SHOULD HEAR THE AIR DRYER PURGE VALVE RELEASE WHEN THE AIR TANKS ARE FULL.
R
12. After the regulator is adjusted, refer to Manual ML46839,
Performance Check List for 2000 series Single Step Air
Leveling System to fully test the system.
11. Remove the pressure gauge assembly from the regulator
and re-install the 1/8 inch plug. Use Teflon tape to seal the
threads. Be careful to not get Teflon tape inside the regulator.
10. Leave the regulator pressure at the final setting and push
the adjustment knob in to lock the regulator setting.
9. Repeat this procedure, increasing the regulator pressure by
5 psi each time until the front of the vehicle does not raise at all
when the UP ARROW button is pushed.
7. Adjust the regulator up 5 psi from 50 psi. to 55 psi.
Remember to support the vehicle before crawling under the
8. Again, push and hold the front UP ARROW button until the
front of the vehicle stops rising. Measure at the trim line again
and record the measurement.
6. Measure from the ground to the trim line of the vehicle at the
approximate center of both front wheel wells. Use a piece of
tape to mark the measuring points. It is important to measure
at the same place each time. Record the measurements.
5. Push and hold the HWH touch panel front UP ARROW
button until the front of the vehicle stops rising. Check to
make sure both front air bags are filling with air.
4. Push and hold the HWH touch panel front DOWN ARROW
button until the front air bags are empty. Check the air bags.
Repeat this with the rear DOWN ARROW button. Again, check
the air bags.
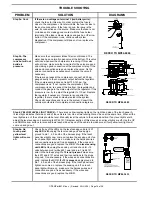
3. Turn the regulator adjustment knob counterclockwise until
the gauge reads 0 psi. Turn the knob clockwise until the gauge
reads 50 psi. It is important to turn the regulator down, then
back up to properly adjust the regulator.
2. To unlock the adjusting knob of the front air manifold
regulator, pull the knob out, away from the main body
of the regulator.
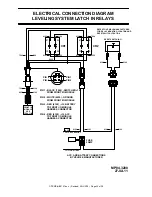
PRESSURE GAUGE
50
100
150
200
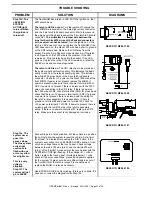
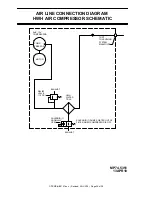
AXLE AIR IN
[ HCV ]
BY-PASS
VALVE
BAG
BY-PASS
VALVE
EXHAUST
BAG
PSW
L
E
F
T
R
I
G
H
T
BAG
AIR
IN
ASSEMBLY
1/8 INCH
PLUG
REGULATOR
KNOB
ADJUSTMENT
UNLOCK
LOCK
DO NOT use Teflon tape or pipe sealant on the gauge assembly threads. DO NOT over tighten the gauge assembly. See
the diagram below. Save the 1/8 inch plug so it can be reinstalled after adjustment of the regulator is complete.
vehicle.


