background image


21 


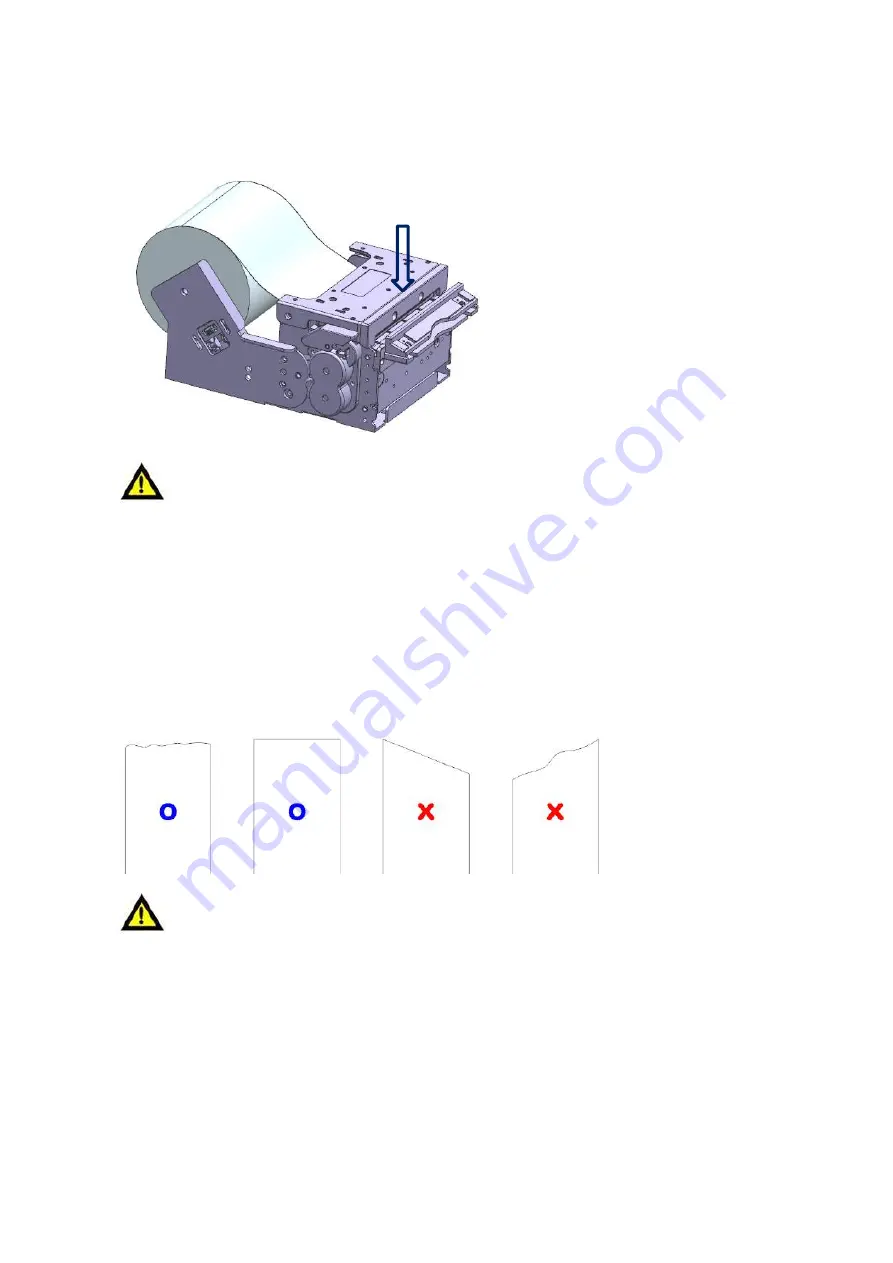
④ Close the cover by pressing it in the direction of the arrow


.   


When closing the cover, be sure to press the middle part of the cover (near the arrow) 

to close it. Otherwise, blurring of the print, etc. may occur. 

2) Auto Loading Method 

① Turn on the Printer‟s Power


Cut the end of the paper straight as shown below with scissors. 


If the end of the paper is not cut straight as shown in the example, the paper may not 

be inserted properly or a paper jam may occur. 


When  the  paper  is  pushed  to  the  paper  detect  sensor  inside  the  paper  input 

port with the cover closed, the printer will start the auto loading, and the paper 
is cut after a certain length is fed.


CAUTION 

CAUTION 

www.compodis.com

Содержание COMPODIS HMK-830 Series

Страница 1: ...HMK 830 Series Technical Manual www compodis com ...

Страница 2: ...evision History Version Date of Revision Revised Page Contents Ver 2 00 Feb 1 2021 Revised and reissued Ver 2 01 Sep 29 2021 Page45 etc Presenter Model name scheme change HMKP 830 HMK 830P www compodis com ...

Страница 3: ...he printer Otherwise you may have problems with your device The user is responsible for any losses resulting from improper handling and operation The contents of this document are subject to change without notice If you are unsure of anything in this manual or if you have any questions or concerns please contact the place where you purchased the product www compodis com ...

Страница 4: ... wash the product Do not cause impact to the product Do not leave the product in a humid place Failure to observe caution signs during use of the product may cause damage to the product and personal injury Caution If you detect any abnormalities in the product please contact us for instructions on how to handle such it Make sure you turn off the power before removing foreign matter from the produc...

Страница 5: ...e Sensor 11 5 Near End Paper Low Sensor 11 6 Adjustable GAP Sensor OPTION 11 7 Presenter Control Sensor OPTION 11 3 PRESENTER OPTION 12 1 Loop Function 12 2 Eject Function 12 3 Hold Function 13 4 Automatic Retract Dispose Function 13 5 Presenter Jam removal method 14 4 Adjustable Guide Sensor Function OPTION 15 1 Paper width adjustment method 15 2 Gap Sensor Black mark Sensor Gap Detection Sensor ...

Страница 6: ...ing the Printer 24 2 Method by using Mount Brackets for fixing and mounting the Printer 25 3 Method by mounting in the floor BOTTOM side 26 2 Large sized paper holder installation method OPTION 27 1 Assembling the paper holder 27 2 Connecting the Near End Sensor connector 27 3 Electrostatic discharge and ground current handling 28 Ⅴ PRINTER FUNCTION SETTINGS 29 1 Setting Manually 29 2 Set Using Me...

Страница 7: ...38 2 Presenter Specifications 40 3 Interface Specifications 41 1 USB 41 2 Serial RS 232C 42 3 Ethernet 43 Ⅶ PRODUCT APPEARANCE AND DIMENSIONS 44 1 HMK 830 A B 44 2 HMK 830 A PB 44 3 HMK 830 A 46 4 HMK 830 A P 48 Ⅷ COMMAND SPECIFICATIONS 50 www compodis com ...

Страница 8: ... suit user s environment Also with HMK 830 Series Printers both of Roll type paper and Fan Folder type paper can be used 1 Printer Features Thermal Head Cover Open Lever Presenter Unit Auto Cutter Feed Button Status Notification Light LED Power Switch Paper Roll Holder Paper Holder Fixture Paper Holder Shaft Power Port Ethernet Port Serial Port USB Port Near End Sensor Connector www compodis com ...

Страница 9: ...witch The power switch is used to turn the power on or off and it is also used for self test and changing printer status settings 2 Paper Feed Button The FEED button can perform the following functions Paper feed button Paper feed button and status notification light Power switch www compodis com ...

Страница 10: ...tton the Error light flashes continuously When the button is released at this time the printer status menu is printed Refer to the description of the Ⅴ PRINTER FUNCTION SETTINGS 3 Status Notification Lights Power light When the power is turned on the green power light turns on Error light Depending on the printer status the light blinks to inform you of the printer status as shown below Notificati...

Страница 11: ...the printing and ticket feeding process until the cover is closed 2 Paper Detect Sensor A sensor that detects the presence and absence of paper used to control paper insertion and printing as well as notifications to notify the user to reload paper Cover Open Sensor GAP Sensor Paper Detect Sensor Black Mark Sensor Near End Paper Low Sensor Cutter Home Sensor Presenter Control Sensor www compodis c...

Страница 12: ...Sensor Paper shortage detection sensor is a detection sensor that automatically informs the user when to change paper 6 Adjustable GAP Sensor OPTION When using label paper it controls the printing position of the label paper by detecting the gap or black mark position between the label and the label 7 Presenter Control Sensor OPTION A sensor that detects the start and end of the paper so that the ...

Страница 13: ...ction keeps the paper in the middle until printing is finished Users can only take the contents after printing is complete ensuring safety 2 Eject Function When printing is finished the ticket or receipt is released out of the machine When printing multiple tickets in a row it is arranged in the order in which they were printed Ticket holder sold separately Paper loop status Stack printed Tickets ...

Страница 14: ...ic Retract Dispose Function If the user does not take the printed ticket or receipt after a certain period of time it is the function to collect and discard the printed material into the designated device or space Automatic disposal of untaken ticket Discarded into designated device or space Printed Ticket www compodis com ...

Страница 15: ...resenter Jam removal method If a paper jam occurs in the presenter raise the Cover open roller in the direction of the arrow to open it remove the paper and close the Cover open roller again www compodis com ...

Страница 16: ...the Adjustable Paper Guide in the left and right direction of the arrow to match the width of the paper to be used Adjustment range 25mm 82 5mm 2 Gap Sensor Black mark Sensor Gap Detection Sensor Black mark Detection Sensor The Adjustable Guide Sensor type product can be used as a gap sensor or a black mark sensor and can be used by moving the sensor position to the required position Adjustable Pa...

Страница 17: ... the black mark sensor holder to the left and right of the arrow according to the position of the black mark on the paper If necessary it can be adjusted by referring to the position display scale at the bottom Black mark sensor holder www compodis com ...

Страница 18: ...f the gap sensor located on the upper cover adjust the gap sensor holder in the direction of the arrow so that the position matches with the gap sensor at the bottom using a tool such as tweezers If the position of GAP Sensor is not aligned with position of the black mark detection sensor at the bottom the sensor sensitivity may decrease as much as it is not aligned In that case gap detection may ...

Страница 19: ...3 hole power cable connection The rated power of this product is 24V so do not use a power supply that is out of specification It may cause product failure or safety accident Please use only the power supply provided by our company for the power supply Be sure to connect according to the instructions in the manual Power port Power cable Power cable Power port CAUTION WARNING www compodis com ...

Страница 20: ...nnection Use an interface cable that meets the specifications of the host When connecting a communication cable be sure to that the power switch is turned off Ethernet Port Serial Port USB Port CAUTION www compodis com ...

Страница 21: ... arrow to open the printer cover Insert paper into the opened paper slot Be careful not to change the side to be printed on the paper at this time Insert paper enough so that the end of the paper comes out to the front of the printer s platen roller Cover Open Lever www compodis com ...

Страница 22: ...he Printer s Power Cut the end of the paper straight as shown below with scissors If the end of the paper is not cut straight as shown in the example the paper may not be inserted properly or a paper jam may occur When the paper is pushed to the paper detect sensor inside the paper input port with the cover closed the printer will start the auto loading and the paper is cut after a certain length ...

Страница 23: ...ROR light flickers and when you remove the feed button the printing begins Printing contents are printed as follows HMK 830 Control Board Firmware VerX XX Create 20XX XX XX Interface and Setting information Interface USB RS 232C Baud Rate 19200 Data Bit 8 Bit Parity None Stop Bit 1 or 2 Peripheral Setting Information USB Status Built in Auto Cutter BuiIt Model Name Firmware Version and Created Dat...

Страница 24: ...ul when developing an application because this notifies the transmission status Prints if 12 digits is received Data under 12 digits will print when you press the feed button Control Code 1F16 or below will be printed as 8016 or above will be printed as Print Sample 16 Hexadecimal ASCII HEX DUMP MODE 41 42 43 44 45 46 47 47 49 30 31 32 33 34 35 36 37 38 FF 1B 69 A B C D E F G H I 0 1 2 3 4 5 6 7 8...

Страница 25: ...w to mount the printer on the product 1 Method by making Hook shapes on the Top side and mounting the Printer Hang the two fronts of the printer on the hook and screw it to two holes on the rear Please refer to the drawing below to design the fixture Recommended screw M3 x 5 B TITE www compodis com ...

Страница 26: ...ing Mount Brackets for fixing and mounting the Printer Fit the printer into the hole and screw it into the 4 holes Please refer to the drawing below to design the fixture Recommended screw M3 x 5 B TITE www compodis com ...

Страница 27: ...ethod by mounting in the floor BOTTOM side Fit the printer into the hole and screw it into the 4 holes Please refer to the drawing below to design the fixture Recommended screw M3 x 5 B TITE www compodis com ...

Страница 28: ... separated You can assemble and use the paper holder in the following way 1 Assembling the paper holder Align the paper holder with the hole in the side of the printer and screw it in two places Recommended screw 3 x 5 B TITE 2 Connecting the Near End Sensor connector Connect the Near End Sensor cable connector to the Near End Sensor connector on the printer Near End Sensor connector www compodis ...

Страница 29: ... in the image below align the ground cable with the printer frame ground hole fix it with screws and ground the other end of the ground cable to the outer case of the product It is recommended to ground the printer to the product surely when installing the printer Otherwise it may cause printer failure Note To prevent static electricity on the paper during printing you can use an Anti Static Brush...

Страница 30: ... items for which settings can be adjusted are printed as follows 2 Item change and specification are determined by the length of time that the FEED button is pressed Pressing the FEED button for less than 1 second will change to the next item For example if you want to adjust the print density press the FEED button for the less than 1 second 5 times to change the item to 5 Print Density After that...

Страница 31: ...It was changed successfully This indicates that the change was successful The value is invalid try again This is displayed when the selected item is invalid or when you move to another menu without changing the item 4 If the change is made successfully the changeable items printed first are displayed If you need to make further adjustments you can proceed in the same way Turn the power off and on ...

Страница 32: ...hen setting all the contents of the memory switch are deleted so please reset set again items such as code page and print options 1 Turn on the power after connecting the printer and the interface cable 2 Open the utility program and select the current communication conditions For communication conditions refer to the self test parameters If communication is successful the Start transmit button is...

Страница 33: ...cial Model Option 4 You can set the required value when the following window appears Note that after completing selection you must press the Start transmit button with the window open After setting turn the power off and on to apply the set values www compodis com ...

Страница 34: ... after a few seconds it flashes rapidly and the update starts Never turn off the printer power before the update is completed 4 When the update complete mark appears the update is completed If there is an update error during update the ERROR LIGHT blinks slowly After closing the update program check the model and communication cable for abnormalities After checking that the values are correct run ...

Страница 35: ...In the printer settings set Ethernet to ON and IP Mode to Static IP and then turn on the power Run the IP Configuration setting utility program Select HMK 830 for the printer model and USB for the port Enter the IP address and gateway you want to use in the Target Parameter column and click Start Write www compodis com ...

Страница 36: ...he power off and on and the printer will boot with these user values and the application can use these user values for communication After booting to the factory default values Boot into Default Value the set values cannot be changed if the IP address conflicts with the network IP address In this case do not use a router and connect directly to the PC to avoid IP address conflict or use it in Dyna...

Страница 37: ...cessful Flashing stops and returns to print standby 3 Turn off the printer 4 Turn on the printer while pressing the FEED button Self test printing is performed and the IP address automatically acquired in DHCP Mode is printed 5 After checking the automatically acquired IP address turn the power off and on and the printer will boot up with this automatically acquired value and applications can comm...

Страница 38: ...wever it is recommended to use Static IP Mode for communication with the application 5 Ticket Paper Settings It is possible to use the memory switch utility to save the ticket paper settings to the printer For detailed ticket setting instructions please refer to the manual attached to the memory switch utility on the website www compodis com ...

Страница 39: ... characte rs 36 characte rs 32 characte rs Font B 9x16 71 characters 68 characte rs 64 characte rs 56 characte rs 48 characte rs 42 characte rs Korean A 24x24 26 characters 25 characte rs 24 characte rs 21 characte rs 18 characte rs 16 characte rs Korean B 16x16 40 characters 38 characte rs 36 characte rs 32 characte rs 27 characte rs 24 characte rs Printing speed Receipt mode Max 300mm s Ticket m...

Страница 40: ...25o C standard condition Head 150Km Cutter 1 000 000 times for print duty 12 it may vary slightly depending on the paper used Temperature range Operating temperature 20 C 60 C 1 Storage temperature 25 C 60 C Humidity range Operating humidity 40 85 RH non condensing Storage humidity 40 95 RH 1 Guaranteed operating temperature range of the product is only from 0 C to 45 C the guaranteed life time of...

Страница 41: ...ckness 50 80 80 200 Outer diameter OD Up to 300mm Folding recommended Roll wound direction Outer O Inner X Ticket Retraction Ticket collection Possible Possible Through Pass Simultaneous pass Possible Possible Loop Possible Not possible Ejection Speed 700 mm s Retraction Speed 700 mm s Retraction Wait time Adjustable Max 60 sec www compodis com ...

Страница 42: ...ifications USB 2 0 compatible Full Speed 12Mb compatible Connector Type B Cable USB2 0 cable Data method Bulk IN Bulk OUT Bulk IN End point 6 Bulk OUT End point 2 Full Speed Max Packet Size 64 Bytes Bulk OUT 64 Bytes Bulk IN www compodis com ...

Страница 43: ...bits 8 bits Parity None Odd Even Stop bits 1 2 bits Connector HANLIM CHD1140 4 Cable DSUB9 Female 4 pin exclusive cable Printer Host Pin Signal Input and output 1 TxD Output 2 RxD Input 4 GND 3 RTS Output Pin Signal Input and output 1 DCD 2 RxD Input 3 TxD Output 4 DTR Output 5 GND 6 DSR Input 7 RTS Output 8 CTS Input 9 RI www compodis com ...

Страница 44: ...0BASE T and IEEE 802 3u 100BASE TX Connector RB1 125BAG1A UDE Pin arrangement Pin No Signal Name Input Output Description 1 TD OUT Transmit Data 2 TD OUT Transmit Data 3 TCT OUT 4 NC None Connection 5 NC None Connection 6 RCT IN 7 RD IN Receive Data 8 RD IN Receive Data www compodis com ...

Страница 45: ...44 Ⅶ Product appearance and dimensions 1 HMK 830 A B HMK 830 Series has the BOARD inside the printer HMK 830B Fixed Guide Type HMK 830AB Adjustable Guide Sensor Type www compodis com ...

Страница 46: ...45 2 HMK 830 A PB HMK 830P is the Presenter attached Model HMK 830PB Fixed Guide Type HMK 830APB Adjustable Guide Sensor Type www compodis com ...

Страница 47: ...46 3 HMK 830 A HMK 830 is the Paper holder attached Model The Image below is based on the use of 100mm out diameter paper HMK 830 Fixed Guide Type HMK 830A Adjustable Guide Sensor Type www compodis com ...

Страница 48: ...47 Model Name A B C D HMK 830S HMK 830AS Ø100 110 8 84 7 166 6 138 5 HMK 830M HMK 830AM Ø150 164 9 121 6 264 219 8 HMK 830L HMK 830AL Ø200 233 6 160 9 332 5 262 7 www compodis com ...

Страница 49: ...830 A P HMK 830P is the Presenter and Paper holder attached Model The Image below is based on the use of 100mm out diameter paper HMK 830P Fixed Guide Type HMK 830AP Adjustable Guide Sensor Type www compodis com ...

Страница 50: ...49 Model Name A B C D HMK 830PS HMK 830APS Ø100 110 8 84 7 166 6 138 5 HMK 830PM HMK 830APM Ø150 164 9 121 6 264 219 8 HMK 830PL HMK 830APL Ø200 233 6 160 9 332 5 262 7 www compodis com ...

Страница 51: ...of space to the right of ASCII characters 55 ESC Collective setting of ASCII character decorations 56 ESC Set the absolute position of print 57 ESC Set bit image vertical arrangement 58 ESC Set and Cancel ASCII character underscore 60 ESC 2 Initial row spacing 60 ESC 3 Set row spacing 61 ESC Printer reset 61 ESC E Bold format 61 ESC G Double printing 62 ESC J FEED 62 ESC j BACK FEED 62 ESC M Font ...

Страница 52: ... B Black White reverse printing 74 GS H Set position of barcode HRI character printing 75 GS L Set left margin 75 GS V Paper cutting 76 GS W Set print area 76 GS h Barcode height 77 GS k Barcode printing 78 GS w Set horizontal size of the barcode 79 GS r Status check response 80 GS a Turn on and off automatic response to status check 80 ESC S Set STANDARD MODE 82 ESC L Set Page mode 83 ESC T Set P...

Страница 53: ...le line 1 89 SUB 2 Select rule line 2 89 SUB W WRITE rule line data 90 SUB C CLEAR rule line data 90 SUB O Rule line ON 90 SUB F Rule line OFF 91 SUB P Print rule line 1 dotted line 91 ESC t Set international code page 92 DLE Real time Ethernet status check 93 www compodis com ...

Страница 54: ...nd line feeds as the line space setting PAGE MODE Line feeds as the line space setting Caution LF immediately after CR is ignored CAN Function Delete print data Code ASCII CAN Hex 18h Decimal 24 Description Delete print data in print area HT Function Horizontal tab Code ASCII HT Hex 09h Decimal 9 Description Move print position to next tab Caution Tab position is set to ESC D n www compodis com ...

Страница 55: ...When the first code is A1h or higher 2 bytes are processed and converted into Korean automatically n 1 Extended Graphic Mode All codes are processed as 1 byte codes Extended Graphic characters can be printed SUB R n Function Set the border outline of characters Code ASCII SUB b n Hex 1A 52h n Decimal 26 82 n Range 0 n 1 Description n 0 Remove border rectangle of characters n 1 Enables border recta...

Страница 56: ...t a speed of 90mm s n 4 Prints at a speed of 100mm s n 5 Prints at a speed of 110mm s n 6 Prints at a speed of 120mm s n 7 Prints at a speed of 130mm s n 8 Prints at a speed of 140mm s n 9 Prints at a speed of 150mm s n 10 Prints at a speed of 160mm s n 11 Prints at a speed of 170mm s n 12 Prints at a speed of 180mm s n 13 Prints at a speed of 190mm s n 14 Prints at a speed of 200mm s www compodis...

Страница 57: ...enotes the number of digits from the start of the line to the set position k is the total number of tabs in a row ESC SP n Function Set the amount of space to the right of ASCII characters Code ASCII ESC SP n Hex 1B 20h n Decimal 27 32 n Range 0 n 255 Initial value n 0 Description Set the space to the right of ASCII characters to nx 0 125mm Caution Spacing for Korean is set using FS S n www compod...

Страница 58: ...t once Caution For Korean only font and highlight are applied Bit Function Hex Decimal 0 0 Font 12x24 Select 24x24 00h 0 1 Font 8x16 Select 16x16 01h 1 1 2 3 0 Highlight off 00h 0 1 Highlight on 08h 8 4 0 Vertical enlargement off 00h 0 1 Vertical enlargement on 10h 16 5 0 Horizontal enlargement off 00h 0 1 Horizontal enlargement on 20h 32 7 0 Underline off 00h 0 1 Underline on 80h 128 www compodis...

Страница 59: ...nH Decimal 27 36 nL nH Range 0 nL nH 256 65535 0 nL 255 0 nH 255 Initial value nL 0 nH 0 Description The print position is moved from the end of the left margin to the nL nH 256 0 125mm position When the print area is exceeded it moves to the end point of the left margin www compodis com ...

Страница 60: ...al value Description Bit data is printed as graphic data in mode m by the number of dots designated by nL nH 256 m mode Number of dots in vertical direction Number of dots in horizontal direction Number of data k 0 8 dots single density 8 224 nL nH 256 1 8 dots double density 8 448 nL nH 256 32 24 dots single density 24 224 nL nH 256 3 33 24 dots double density 24 448 nL nH 256 3 www compodis com ...

Страница 61: ...de D1 D2 D3 MSB LSB D1 D2 D3 2X 2X 3X 3X Single density Double density 24 dot mode D 1 D 2 D 3 D 4 D 5 D 6 D 7 D 8 D 9 MSB LSB D1 D4 D7 D2 D5 D8 D3 D6 D9 2X 2X 3X 3X Single density Double density www compodis com ...

Страница 62: ...125mm 2 Set underline thickness to 0 25mm 3 Set underline thickness to 0 375mm 4 Set underline thickness to 0 5mm 5 Set underline thickness to 0 625mm 6 Set underline thickness to 0 75mm 7 Set underline thickness to 0 875mm ESC 2 Function Set initial line spacing Code ASCII ESC 2 Hex 1B 32h Decimal 27 50 Range 0 n 255 Initial value n 0 Description Set the row spacing to the initial value 4mm www c...

Страница 63: ...0 125mm ESC Function Printer reset Code ASCII ESC Hex 1B 40h Decimal 27 64 Range 0 n 255 Description Clear buffer and initialize all parameters ESC E n Function Set bold font Code ASCII ESC E n Hex 1B 45h n Decimal 27 69 n Range 0 n 255 Initial value n 0 Description Bold format is turned off when n 0 Bold format is turned on when n 1 www compodis com ...

Страница 64: ... n 1 Set Double print font ESC J n Function Feeding Code ASCII ESC J n Hex 1B 4Ah n Decimal 27 74 n Range 0 n 255 Description After printing the data in the buffer it is fed by n x 0 125mm ESC j n Function Back Feeding Code ASCII ESC j n Hex 1B 6Ah n Decimal 27 106 n Range 0 n 255 Description After printing the data in the buffer it is back fed by nx 0 125mm www compodis com ...

Страница 65: ... font 0000 Korean 24x24 Gothic 0000 12x24 0001 Korean 16x16 Dotum font 0001 8x16 9x16 0010 Japanese 24x24 Ming font 0010 Reservation 0011 Chinese 24x24 Gothic 0011 Reservation If you set the memory switch using the memory switch setting utility you can select and use one of the above fonts as the default font without this command For details refer to the memory switch setting items www compodis co...

Страница 66: ... 82 n Range 0 n 13 Initial value n 13 Description International characters are set as shown in the table below n Country name 0 United States 1 France 2 Germany 3 United Kingdom 4 Denmark 1 5 Sweden 6 Italy 7 Spain 1 8 Japan 9 Norway 10 Denmark 2 11 Spain 2 12 Latin America 13 Korea www compodis com ...

Страница 67: ...l 27 97 n Range 0 n 2 Initial value n 0 Description Align the printing position n Alignment position 0 Left 1 Center 2 Right ESC d n Function Print and n row feed Code ASCII ESC d n Hex 1B 64h n Decimal 27 100 n Range 0 n 255 Description Feeds by n line s after printing data www compodis com ...

Страница 68: ...ght end n Function 0 Turn off 180 rotation 1 Turn on 180 rotation ESC i Function Full Cutting Code ASCII ESC i Hex 1B 69h Decimal27 105 Description The paper is fully cut ESC m Function Partial Cutting Code ASCII ESC m Hex 1B 6Dh Decimal27 109 Description The paper is partially cut Caution In the case of the presenter model partial cutting is set to invalid and full cutting is performed www compod...

Страница 69: ...ription Set Korean printing mode character decoration collectively Caution Applies only to Korean Bit Function Hex Decimal 0 00h 0 1 00h 0 2 Horizontal enlargement off 00h 0 Horizontal enlargement on 04h 4 3 Vertical enlargement off 00h 0 Vertical enlargement on 08h 8 4 00h 0 5 00h 0 6 00h 0 7 Underline off 00h 0 Underline on 80h 128 www compodis com ...

Страница 70: ...tically recognized during Korean mode so no setting is required Refer to SUB x n command FS Function Cancel Korean character mode 2 byte mode Code ASCII FS Hex 1C 2Eh Decimal28 46 Description Korean mode 2 byte mode is deactivated Caution Necessary when deactivating 2 byte mode during extended graphic mode It is automatically recognized during Korean mode so no setting is required Refer to SUB x n...

Страница 71: ...ss of Korean underline is set to 0 125mm 2 The thickness of Korean underline is set to 0 25mm FS S n1 n2 Function Set spacing between Korean characters Code ASCII FS S n1 n2 Hex 1C 53h n1 n2 Decimal28 83 n1 n2 Range 0 n1 255 0 n2 255 Initial value n 0 Description Sets spacing between Korean characters The left space between Korean characters is set to n1 0 125mm The right space between Korean char...

Страница 72: ... n Hex 1C 57h n Decimal28 87 n Range 0 n1 255 Initial value n 0 Description Korean character size is set to be double horizontally and vertically When n 0 2X horizontal and 2X vertical are disabled When n 1 2X horizontal and 2X vertical are set www compodis com ...

Страница 73: ... capacity is up to 64KB Description Registers the designated NV non volatile logo bit image in non volatile memory n means the total number of NV logos xL xH sets the number of dots in the horizontal direction of xL xH 256 8 yL yH sets the number of dots in the vertical direction of xL xH 256 8 k means the number of bit images of one NV logo As long as the NV logo does not exceed the capacity seve...

Страница 74: ...imal28 112 n m Range 1 n 255 0 m 3 Initial value n 0 Description The registered NV logo is printed in m mode n refers to the nth registered logo m Printing mode 0 STANDARD 1 Horizontal enlargement 2 Vertical enlargement 3 Horizontal and vertical enlargement www compodis com ...

Страница 75: ... vertically at the same time add both numbers below Example 3 times horizontally 3 times vertically n 32 2 34 Bit Function 0 3 Sets the vertical enlargement ratio 4 7 Sets the horizontal enlargement ratio Horizontal enlargement Vertical enlargement n Hex n Decimal Enlargement ratio 00h 0 1X 10h 16 2X 20h 32 3X 30h 48 4X 40h 64 5X 50h 80 6X 60h 96 7X 70h 112 8X n Hex n Decimal Enlargement ratio 00h...

Страница 76: ... level 2 253 Density level 3 3 Density level 3 254 Density level 2 4 Density level 4 255 Density level 1 5 Density level 5 If a Density other than the standard Density is specified the life of the head is shortened It is recommended to print below the standard density GS B n Function Printing Black White in reverse Code ASCII GS B n Hex 1D 42h n Decimal29 66 n Range 0 n 255 Initial value n 0 Descr...

Страница 77: ...ers and characters n Printing position 0 No printing 1 Prints on top of the barcode 2 Prints at the bottom of the barcode 3 Prints on top and at the bottom of the barcode GS L nL nH Function Sets the left margin Code ASCII GS L nL nH Hex 1D 4Ch nL nH Decimal29 76 nL nH Range 0 nL 255 0 nH 255 Initial value nL nH 256 0 nL 0 nH 0 Description Sets the left margin to nL nH 256 0 125mm www compodis com...

Страница 78: ...options m Function 0 Full Cutting 1 Partial Cutting GS W nL nH Function Designates the printing area Code ASCII GS W nL nH Hex 1D 57h nL nH Decimal29 87 nL nH Range 0 nL 255 0 nH 255 Initial value nL nH 256 448 56mm nL 0 nH 0 Descriptio n Sets the printing area to nL nH 256 0 125mm in the left margin Printable area Left margin Print area www compodis com ...

Страница 79: ...78 GS h n Function Sets the barcode height Code ASCII GS h n Hex 1D 68h n Decimal29 104 n Range 1 n 255 Initial value n 162 20 25mm Description The barcode height is set to n 0 125mm www compodis com ...

Страница 80: ...7 verification character added automatically 48 d 57 4 CODE39 1 n start and stop characters added automatically 48 d 57 65 d 90 d 32 36 37 43 45 46 47 5 ITF I of 2 5 1 n odd even numbers 48 d 57 6 CODABAR 1 n 48 d 57 65 d 68 d 36 43 45 46 47 58 7 CODE128 2 n 255 verification and stop characters added automatically 0 d 127 Caution In CODE128 in the case of special characters as shown in the table b...

Страница 81: ... CODE A g gABCD CODE B h hABCD CODE C i iABCD GS w n Function Sets the horizontal size of the barcode Code ASCII GS w n Hex 1D 77h n Decimal29 119 n Range 1 n 4 Initial value n 2 Description Sets the horizontal size of the barcode n Multi level barcode Module width 2 level barcode Narrow element Wide element 1 0 25mm 0 125mm 0 375mm 2 0 375mm 0 25mm 0 625mm 3 0 5mm 0 375mm 1mm 4 0 625mm 0 5mm 1 25...

Страница 82: ...tion Enabling and disabling status check automatic response Code ASCII GS a n Hex 1D 61h n Decimal29 97 n Range 0 n 1 Initial value n 1 Description Set or cancel the status check automatic response function This printer has a function enabling it to automatically respond when the status changes after checking the printer status This command can be used to enable or disable this function n Function...

Страница 83: ...ough 1 Not much paper left 00h 08h 0 8 4 0 Print completed 1 During printing or feeding 00h 10h 0 16 5 0 No cutter error jam 1 There is a cutter error jam 00h 20h 0 32 6 0 Not used 00h 0 7 0 No paper in the auxiliary sensor 1 There is paper in the auxiliary sensor 00h 80h 0 128 The status value of bit 4 is valid only when real time command DLE EOT n command is executed otherwise it is fixed to 0 w...

Страница 84: ...II ESC S Hex 1B 53h Decimal27 83 Description Change from Page mode to STANDARD mode ESC L Function Set Page mode Code ASCII ESC L Hex 1B 4Ch Decimal27 76 Range 0 n 255 Initial value n 0 Description Switch from STANDARD mode to Page mode www compodis com ...

Страница 85: ... Hex 1B 54h n Decimal27 84 n Range 0 n 3 Initial value n 0 Description Sets the printing direction and starting point of page mode When N 0 left right ABCD Feeding When N 1 bottom top ABCD Feeding When N 2 top bottom Feeding When N 3 top bottom ABCD Feeding ABCD www compodis com ...

Страница 86: ...on Sets the starting point and size of the printing area Horizontal starting point xL xH 256 0 125mm Vertical starting point yL yH 256 0 125mm Horizontal size dxL dxH 256 0 125mm Vertical size dyL dyH 256 0 125mm The maximum configurable page width is limited to 56mm The maximum page length that can be set is limited to 150mm Since barcode and graphic data are also edited based on the baseline whe...

Страница 87: ...ontent of the page area is not erased so when clearing the page area use the ESC S command DLE ENQ n Function Clearing each buffer in the printer in real time Code ASCII DLE ENQ n Hex 10h 05h n Decimal16 5 n Range n 2 Description n 2 Each buffer of the printer is cleared in real time If data that matches this command is received care must be taken as the same operation as this command is performed...

Страница 88: ... is performed bit image data etc Status transmission data Bit State Hex Decimal 0 0 There is paper 1 No paper 00h 01h 0 1 1 0 Printer head down 1 Printer head up 00h 02h 0 2 2 0 Paper not jammed 1 Paper jammed 00h 04h 0 4 3 0 Paper remained enough 1 Not much paper left 00h 08h 0 8 4 0 Print completed 1 Printing or feeding in progress 00h 10h 0 16 5 0 No cutter error jam 1 Cutter error jam 00h 20h ...

Страница 89: ... mode m xL xH sets the number of data in the horizontal direction bytes of the image data yL yH sets the number of dotted lines in the vertical direction of the image data d indicates raster bit image data m Mode Enlargement 0 48 Normal 1X 1 49 Horizontal enlargement 2X horizontal 2 50 Vertical enlargement 2X vertical 3 51 Horizontal vertical enlargement 2X horizontal 2X vertical Example Unfolded ...

Страница 90: ...ows 4 4 rows 5 5 rows 6 6 rows 7 7 rows 8 8 rows 9 9 rows Vertical size is set automatically 2 QR code n2 Number of barcode data n3 1 1 n2 17 n3 3 1 n2 53 n3 5 1 n2 106 n3 9 1 n2 230 n3 Barcode size 1 Version 1 3 Version 3 5 Version 5 9 Version 9 Descripti on Select and use the appropriate barcode size according to the number of barcode data n1 2D barcode type n2 number of barcode data n3 barcode ...

Страница 91: ...nter will automatically detect the blackmark and store the information in the internal memory switch and then reads the information registered in SW1 SW2 to cut the paper at the designated position Refer to 5 2 Memory Switch for the detailed information Please use the provided Memory Switch Utility Program to register data on the Memory Switch SUB 1 Function Select rule line 1 Code ASCII SUB 1 Hex...

Страница 92: ...91 SUB 2 Function Select rule line 2 Code ASCII SUB 1 2 Hex 1A 32h Decimal26 50 Description Rule line 2 is selected among rule lines 1 and 2 www compodis com ...

Страница 93: ... lines command is received or the power is turned off SUB C Function Clears rule line data Code ASCII SUB C Hex 1A 43h Decimal26 67 Description All selected rule lines are cleared to 0 To speed up processing rule line print ON OFF is used for printing non printing of rule lines written once and this level Command is used to re write rule line data SUB O Function Rule line ON Code ASCII SUB O Hex 1...

Страница 94: ...erved SUB P Function Print rule line 1 dotted line Code ASCII SUB P Hex 1A 50h Decimal26 80 Description Rule line 1 dotted line is printed When printing character and graphic do not use this command but use the rule lines ON command This command should be used to print rule lines in the space between row and row CAUTION www compodis com ...

Страница 95: ... each code page are set as shown in the table below Valid when set to 1 byte mode with SUB x command or FS command Invalid when set to 2 byte mode n Code Page 0 PC437 US 1 KANA JAPAN 2 Greece 3 Windows1251 4 PC866 Cyrillic 2 5 Windows1250 Poland 6 PC850 Multilingual 7 PC860 Portugal 8 Windows1252 9 Iran System Encoding Standard 10 PC857 Turkish CAUTION www compodis com ...

Страница 96: ... be taken as the same operation as this command is performed bit image data etc Status transmission data Bit State Hex Decimal 0 0 There is paper 1 No paper 00h 01h 0 1 1 0 Printer head down 1 Printer head up 00h 02h 0 2 2 0 Paper not jammed 1 Paper jammed 00h 04h 0 4 3 0 Paper is left enough 1 Not much paper left 00h 08h 0 8 4 0 Print completed 1 Printing or feeding in progress 00h 10h 0 16 5 0 N...

Отзывы: