background image

P/N 0518258_D

1-4 

R

efRigeRation

 / e

lectRical

U.S. & Canada 1-800-922-1919 • Mexico 1-800-890-2900 • WWW.HUSSMANN.COM

1-4

I

NSTALLATION

Fasten Cases

1. Move the second merchandiser into posi-

tion against the first. Match the alignment
pins with the corresponding holes.

2. Fasten fronts together using cap screws,

flat washers, lock washers and nuts.
Tighten only until front panels touch. 

Do not tighten fully.

3. Use the cap screws, flat washers and lock

washers provided in the joint kit to draw 
the merchandisers together at rear. 

Do not

tighten fully.

4. Draw canopies of multi-deck wall mer-

chandisers together by inserting threaded
rod through top shoe as shown. Fasten
each end with washers and nuts. 

Tighten

only until canopies touch.

5. Tighten joints in the order shown (A, B,

C, D) until gaskets are compressed, and
cases join smoothly.

P/N 0518258_C

U.S. & Canada 1-800-922-1919 • Mexico 1-800-890-2900 • www.hussmann.com

5

/

8

 in. Gasket (41 mm)

1

/

2

 in. Gasket (13 mm)

PW & MWG

Models

B

C

A

Содержание EXCEL MWG

Страница 1: ...dium Temperature Bulk Produce and Bakery Merchandisers IMPORTANT Keep in store for future reference Installation Service Manual Shipped With Case Data Sheets P N 0518258_D January 2022 Spanish P N 0538840 ...

Страница 2: ...n whole or in part without written permission LOCK OUT TAG OUT To avoid serious injury or death from electrical shock always disconnect the electrical power at the main disconnect when servicing or replacing any electrical component This includes but is not limited to such items as controllers electrical panels condensers lights fans and heaters This manual was written in accordance with originall...

Страница 3: ...SPLASHGUARDS Waste Outlet and Water Seal 3 1 Installing Drip Piping 3 1 Installing Splashguards and Lower Front Panels 3 2 Sealing Splashguard to Floor 3 3 Installing Optional Stainless Steel Splashguards 3 3 START UP OPERATION Start up 4 1 Load Limits 4 1 Stocking 4 1 Installing FDA NSF Required Thermometer 4 1 MAINTENANCE Care and Cleaning 5 1 Cleaning Honeycomb Assemblies 5 3 Cleaning Stainless...

Страница 4: ... that Hussmann products will cause cancer or reproductive harm or is in violation of any product safety standards or requirements As clarified by the California State government Proposition 65 can be considered more of a right to know law than a pure product safety law When used as designed Hussmann believes that our products are not harmful We provide the Proposition 65 warning to stay in complia...

Страница 5: ...s be maintained at proper temperature This means that from the time the product is received through storage preparation and display the temperature of the product must be controlled to maximize the life of the product The exterior frames on these cases provide space for air circulation However in high ambient conditions sweating may still occur If this happens install a method of forced ventilatio...

Страница 6: ...ACES Move the merchandiser as close as possible to its permanent location and then remove all packaging Check for damage before discard ing packaging Remove all separately packed accessories such as kits and shelves LEVELING Merchandisers must be installed level to ensure proper operation of the refrigeration system and to ensure proper drainage of defrost water When leveling merchandisers use a c...

Страница 7: ...rom the right end On multi deck cases remove the lower back panel first To remove a panel lift it up from its bottom edge and out No tools are required Apply Gaskets 1 Apply 1 2 in 13 mm gasket in the horizontal recess across the bottom and up the front of the merchandiser as shown Gasket should cover slots 2 Apply the 15 8 in 41 mm gas ket to cover foam to metal gap at rear of case and across the...

Страница 8: ...t tighten fully 3 Use the cap screws flat washers and lock washers provided in the joint kit to draw the merchandisers together at rear Do not tighten fully 4 Draw canopies of multi deck wall mer chandisers together by inserting threaded rod through top shoe as shown Fasten each end with washers and nuts Tighten only until canopies touch 5 Tighten joints in the order shown A B C D until gaskets ar...

Страница 9: ...ket 13 mm Alignment Pins B C A Glass Front Detail Tighten in Order Shown Medium Temperature P N 0518258_C 1 5 HUSSMANN CORPORATION BRIDGETON MO 63044 2483 U S A IMPORTANT Do not stretch gasket especially around corners Do not butt gaskets always overlap them as shown Remove paper backing after gasket has been applied ...

Страница 10: ...m slot at the rear of the bracket where it attaches to the merchandiser Tighten screws to secure the brackets Install Splashguard Joint Support Position the joint support across the brackets as shown above Fasten with hex head sheet metal screws OFFSETTING BUMPERS AND TOP RAIL Offsetting the bumpers and top rails helps to disguise the joint locations giving the lineup a smoother look 1 Locate star...

Страница 11: ...t the first is flush to the left end panel and the second is centered between the starter bumper and the full length bumper as shown below b Install full length bumpers and internal trims offset across joints Make sure that no gaps exist between sections Continue installing the upper bumpers the length of the line up Do NOT install the last upper bumper sec tion at this time This sec tion will be ...

Страница 12: ... will allow the bumpers and top rails to contract 10 Go to the right end of the line up and tap the top rail and bumpers to close any gaps 11 Measure and cut last sections of top rail and bumpers Use a miter box and fine tooth saw to cut last bumpers and top rail to length Install the last sections Note If part of plastic top rail pops loose remove that section of top rail and re install according...

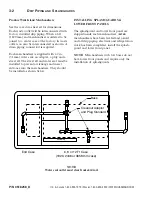
Страница 13: ...s operating on the same refrigeration system may be run from case to case DO NOT RUN REFRIGERANT LINES THROUGH MERCHANDISERS THAT ARE NOT ON THE SAME REFRIGERATION SYSTEM BRANCH as this may result in poor refrigeration control and compressor failure Interconnecting piping inside the merchandiser must be located as shown below to allow room for lifting the hinged fan plenums and for clearance benea...

Страница 14: ...e liquid and suction lines is recommended wherever condensation drippage is objectionable or lines are exposed to ambient conditions SUCTION LINE Pitch in direction of flow May be reduced by one size at one third of case run load and again after the second third Do not reduce below the case suction line size Case suction lines should enter at the top of the branch line LIQUID LINE May be reduced b...

Страница 15: ... on the left hand facing front end of the case DEFROST SEQUENCES These merchandisers require defrost cycles for proper operation Refer to the data sheets for application data The Time Clock initiates defrost The evaporator fans continue to circulate air across the evapo rator coil melting any frost build up Defrost can be terminated by either temperature or time Temperature Termination Temperature...

Страница 16: ...n thermostats When multiple merchandisers are on the same defrost circuit the defrost termination thermostats are wired in series ALWAYS CHECK THE SERIAL PLATE FOR COMPONENT AMPERES IDENTIFICATION OF WIRING Leads for all electrical circuits are identified by colored plastic bands These bands correspond to the color code sticker shown below located inside the merchandiser s wireway Optional T8 rail...

Страница 17: ...he merchandiser 2 When connecting drip piping the water seal must be used as part of the drip piping to prevent air leakage or insect entrance Never use two water seals in series in any one drip pipe DOUBLE WATER SEALS IN SERIES WILL CAUSE AN AIR LOCK AND PREVENT DRAINING 3 Pitch the drip piping in the direction of flow There should be a minimum pitch of 1 4 in per ft 20 mm per 1 m 4 Avoid long ru...

Страница 18: ...is supplied with a 2 in 51 mm water seal an adapter a plug and a street ell The street ell and water seal must be installed to prevent air leakage and insect entrance into the merchandiser They should be installed as shown below INSTALLING SPLASHGUARDS LOWER FRONT PANELS The splashguard and lower front panel are shipped inside each merchandiser AFTER merchandisers have been leveled and joined and ...

Страница 19: ... SPLASHGUARD TO FLOOR IF REQUIRED by local sanitation codes or if desired by the customer plastic splashguards may be sealed to the floor using silicone type sealer The amount needed will depend on how much the floor is out of level 1 Remove all dirt wax and grease from the area of the splashguard where adhesion will be necessary to ensure a secure installation 2 Apply a good silicone type sealer ...

Страница 20: ...ift the panel up and drop it into the grove at the top of the splashguard OPTIONAL Stainless steel splashguards may be sealed to the floor using a vinyl cove base trim The size of trim needed will depend on how much the floor is out of level To install the trim to the splashguard 1 Remove all dirt wax and grease from the area of the splashguard where adhesion will be necessary to ensure a secure i...

Страница 21: ...d AT NO TIME SHOULD MERCHANDISERS BE STOCKED BEYOND THE LOAD LIMITS INDICATED DO NOT BLOCK HONEYCOMB STOCKING Product should NOT be placed in merchandisers until case is at proper operating temperature Proper rotation of product during stocking is necessary to prevent product loss Always bring the oldest product to the front and set the newest to the back AIR DISCHARGE AND RETURN FLUES MUST REMAIN...

Страница 22: ... VTTNBOO PSQPSBUJPO r 4U IBSMFT 3PDL 3PBE r SJEHFUPO 0 6 4 BOBEB r FYJDP r XXX IVTTNBOO DPN VTTNBOO PSQPSBUJPO This is an NSF 7 US FDA Food Code Required Thermometer Suggested Mounting Locations in Single Deck Glass Front Impact Merchandisers Hussmann P N 0429971_C 10 2007 Thermometer Hussmann Part TM 4911251 Acrylic 1BDLBHF VBSE BDJOH 0VU Inside End Panel Shelf Price Tag Molding m 3FUVSO JS SJMMF...

Страница 23: ...on how the unit is stocked shopping patterns in the department and ambient conditions of the store The suggested locations provided herein are possible locations It is the responsibility of the purchaser user to determine the location with the food storage area of the unit that best meets the code requirements above The thermometer may need to be moved several times to find the warmest location Mo...

Страница 24: ... Startup Operation P N 0518258_D U S Canada 1 800 922 1919 Mexico 1 800 890 2900 WWW HUSSMANN COM 4 4 START UP OPERATION P N 0518258_C U S Canada 1 800 922 1919 Mexico 1 800 890 2900 www hussmann com Notes ...

Страница 25: ...d to facilitate cleaning Simply lift a four foot section up and out as shown below Exterior Surfaces The exterior surfaces must be cleaned with a mild detergent and warm water to protect and maintain their attractive finish NEVER USE ABRASIVE CLEANSERS OR SCOURING PADS Interior Surfaces The interior surfaces may be cleaned with most domestic detergents ammonia based cleaners and sanitizing solutio...

Страница 26: ... can be taken to the cooler in a timely manner First turn off refrigeration then disconnect electrical power Thoroughly clean all surfaces with soap and hot water DO NOT USE STEAM OR HIGH WATER PRESSURE HOSES TO WASH THE INTERIOR THESE WILL DESTROY THE MERCHANDISERS SEALING CAUSING LEAKS AND POOR PERFORMANCE Lift hinged fan plenum for cleaning Hook chain in rear panel to secure plenum during clean...

Страница 27: ...o the water and apply with a cloth Always wipe rails dry after wetting Use alkaline chlorinated or non chlorine containing cleaners such as window cleaners and mild detergents Do not use cleaners containing salts as this may cause pitting and rusting of the stainless steel finish Do not use bleach Clean frequently to avoid build up of hard stubborn stains A stainless steel cleaning solution may be...

Страница 28: ...following procedure Use steel wool to smooth out the surface area of the bumper Clean area Apply vinyl or car wax and polish surface for a smooth glossy finish MAINTAINING FLUORESCENT LAMPS Fluorescent lamps should not be allowed to run to failure If a re lamp schedule is not in place the tubes should be inspected for signs of degradation blackened ends Degraded or failed tubes should be replaced ...

Страница 29: ...o wiring harness 9 Turn on power 10 Verify that motor is working and blade is turning in the correct direction 11 Close air gaps under fan plenum Warmer air moving into refrigerated air reduces effective cooling If the plenum does not rest against the case bottom without gaps apply foam tape to the bottom of the fan plenum to reduce improper air movement Use silicone sealant to close other gaps 12...

Страница 30: ...mp sockets and plug receptacle connections for signs of arcing Replace any component that shows signs of arcing Make sure all unused receptacles have their close off covers securely attached REPLACING LAMP HOLDERS AND END CAPS The lamp holder is designed to snap into the sheet metal of the case The lamp holder has a locking nub which fits inside the groove of specially designed end caps IMPORTANT ...

Страница 31: ...as they were originally installed 5 Reconnect the electrical power REPLACING DAMAGED DRAIN FITTING The following procedure is for the field repair of a broken drain fitting 1 Use a drill with a 2 in 51 mm hole saw to drill out the bottom of the drain fitting Be sure to drill completely through fitting and bottom liner 2 Apply an ABS and PVC compatible primer sealer to outside of PVC coupling and i...

Страница 32: ... Phone 1 800 645 3413 Fax 1 800 645 3414 X Ergon 1570 E Northgate P O Box 2102 Irving TX 75062 Phone 1 800 527 9916 NOTE Hussmann Aluminum melts at 1125 F 607 C Aladdin 3 in 1 rod at 732 F 389 C X Ergon Acid core at 455 F 235 C Technique 1 Locate Leak 2 REMOVE ALL PRESSURE 3 Brush area UNDER HEAT 4 Use PRESTOLITE TORCH ONLY Number 6 tip 5 Maintain separate set of stainless steel brushes and USE ON...

Страница 33: ...mann Corporation Corporate Headquarters Bridgeton Missouri U S A To obtain warranty information or other support contact your Hussmann representative Please include the model and serial number of the product ...

Страница 34: ...Hussmann Corporation 12999 St Charles Rock Road Bridgeton MO 63044 2483 www hussmann com ...

Отзывы: