background image

43

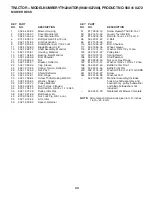
TRACTOR - - MODEL NUMBER YTH2246TDR (96041027200), PRODUCT NO. 960 41 02-72

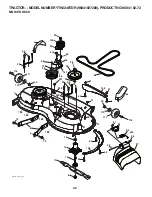
MOWER DECK 


NOTE:

  All component dimensions given in U.S. inches


      1 inch = 25.4 mm

532 44 43-80 

Mower Housing

532 40 55-07 

Cover Mandrel LH

532 40 55-06 

Cover Mandrel RH

874 76 05-12 

Bolt Hex Hed 5/16-18 unc

532 19 51-86 

Arm Suspension

532 19 30-03 

Bolt/Washer asm 7/16-20 unf

11 

532 40 53-80 

Blade Mower Hi Lift

13 

532 19 28-72 

Shaft Assembly, Mandrel

14 

532 18 72-81 

Housing, Mandrel

15 

532 11 04-85 

Bearing, Ball, Mandrel

19 

532 19 65-39 

Bolt, Shoulder

21 

873 68 05-00 

Nut 

23 

532 19 25-57 

Bracket, Deflector

24 

532 10 53-04 

Cap, Sleeve

25 

532 19 70-26 

Spring, Torsion, Deflector

26 

532 11 04-52 

Nut, Push

27 

532 40 53-57 

Shield, Deflector

29 

532 13 14-91 

Rod, Hinge

30 

532 17 39-84 

Screw Thdrol Rolling Wsh Hd

31 

532 18 76-90 

Washer, Spacer

32 

532 19 74-73 

Pulley, Mandrel

33 

532 40 02-34 

Nut, Toplock, Flanged

34 

872 11 06-12 

Bolt Carr Sh. 3/8-16 x 1-1/2 Gr. 5

36 

532 19 73-79 

Pulley, Idler, Flat

38 

532 19 91-89 

Belt Keeper LH

40 

873 90 06-00 

Nut, Lock Flg. 3/8-16 unc 

55 

532 19 72-49 

Arm, Idler

56 

532 19 90-92 

Spacer, Retainer

57 

817 00 06-16 

Screw Hexwsh Thd 3/8-16 x 1

59 

532 14 10-43 

Guard, Tuv Idler (94)

62 

874 52 06-36 

Bolt 3/8-16 unc x 2-1/4 Gr. 5

68 

532 40 51-43 

V-Belt

69 

872 14 05-05 

Bolt

116  532 12 48-42 

Bolt, Shoulder

117  532 18 86-06 

Wheel, Gauge

119  819 12 14-14 

Washer 3/8 x 7/8 x 14 Ga.

145  532 19 31-97 

Pulley Idler 

147  532 19 72-51 

Spring Return

188  532 19 51-61 

Stud Fastener

189  873 90 05-00 

Nut Lock Hex Flange

197  819 13 13-12 

Washer 13/32 x 13/16 x 12 Ga.

198  532 40 31-49 

Baffle Center Front

199  532 40 31-50 

Baffle Front RH

200  532 41 35-24 

Washer 13/32 x 1 x 1/2 11 GAHRD

241  532 15 29-27 

Screw

242  532 41 55-98 

Washout Port

- - 

532 19 28-70 

Mandrel Assembly (Includes 

housing, shaft assembly, and 

bearing only - pulley/nut/washer 

and blade bolt/washers not 

included)

- - 

532 44 43-79 

Replacement Mower, Complete

KEY PART 


NO. NO. 


 DESCRIPTION

KEY PART 


NO. NO. 


 DESCRIPTION

Содержание YTH2246TDR

Страница 1: ...246TDR Owner s Manual 532 44 40 72 Rev 13 Gasoline containing up to 10 ethanol E10 is acceptable for use in this machine The use of any gasoline exceeding 10 ethanol E10 will void the product warranty 07002 ...

Страница 2: ...p all movement on the slopes slow and gradual Do not make sudden changes in speed or direction which could cause the machine to roll over Use extra care while operating machine with grass catch ers or other attachments they can affect the stability of the machine Do no use on steep slopes Do not try to stabilize the machine by putting your foot on the ground Do not mow near drop offs ditches or em...

Страница 3: ...Use extra care when approaching blind corners shrubs trees or other objects that may block your view of a child IV TOWING Tow only with a machine that has a hitch designed for towing Do not attach towed equipment except at the hitch point Follow the manufacturer s recommendation for weight limits for towed equipment and towing on slopes Never allow children or others in or on towed equipment On sl...

Страница 4: ...al The instructions will enable you to assemble and maintain your tractor properly Always observe the SAFETY RULES CUSTOMER RESPONSIBILITIES Read and observe the safety rules Follow a regular schedule in maintaining caring for and using your tractor FollowtheinstructionsintheMaintenanceandStorage sections of this manual Wear proper Personal Protective Equipment PPE while operating this machine inc...

Страница 5: ...ACK CARTON Remove all accessible loose parts and parts cartons from carton Cut along dotted lines on all four panels of carton Remove end panels and lay side panels flat Check for any additional loose parts or cartons and remove BEFORE REMOVING TRACTOR FROM SKID TOOLS REQUIRED FOR ASSEMBLY A socket wrench set will make assembly easier Standard wrench sizes are listed 1 1 2 wrench Tire pressure gau...

Страница 6: ...connections are still secure and wires are properly clamped Before driving tractor be sure freewheel control is in transmission engaged position see TO TRANS PORT in the Operation section of this manual WHILE LEARNING HOW TO USE YOUR TRACTOR PAY EXTRA ATTENTION TO THE FOLLOWING IMPORTANT ITEMS Engine oil is at proper level Fuel tank is filled with fresh clean regular unleaded gasoline Become famil...

Страница 7: ...entify safety inform ation about hazards which can result in death serious injury and or property damage DANGER indicates a hazard which if not avoided will result in death or serious injury WARNING indicates a hazard which if not avoided could result in death or serious injury CAUTION indicates a hazard which if not avoided might result in minor or moderate injury CAUTION when used without the al...

Страница 8: ...ling engine speed E ATTACHMENTCLUTCHLEVER Usedtoengagethe mowerbladesorotherattachmentsmountedtoyourtractor F IGNITION SWITCH Used for starting and stopping the engine G REVERSE OPERATION SYSTEM ROS ON POSITION Allows operation of mower or other powered attachment while in reverse H LIGHT SWITCH Turns the headlights on and off J CRUISE CONTROL LEVER Used to set forward movement of tractor at desir...

Страница 9: ...SSED ENGINE Move throttle control D between half and full speed fast position NOTE Failure to move throttle control between half and full speed fast position before stopping may cause engine to backfire Turnignitionkey F to STOP positionandremovekey Always remove key when leaving tractor to prevent unauthorized use Never use the choke to stop the engine IMPORTANT LEAVING THE IGNITION SWITCH IN ANY...

Страница 10: ...n slopes rough terrian or while trimmimg or turning With forward drive pedal depressed to desired speed pull cruise control lever J up and hold while lifting your foot off the pedal then release the lever To disengage the cruise control depress the brake pedal or tap on forward drive pedal TO ADJUST MOWER CUTTING HEIGHT See Fig 8 The position of the attachment lift lever A determines the cutting h...

Страница 11: ...ely necessary push brake pedal quickly to brake position and engage parking brake To restart movement slowly release parking brake and brake pedal Slowlydepressappropriatedrivepedaltoslowestsetting Make all turns slowly USING THE REVERSE OPERATION SYSTEM Only use if you are certain no children or other bystanders will enter the mowing area Depress brake pedal all the way down Withenginerunning tur...

Страница 12: ...nd formation of acids during storage Acidic gas can damage the fuel system of an engine while in storage To avoid engineproblems thefuelsystemshouldbeemptied before storage of 30 days or longer Drain the gas tank start the engine and let it run until the fuel lines and carburetor are empty Use fresh fuel next season See Storage Instructions for additional information Neveruseengineorcarburetorclea...

Страница 13: ...mance it is recom mended that the transmission be purged before operating tractor for the first time This procedure will remove any trapped air inside the transmission which may have devel oped during shipping of your tractor IMPORTANT SHOULD YOUR TRANSMISSION REQUIRE REMOVAL FOR SERVICE OR REPLACEMENT IT SHOULD BE PURGED AFTER REINSTALLATION BEFORE OPERATING THE TRACTOR 1 Place tractor safely on ...

Страница 14: ...eways etc After one or two rounds mow in the opposite direction making left hand turns until finished See Fig 14 Fig 14 If grass is extremely tall it should be mowed twice to reduce load and possible fire hazard from dried clip pings Make first cut relatively high the second to the desired height Do not mow grass when it is wet Wet grass will plug mower and leave undesirable clumps Allow grass to ...

Страница 15: ...ose Fasteners Check Replace Mower Blades Check Transaxle Cooling Che Check Operator Presence ROS Systems ck V Belts Check Mower Levelness GENERAL RECOMMENDATIONS The warranty on this tractor does not cover items that have beensubjectedtooperatorabuseornegligence Toreceive full value from the warranty operator must maintain tractor as instructed in this manual Some adjustments will need to be made ...

Страница 16: ...by the operator to shift into reverse should NOT shut off the engine BLADE CARE Forbestresultsmowerbladesmustbekeptsharp Replace bent or damaged blades BATTERY Yourtractorhasabatterychargingsystemwhichissufficient for normal use However periodic charging of the battery with an automotive charger will extend its life Keep battery and terminals clean Keep battery bolts tight Keep small vent holes op...

Страница 17: ... fan blades are intact and clean Inspect cooling fins for dirt grass clippings and other materials Topreventdamagetoseals donotusecom pressedairorhighpressuresprayertocleancoolingfins TRANSAXLE PUMP FLUID The transaxle was sealed at the factory and fluid mainte nance is not required for the life of the transaxle Should the transaxle ever leak or require servicing contact your nearest authorized se...

Страница 18: ...sing washout fitting could expose you or others to thrownobjectsfromcontactwiththeblade Replace broken or missing washout fitting immediately prior to using mower again Pluganyholesinmowerwithboltsandlocknuts Fig 21 DECK WASHOUT PORT See Fig 21 Your tractor s deck is equipped with a washout port on its surface as part of its deck wash system It should be utilized after each use Drive the tractor t...

Страница 19: ...d disconnect mower suspension arm A from chassis and rear lift link C from rear mower bracket D remove retainer springs and washers Go to other side of mower and disconnect the suspen sion arm and rear lift link CAUTION After rear lift links are dis connected the attachment lift lever will be spring loaded Have a tight grip on lift lever when changing position of the lever Slide mower out from und...

Страница 20: ...INKS C Lift rear corner of mower and position slot in link assembly over pin on rear mower bracket D and secure with washer and retainer spring ATTACH MOWER SIDE SUSPENSION ARMS A TO CHASSIS Position hole in arm over pin B on outside of tractor chassis and secure with retainer spring Repeat on opposite side of tractor M C D A E F B Fig 27 M Fig 26 IMPORTANT CHECK BELT FOR PROPER ROUTING IN ALL MOW...

Страница 21: ... nut will change mower height about 3 16 Test your adjustment by mowing some uncut grass and visually checking the appearance Readjust if necessary until you are satisfied with the results PRECISION SIDE TO SIDE ADJUSTMENT See Fig 29 With all tires properly inflated park tractor on level ground or driveway CAUTION Blades are sharp Protect your hands with gloves and or wrap blade with heavy cloth R...

Страница 22: ...ront of tractor and roll belt around electric clutch and onto engine pulley G Pull belt toward rear of tractor Carefully work belt down around transmission cooling fan and onto the input pulley F Be sure belt is inside the belt keeper Install belt on centerspan idler E Install belt through stationary idler C and clutching idler D Reinstall anti rotation link B on right side of tractor Tighten secu...

Страница 23: ... tire and reassemble On rear wheels only align grooves in rear wheel hub and axle Insert square key Replace washers and snap retaining ring securely in axle groove Replace axle cover NOTE To seal tire punctures and prevent flat tires due to slow leaks tire sealant may be purchased from your local parts dealer Tire sealant also prevents tire dry rot and corrosion FRONT WHEEL TOE IN CAMBER Your new ...

Страница 24: ...tc Positive terminal must be connected first to prevent sparking from accidental grounding Lift hood to raised position Remove terminal cover Disconnect BLACK battery cable then RED battery cable and carefully remove battery from tractor Install new battery with terminals in same position as old battery Reinstall terminal cover First connect RED battery cable to positive battery terminal with bolt...

Страница 25: ...SENTIALFUELSYSTEMPARTSSUCH AS CARBURETOR FUEL FILTER FUEL HOSE OR TANK DURING STORAGE ALSO EXPERIENCE INDICATES THAT ALCOHOL BLENDED FUELS CALLED GASOHOL OR USING ETHANOLORMETHANOL CANATTRACTMOISTUREWHICH LEADSTOSEPARATIONANDFORMATIONOFACIDSDURING STORAGE ACIDIC GAS CAN DAMAGE THE FUEL SYSTEM OF AN ENGINE WHILE IN STORAGE Empty the fuel tank by starting the engine and let it run until the fuel lin...

Страница 26: ...7 Check replace ignition switch 8 Faulty solenoid or starter 8 Check replace solenoid or starter 9 Faulty operator presence switch es 9 Contact an authorized service center department Engine clicks but will not start 1 Weak or dead battery 1 Recharge or replace battery 2 Corroded battery terminals 2 Clean battery terminals 3 Loose or damaged wiring 3 Check all wiring 4 Faulty solenoid or starter 4...

Страница 27: ...place mower drive belt 9 Blades improperly installed 9 Reinstall blades sharp edge down 10 Improper blades used 10 Replace with blades listed in parts manual 11 Cloggedmowerdeckventholesfrombuildup of grass leaves trash around mandrels 11 Clean around mandrels to open vent holes Headlight s not working if so equipped 1 Switch is OFF 1 Turn switch ON 2 Bulb s or lamp s burned out 2 Replace bulb s o...

Страница 28: ...em Only 11 532 13 83 37 Rim Asm 8 rear Service 532 14 43 34 Sealant Tire 10 oz Tube 1 532 43 29 14 Decal Engine 2 581 62 73 01 Decal Badge 3 532 44 40 40 Decal Panel SD 4 532 19 68 41 Decal Eng HP 5 532 12 44 33 Decal DBA 6 532 44 38 37 Decal Replacement 7 532 15 97 37 Decal Brake Clutch 8 532 18 21 66 Decal Cutfinger 9 532 14 50 05 Decal Battery Dnge Poi 10 532 19 63 57 Decal Defl 11 532 42 62 09...

Страница 29: ...PLUGS ON TWIN CYL ENGINES 28 VOLTS AC 3600 RPM REGULATOR DISCONNECTED CHARGING SYSTEM OUTPUT 9 15 AMP DC 3600 RPM OPTIONAL NON REMOVABLE CONNECTIONS REMOVABLE CONNECTIONS WIRING INSULATED CLIPS NOTE IF WIRING INSULATED CLIPS WERE REMOVED FOR SERVICING OF UNIT THEY SHOULD BE RE INSTALLED TO PROPERLY SECURE YOUR WIRING SCH13 IGNITION SWITCH CIRCUIT POSITION OFF B A1 RUN OVERRIDE B S A1 START M G A1 ...

Страница 30: ...041027200 PRODUCTNO 9604102 72 ELECTRICAL 8 1 99 100 91 2 27 90 28 55 26 43 41 24 27 25 30 33 22 79 21 40 71 34 With Service Minder Option 46 46 With 12V Outlet Option 59 103 16 42 T20S 102 29 81 105 With Charge Indicator Option 142 143 ...

Страница 31: ... Switch Light Reset 40 581 02 28 01 Harness Ign Dash 41 817 72 04 08 Screw Thd Cut 1 4 20 x 1 2 42 532 13 15 63 Cover Terminal 43 532 19 25 07 Solenoid 46 532 40 17 63 Gauge Servicereminder Hrmtr 50 532 17 46 51 Switch PTO 55 817 06 05 12 Screw Thdrol 5 16 18 x 3 4 TYTT 71 532 19 42 76 Harness Ign Chassis 79 532 17 52 42 Socket Asm Bulb Twistlock 81 532 40 96 15 Relay Harness Sealed 90 532 43 53 9...

Страница 32: ...130 130 159 159 152 217 chassis tex_GT HUSQ II_86_r1 178 68 68 183 236 34 235 161 162 196 221 68 68 213 213 218 165 228 228 194 180 58 189 189 37 36 194 194 36 162 199 159 159 195 14 202 203 205 151 206 137 137 214 204 208 15 25 207 3 297 191 18 130 130 130 234 176 5 176 176 350 335 350 336 306 125 146 ...

Страница 33: ... Net Asm 180 532 41 50 64 Chassis 182 532 40 68 59 Dash Lower 183 874 52 05 20 Bolt 5 16 18 x 1 1 4 Full Thd 189 817 00 05 12 Screw 5 16 18 x 3 4 191 532 43 74 55 Insert Reflective LH NOTE All component dimensions given in U S inches 1 inch 25 4 mm KEY PART NO NO DESCRIPTION 194 873 90 05 00 Nut Lock Hex Flange 5 16 18 195 532 40 41 37 Plug Hole 196 532 43 96 74 Console Asm Decklift 199 532 19 82 ...

Страница 34: ...6_pedal_40_r1 2 2 73 73 33 205 1 116 33 230 230 183 183 205 116 64 188 161 35 184 167 160 42 29 15 159 159 221 186 189 49 187 50 51 52 51 190 185 210 284 125 215 153 208 166 211 211 222 17 163 153 99 70 74 220 74 56 52 51 170 216 143 171 213 221 160 206 26 207 209 92 125 116 80 125 125 227 226 197 196 ...

Страница 35: ...l Control 166 532 42 91 64 Nut Push 167 532 40 52 57 Latch Brake Parking 170 532 19 43 22 Keeper Belt Centerspan 171 872 11 06 16 Bolt RDHD SQNK 3 8 16 unc x 2 183 532 13 70 57 Spacer Split 184 532 44 14 55 Handle Parking Brake 185 872 11 06 22 Bolt Rdhd Sqnk 3 8 16 x 2 3 4 Gr 5 186 532 19 43 21 Spacer Retainer 187 819 13 32 10 Washer 188 532 19 43 23 Link Clutch Ground Drive 189 532 19 43 17 Bell...

Страница 36: ...36 TRACTOR MODELNUMBERYTH2246TDR 96041027200 PRODUCTNO 9604102 72 ENGINE 30 2 ª 22 34 2ª 4 ENGINE TEX BS CYL ...

Страница 37: ...s ambient operating conditions temperature humidity altitude and engine to engine variability Due to manufacturing and capacity limitations Briggs Stratton may substitute an engine of higher rated power for this Series engine KEY PART NO NO DESCRIPTION 1 Engine B S 40H777 1575 G5 442152 Order parts from engine manufacturer 2 532 14 97 23 Muffler 9 532 19 43 20 Keeper Belt Engine 11 532 40 00 08 Cl...

Страница 38: ...ODUCTNO 9604102 72 STEERING ASSEMBLY 19 60 59 58 70 68 69 16 28 28 13 22 64 35 67 63 57 57 63 1 21 6 15 14 5 81 13 13 8 53 62 81 61 82 15 14 14 14 15 80 85 14 15 80 82 80 6 4 15 14 86 9 8 9 8 67 66 7 7 118 2 80 45 26 51 steering tex_TTR_8_r1 118 118 ...

Страница 39: ... 35 532 44 07 70 Gear Sector 45 819 18 38 12 Washer 9 16 ID x 2 3 8 OD 12 Ga 51 873 94 08 00 Nut Hex Jam Toplock 1 2 20 unf 53 532 18 89 67 WasherHardened 793x1 637x 060 57 532 40 74 65 Bracket Upstop 58 532 19 47 47 Bolt Shoulder Sector Pivot CFM 59 532 19 47 48 Washer Thrust Sector Steering 60 873 97 10 00 Nut Flange Lock 5 8 11 61 532 43 68 84 Draglink LH 62 532 43 68 85 Draglink RH 63 817 00 0...

Страница 40: ... 16 18 unc x 3 4 w Sems 10 532 19 69 77 Pan Seat 21 532 17 18 52 Bolt Shoulder 5 16 18 37 873 80 05 00 Nut Lock 5 16 18 unc 40 532 19 76 61 Handle Slide Seat 41 532 19 82 00 Spring Latch Seat 43 874 76 06 12 Bolt Fin Hex 3 8 16 unc x 3 4 44 819 13 38 12 Washer 13 32 x 2 3 8 x 12 Ga KEY PART NO NO DESCRIPTION KEY PART NO NO DESCRIPTION NOTE All component dimensions given in U S inches 1 inch 25 4 m...

Страница 41: ...Spring Torsion 87 532 19 42 09 Pin Cotter 7 16 Bow Tie Lock 88 532 41 07 10 Spring Lift Assist 89 819 19 19 12 Washer Clear Zinc 90 532 19 42 08 Pin Cotter 5 16 Bow Tie Lock 91 532 19 51 81 Link Lift Susp Mower Rear KEY PART NO NO DESCRIPTION NOTE All component dimensions given in U S inches 1 inch 25 4 mm 97 817 00 06 12 Screw 3 8 16 x 3 4 98 532 19 52 70 Link Asm Susp Front Mower 100 873 93 06 0...

Страница 42: ...O 9604102 72 MOWER DECK 30 38 55 147 30 32 31 33 56 34 57 59 62 197 188 1 69 69 69 199 40 145 46_tex_elect_5_r2 15 14 13 11 8 36 40 200 19 19 6 117 116 40 119 117 119 116 40 68 189 189 188 21 21 69 198 21 21 69 4 21 30 38 242 241 21 25 26 27 29 23 24 2 3 ...

Страница 43: ...ck Flanged 34 872 11 06 12 Bolt Carr Sh 3 8 16 x 1 1 2 Gr 5 36 532 19 73 79 Pulley Idler Flat 38 532 19 91 89 Belt Keeper LH 40 873 90 06 00 Nut Lock Flg 3 8 16 unc 55 532 19 72 49 Arm Idler 56 532 19 90 92 Spacer Retainer 57 817 00 06 16 Screw Hexwsh Thd 3 8 16 x 1 59 532 14 10 43 Guard Tuv Idler 94 62 874 52 06 36 Bolt 3 8 16 unc x 2 1 4 Gr 5 68 532 40 51 43 V Belt 69 872 14 05 05 Bolt 116 532 1...

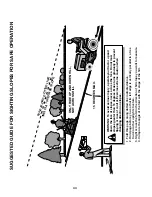
Страница 44: ... never across the face Do not mow slopes greater than 15 degrees Make turns gradually to prevent tipping or loss of control Exercise extreme caution when changing direction on slopes 1 Fold this page along dotted line indicated above 2 Hold page before you so that its left edge is vertically parallel to a tree trunk or other upright structure 3 Sight across the fold in the direction of hill slope ...

Страница 45: ...45 SERVICE NOTES ...

Страница 46: ...46 SERVICE NOTES ...

Страница 47: ...47 SERVICE NOTES ...

Страница 48: ...06 18 13 BD Printed in the U S A ...

Отзывы: