background image

44

MANTENIMENTO

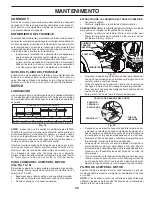
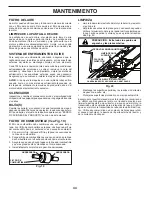
Fig. 19

SILENCIADOR

Inspeccione y cambie el silenciador corroído y el amortiguador de 

chispas (si viene equipado) pues pueden crear un peligro de incendio 

y/o daños.

FILTRO DE COMBUSTIBLE (Vea Fig. 19)

El 

fi

 ltro de combustible debe cambiarse una vez cada tempo-

rada. Si el 

fi

 ltro de combustible se tapona, obstruyendo el 

fl

 ujo 

del combustible hacia el carburador, es necesario cambiarlo.

1.  Con el motor frío, remueva el 

fi

 ltro y tapone las secciones de 

la línea de combustible.

2. Ponga el 

fi

 ltro de combustible nuevo en su posición en la línea 

de combustible con la 

fl

 echa señalando hacia el car bu ra dor.

3.  Asegúrese de que no hayan fugas en la línea del combustible 

y que las grapas estén colocadas en forma adecuada.

4.  Inmediatamente limpie toda la gasolina derramada.

FILTRO DEL AIRE

Su motor puede sufrir averías y funcionar de manera incorrecta 

con un 

fi

 ltro del aire sucio. Déle servicio al 

fi

 ltro de aire más a 

menudo si se usa en condiciones polvorosas. Vea la manual de 

la motor.

BUJÍA(S)

Cambie las bujía(s) al comienzo de cada temporada de siega o 

después de cada 100 horas de operación, lo que suceda pri me ro. 

El tipo de bujía y el ajuste de la abertura aparecen en “ES PE CI-

FI CA CIO NES DEL PRODUCTO” sección de este manual.

SISTEMA DE ENFRIAMIENTO DE AIRE 

Para asegurar un enfriamiento adecuado, asegúrese que la 
rejilla del césped, las aletas de enfriamiento, y otras super

fi

 cies 

ex ter nas del motor se mantengan limpias en todo momento.
Cada 100 horas de operación (más a menudo bajo condiciones 
extremadamente polvorosas o sucias), remueva la caja del 
ven ti la dor y otras tapas de enfriamiento. Limpie las aletas de 
en fria mien to y las super

fi

 cies externas, según sea necesario. 

Ase gú re se que se vuelvan a instalar las tapas de enfriamiento.

AVISO

: Si se opera la máquina con una rejilla del césped blo-

queada, sucia, o con las aletas de enfriamiento taponadas, y/o 
las tapas de enfriamiento removidas se producirá daño en el 
motor debido al calentamiento excesivo.

FILTRO DE 

COMBUSTIBLE

ABRAZADERA

ABRAZADERA

LIMPIEZA DE LA PANTALLA DE AIRE

La pantalla de aire está sobre el soplador de la toma de aire 

que se ubica en la parte superior del motor.  La pantalla de aire 

se debe mantener libre de suciedad y paja para evitar que el 

motor se dañe por sobrecalentamiento.  Limpie con un cepillo 

de alambre o con aire comprimido para retirar la suciedad y las 

fi

 bras de goma secas difíciles de quitar.

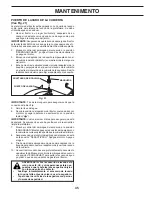
Fig. 20

• 

Mantenga las super

fi

 cies pulidas y las ruedas sin de rra mes 

de gasolina, aceite, etc.

• 

Proteja las super

fi

 cies pintadas con cera tipo automotriz.

Excepto por el puerto de lavado (si está incluido), se recomienda 

no utilizar una manguera de jardín ni el lavado a presión para 

limpiar la parte externa de su tractor, a menos que el motor y la 

transmisión estén cubiertos para protegerlos del agua. Si entra 

agua en el motor o la transmisión se reducirá la vida útil del trac-

tor.  Utilice aire comprimido o un soplador de hojas para retirar 

el césped, las hojas y la basura de la parte externa del tractor y 

de la cortadora de césped.

LIMPIEZA

• 

Limpie todo material extraño del motor, la batería, el asiento, 

el pulido, etc. 

• 

Limpie los desechos de la placa guía.  Los desechos pueden 

limitar el movimiento del eje del pedal del freno/embrague, 

lo que hará que patine la correa y que se pierda la tracción. 

Vea Fig. 20.

PRECAUCIÓN:  Evite todos los puntos de 

enganche y las piezas móviles.

SISTEMA DE DIRECCIÓN, SALPICADERO, 

GUARDA-BARROS Y SEGADORA NO MOSTRADOS

PEDAL DEL EMBRAGUE/FRENO

PLACA DE 

DIRECCIÓN

LIMPIAR PARTE 

SUPERIOR

Содержание TS 142X

Страница 1: ...oidtheproductwarranty Esta máquina puede utilizar gasolina con un con tenido de hasta el 10 de etanol E10 El uso de una gasolina que supere el 10 de etanol E10 anulará la garantía del producto Please read the operator s manual carefully and make sure you understand the instructions before using the machine Por favor lea cuidadosamente y comprenda estas intrucciones antes de usar esta maquina ...

Страница 2: ...catcher or unclogging the discharge chute Operate machine only in daylight or good artificial light Do not operate the machine while under the influence of alcohol or drugs Watchfortrafficwhenoperatingnearorcrossingroadways Use extreme caution when loading or unloading the ma chine into a trailer or truck Always wear eye protection when operating machine Use ear protectors to avoid damage to heari...

Страница 3: ...G OF GASOLINE To avoid personal injury or property damage use extreme care in handling gasoline Gasoline is extremely flammable and the vapors are explosive Extinguish all cigarettes cigars pipes and other sources of ignition Use only approved gasoline container Neverremovegascaporaddfuelwiththeenginerunning Allow engine to cool before refueling Never fuel the machine indoors Never store the machi...

Страница 4: ...ion Do not mow in shorts and or open toed footwear Always let someone know you are outside mowing WARNING This tractor is equipped with an internal com bustion engine and should not be used on or near any un improved forest covered brush covered or grass covered land unless the engine s exhaust system is equipped with a spark arrester meeting applicable local or state laws if any If a spark arrest...

Страница 5: ...ructions Determine battery location Battery location will be under the seat or the hood Lift seat pan or hood to raised position Remove two terminal caps and discard Fig 1 02605 NUT POSITIVE RED CABLE NEGATIVE BLACK CABLE BOLT TERMINAL COVER LABEL TERMINAL CAP First connect RED battery cable to positive terminal with bolt and nut as shown Tighten securely Slide terminal cover over terminal Connect...

Страница 6: ...gthedeflectorshieldupagainst tractor Continue with the instructions that follow CHECKLIST BEFORE YOU OPERATE YOUR NEW TRACTOR WE WISH TO ENSURE THAT YOU RECEIVE THE BEST PERFORMANCE AND SATISFACTION FROM THIS QUALITY PRODUCT PLEASE REVIEW THE FOLLOWING CHECKLIST All assembly instructions have been completed No remaining loose parts in carton Battery is properly prepared and charged Seat is adjuste...

Страница 7: ...oided will result in death or serious injury WARNING indicates a hazard which if not avoided could result in death or serious injury CAUTION indicates a hazard which if not avoided might result in minor or moderate injury CAUTION when used without the alert symbol indicates a situation that could result in damage to the tractor and or engine FIRE indicates a hazard which if not avoided could resul...

Страница 8: ...r starting and controlling engine speed E ATTACHMENT CLUTCH LEVER Used to engage the mower blades or other attachments mounted to your tractor F IGNITION SWITCH Used for starting and stopping the engine G REVERSE OPERATION SYSTEM ROS ON POSITION Allows operation of mower or other powered attachment while in reverse H LIGHT SWITCH Turns the headlights on and off J CRUISE CONTROL LEVER Used to set f...

Страница 9: ...LE CONTROL D See Fig 6 Always operate engine at full speed fast Operating engine at less than full speed fast reduces the engine s operating efficiency Full speed fast offers the best mower performance D F B C ATTACHMENT CLUTCH LEVER ENGAGED ATTACHMENT CLUTCH LEVER DISENGAGED GROUND DRIVE To stop ground drive depress brake pedal into full BRAKE position IMPORTANT FORWARD AND REVERSE DRIVE PEDALS R...

Страница 10: ... ADJUST MOWER CUTTING HEIGHT See Fig 8 The position of the attachment lift lever A determines the cutting height Put attachment lift lever in desired cutting height slot The cutting height range is approximately 1 to 4 25 4 to 101 6 mm The heights are measured from the ground to the blade tip with the engine not running These heights are approximate and may vary depending upon soil conditions heig...

Страница 11: ...ve across any slope Choose the slowest speed before starting up or down hills Avoid stopping or changing speed on hills If stopping is absolutely necessary push brake pedal quickly to brake position and engage parking brake Torestartmovement slowlyreleaseparkingbrakeand brake pedal Slowly depress appropriate drive pedal to slowest set ting Make all turns slowly OPERATION SERVICE MINDER HOUR METER ...

Страница 12: ...tabilizer to reach the carburetor Do not empty the gas tank and carburetor if using fuel stabilizer TO START ENGINE See Fig 3 The Briggs Stratton Endurance engine equipped with yourtractorfeaturesaReady Startautomaticchokesystem to provide simplified starting in normal conditions Please read the following starting instruction carefully When starting the engine for the first time or if the engine h...

Страница 13: ... Never engage or disengage free wheel lever while the engine is running To ensure proper operation and performance it is recom mended that the transmission be purged before operating tractor for the first time This procedure will remove any trapped air inside the transmission which may have devel oped during shipping of your tractor IMPORTANT SHOULD YOUR TRANSMISSION REQUIRE REMOVAL FOR SERVICE OR...

Страница 14: ...nce ENGINE Section 01965 ENGINE FRONT WHEEL BEARING ZERK STEERING SECTOR GEAR TEETH FRONT WHEEL BEARING ZERK SPINDLE ZERK SPINDLE ZERK T R A C T O R E N G I N E 3 2 2 6 1 2 2 2 1 2 4 5 1 2 BEFORE EACH USE EVERY 25 HOURS EVERY 8 HOURS EVERY 100 HOURS EVERY SEASON BEFORE STORAGE EVERY 50 HOURS 1 Change more often when operating under a heavy load or in high ambient temperatures 2 Service more often ...

Страница 15: ...ine is running with the ignition switch in the ROS ON position and the attachment clutch engaged any attempt by the operator to shift into reverse should NOT shut off the engine BLADE CARE Forbestresultsmowerbladesmustbekeptsharp Replace bent or damaged blades BATTERY Yourtractorhasabatterychargingsystemwhichissufficient for normal use However periodic charging of the battery with an automotive ch...

Страница 16: ... accurate reading Keep oil at FULL line on dipstick Tighten cap onto the tube securely when finished ENGINE LUBRICATION Only use high quality detergent oil rated with API service classification SJ SN Select the oil s SAE viscosity grade according to your expected operating temperature NOTE Although multi viscosity oils 5W30 10W30 etc improvestartingincoldweather theywillresultinincreased oil consu...

Страница 17: ...fuel line with arrow pointing towards carburetor Be sure there are no fuel line leaks and clamps are properly positioned Immediately wipe up any spilled gasoline ENGINE OIL FILTER Replace the engine oil filter every season or every other oil changeifthetractorisusedmorethan100hoursinoneyear NOTE If needed remove lower dash covers using steps from Lower dash cover removal section of this manual CLE...

Страница 18: ...5 Turn the water on 6 While sitting in the operator s position on the tractor re start the engine and place the throttle lever in the Fast position IMPORTANT Rechecktheareatoensuretheareaisclear Ensure no children are in the area while cleaning the deck 7 Move the tractor s attachment clutch control to the ENGAGED position Remainintheoperator sposition with the cutting deck engaged until the deck ...

Страница 19: ...GHT GRIP ON LIFT LEVER LOWER IT SLOWLY AND ENGAGE IN LOWEST POSITION NOTE Ensure mower side suspension arms A are point ing forward before sliding mower under tractor Slide mower under tractor until it is centered under tractor TO REMOVE MOWER See Fig 22 Place attachment clutch in DISENGAGED position Lower attachment lift lever to its lowest position Roll belt off engine pulley M and belt keepers ...

Страница 20: ...epeat on opposite side of tractor ATTACH REAR LIFT LINKS C Lift rear corner of mower and position slot in link assembly over pin D on rear mower bracket and secure with washer and retainer spring Insert end of link E into hole in front mower bracket and secure with washer and retainer spring J Hook end of clutch cable spring Q into hole in idler arm R Push clutch cable housing guide P into bracket...

Страница 21: ...t your adjustment by mowing some uncut grass and visually checking the appearance Readjust if neces sary until you are satisfied with the results PRECISION SIDE TO SIDE ADJUSTMENT See Fig 29 With all tires properly inflated park tractor on level ground or driveway CAUTION Blades are sharp Protect your hands with gloves and or wrap blade with heavy cloth Raise mower to its highest position At both ...

Страница 22: ... If the rear wheels rotate then the brakeneedstobeserviced Contactaqualifiedservicecenter TO REPLACE MOTION DRIVE BELT See Fig 33 Park the tractor on level surface Engage parking brake For assistance there is a belt installation guide decal on bottom side of left footrest 02952 A B C D E F G Fig 33 BELT REMOVAL Removemower See TOREMOVEMOWER section in this manual NOTE Observe entire motion drive b...

Страница 23: ...PPED WITH A 12 VOLT SYSTEM THE OTHER VEHICLE MUST ALSO BE A 12 VOLT SYSTEM DO NOT USE YOUR TRACTOR BATTERY TO START OTHER VEHICLES TO ATTACH JUMPER CABLES Connect one end of the RED cable to the POSITIVE terminal of each battery A B taking care not to short against tractor chassis ConnectoneendoftheBLACKcabletotheNEGATIVE terminal C of fully charged battery Connect the other end of the BLACK cable...

Страница 24: ...RILL ASSEMBLY See Fig 37 Raise hood Unsnap headlight wire connector Stand in front of tractor Grasp hood at sides tilt toward engine and lift off of tractor To replace reverse above procedure Fig 37 SERVICE AND ADJUSTMENTS 07002 HEADLIGHT WIRE CONNECTOR HOOD TRANSMISSION REMOVAL REPLACEMENT Should your transmission require removal for service or replacement it should be purged after reinstallation...

Страница 25: ... Plastic cannot breathe which allows condensation to form and will cause your tractor to rust IMPORTANT NEVER COVER TRACTOR WHILE ENGINE AND EXHAUST AREAS ARE STILL WARM Immediately prepare your tractor for storage at the end of the season or if the tractor will not be used for 30 days or more WARNING Neverstorethetractorwith gasoline in the tank inside a building where fumes may reach an open fla...

Страница 26: ... starter 8 Check replace solenoid or starter 9 Faulty operator presence switch es 9 Contact an authorized service center department Engine clicks but will not start 1 Weak or dead battery 1 Recharge or replace battery 2 Corroded battery terminals 2 Clean battery terminals 3 Loose or damaged wiring 3 Check all wiring 4 Faulty solenoid or starter 4 Check replace solenoid or starter Loss of power 1 C...

Страница 27: ...e mower drive belt 9 Blades improperly installed 9 Reinstall blades sharp edge down 10 Improper blades used 10 Replace with blades listed in parts manual 11 Cloggedmowerdeckventholesfrombuildup of grass leaves trash around mandrels 11 Clean around mandrels to open vent holes Headlight s not working if so equipped 1 Switch is OFF 1 Turn switch ON 2 Bulb s or lamp s burned out 2 Replace bulb s or la...

Страница 28: ... never across the face Do not mow slopes greater than 15 degrees Make turns gradually to prevent tipping or loss of control Exercise extreme caution when changing direction on slopes 1 Fold this page along dotted line indicated above 2 Hold page before you so that its left edge is vertically parallel to a tree trunk or other upright structure 3 Sight across the fold in the direction of hill slope ...

Страница 29: ... funcionamiento de la máquina sólo a adultos que tengan familiaridad con las instrucciones Limpiar el área de objetos como piedras juguetes cables etc quepuedenserrecogidosydisparadosconlascuchillas Asegurarse de que el área esté libre de otras personas antes de ponerla en marcha Parar la máquina si alguien entra en el área Nunca llevar pasajeros No cortar marcha atrás al no ser absolutamente nece...

Страница 30: ...RVICIO MANIPULACIÓN SEGURA DE LA GASOLINA Para evitar heridas personales o daños a las cosas poner el máximo cuidado a la hora de manipular la gasolina La gasolina es extremamente inflamable y los vapores son explosivos Apagar todos los cigarrillos cigarros pipas y otras fuentes de ignición Usar sólo contenedores para gasolina aprobados Nunca quitar el tapón de la gasolina o añadir carburante con ...

Страница 31: ...e manual Utilice prendas de seguridad adecuadas al manejar la máquina incluidos como mínimo calzado de seguridad gafasprotectorasyprotecciónauditiva Noutilicepantalones cortos y o calzado abierto cuando corte la hierba Informe siempre a alguien de que se dispone a cortar la hierba en el exterior ADVERTENCIA Este tractor viene equipado con un motor de combustión interna y no se debe usar sobre o ce...

Страница 32: ...ojes de pulsera de metal los anillos etc Elterminalpositivotienequeconectarseprimero para evitar las chispas debido a la conexión a tierra por accidente Fig 1 CUBIERTA TERMINAL CABLE NEGRO NEGATIVO CABLE ROJO POSITIVO TUERCA PERNO ETIQUETA 02605 TAPAS PROTECTORAS Primero conecte el cable de la batería ROJO al terminal positivo con el perno y la tuerca como se muestra debajo Apriételos seguramente ...

Страница 33: ... contra del tractor Continuar con las siguientes instrucciones LISTA DE REVISIÓN ANTES DE OPERAR Y DE DISFRUTAR DE SU TRACTOR NUEVO LE DESEAMOS QUE RECIBA EL MEJOR RENDIMIENTO Y LA MAYOR SATISFACCION DE ESTE PRODUCTO DE CALIDAD HAGA EL FAVOR DE REVISAR LA LISTA A CONTINUACION Se han completado todas las instrucciones de montaje No quedan partes sueltas en la caja de cartón La batería está preparad...

Страница 34: ...idas graves y o daños a la máquina PELIGRO indica un peligro que si no se evita provoca muerte o lesiones graves ADVERTENCIA indica un peligro que si no se evita puede provocar muerte o lesiones graves PRECAUCIÓN indica un peligro que si no se evita puede provocar lesiones ligeras o moderadas PRECAUCIÓN cuando se utiliza sin el símbolo de aviso indica una situación que puede provocar daños al trac...

Страница 35: ... HACIA ATRÁS ROS EN POSICIÓN ON Permite la operación del conjunto segador o otro accesorio accionado mientras que en revés H INTERRUPTOR DE LA LUZ Enciende y apaga las luces delanteras J PALANCA DE MANDO CRUCERO Se utiliza para fijar el movimiento hacia adelante del tractor a la velocidad deseada sin apretar el pedal de marcha atrás K PEDAL DE MARCHA ADELANTE Se utiliza para el mov imiento del tra...

Страница 36: ...os graves en éstos Siempre use anteojos de seguridad o protecciones para los ojos mientras opere su tractor o cuando haga ajustes o reparaciones Recomendamos gafas de seguridad o una máscara de visión amplia de seguridad usada sobre las gafas B C PARADA Vea Fig 5 CUCHILLAS DE LA SEGADORA Mueva el control del embrague del accesorio a la posición DESENGANCHADO IMPULSIÓN DE RECORRIDO Para parar el me...

Страница 37: ...priete con seguridad 3 Repita el procedimiento para el lado opuesto instalando la rueda calibradora en el mismo agujero de ajuste PARA OPERAR LA SEGADORA Su tractor viene equipada con un interruptor sensor que exige la presencia del operador Si el motor está funcionando y el embra gue del accesorio está enganchado y el operador trata de bajarse del asiento se apagará el motor Tiene que mantenerse ...

Страница 38: ...r con el movimiento suelte lenta mente el freno de estacionamiento y el pedal de freno Apretar despacio el pedal apropiado hasta la posición más lenta Gire siempre lentamente REMOLQUE DE CARRETILLAS O OTROS ACCESORIOS Remolquesolamentelosaccesoriosrecomendadosyespecifica dos por el fabricante del tractor Use sentido común cuado este remolcando Las cargas pesadas cuando este yendo sobre una pendien...

Страница 39: ...ne derrame ousegasolinacercadeunallamaexpuesta IMPORTANTE CUANDO SE OPERE EN TEMPERATURAS POR DEBAJO DE 32 F 0 C USE GASOLINA DE INVIERNO LIMPIA Y NUEVA PARA AUEDAR A ASEGURAR UN BUEN ARRANQUE EN CLIMA FRÍO ARRANQUE DEL MOTOR Vea Fig 3 El motor Briggs Stratton Endurance instalado en su tractor cuenta con un sistema estrangulador automático que simplifica el arranque en condiciones normales Lea con...

Страница 40: ...ue se está usando PURGAR LA TRANSMISIÓN PRECAUCIÓN Nunca enganche o desen ganche la palanca del control de rueda libre cuando el motor esta funcionando Para asegurar la operación y ejecución adecuada es recomen dado que la transmisión sea purgada antes de operar el tractor paralaprimeravez Esteprocesoremoverácualquieraireadentro de la transmisión que se halla formado durante el transporte de su tr...

Страница 41: ...ROS funcionen adecuatamente Revise si hay sujetadores sueltos TABLA DE LUBRICACIÓN 3 2 2 1 2 2 2 1 2 4 5 1 2 ANTES DE CADA USO CADA 25 HORAS CADA 8 HORAS CADA 100 HORAS CADA TEMP ORADA ALMACEN AMIENTO CADA 50 HORAS Limpiar el filtro de aire Cambiar el aceite del motor Modelos con filtro de aceite Limpiar las aletas de enfriamiento Limpiar la rejilla de aire Cambiar el filtro de aceite si equipado ...

Страница 42: ...tiva del operador de viajar marcha atrás NO apagará el motor 02828 POSICIÓN ROS ON MOTOR EN POSICIÓN ON OPERACIÓN NORMAL REMOCIÓN DE LA CUCHILLA Vea Fig 15 Levante la segadora a su posición más alta para permitir el acceso a las cuchillas AVISO Proteja sus manos con guantes y o envuelva la cuchilla con una tela gruesa Remueva el perno de la cuchilla dandole vueltas en el sentido inverso al de las ...

Страница 43: ...horas en un año NOTA Si es necesario retire las cubiertas de panel inferiores utilizando los pasos de la sección Extracción de la cubierta del tablero inferior de este manual MOTOR LUBRICACIÓN Use solamente aceite de detergente de alta calidad clasificado con la clasificación SJ SN de servicio API Seleccione la calidad de viscosidad del aceite SAE según su temperatura de operación esperada AVISO A...

Страница 44: ...ternas según sea necesario Asegúrese que se vuelvan a instalar las tapas de enfriamiento AVISO Si se opera la máquina con una rejilla del césped blo queada sucia o con las aletas de enfriamiento taponadas y o las tapas de enfriamiento removidas se producirá daño en el motor debido al calentamiento excesivo FILTRO DE COMBUSTIBLE ABRAZADERA ABRAZADERA LIMPIEZA DE LA PANTALLA DE AIRE La pantalla de a...

Страница 45: ... Fig 21 La plataforma del tractor está equipada con un puerto de lavado como parte del sistema de lavado de la plataforma Se debe utilizar después de cada uso 1 Lleve el tractor a un lugar horizontal y despejado de su césped lo bastante cerca de una boca de riego como para que llegue la manguera del jardín IMPORTANTE Asegúresedequelabocadedescargadeltractor está orientada LEJOS de su casa garaje c...

Страница 46: ... QUELA EN LA POSICIÓN MÁS BAJA AVISO Cerciórese de que los brazos de suspensión de los lados de la segadora A estén dirigidos hacia adelante antes de deslizarla por debajo del tractor Deslice la segadora por debajo del tractor hasta que quede bien centrada debajo de éste PARA DESMONTAR LA CORTADORA DE CÉSPED Vea Fig 22 Suelte el embrague poniéndolo en la posición DISEN GAGED DESACTIVADO Baje la pa...

Страница 47: ...ma de la polea del motor M CONECTE LA CONEXION ANTERIOR E Trabajo del dejó el lado de tractor Meta el fin de la barra de la asamblea de la conexión por orificio anterior en el tractor suporte anterior de suspensión F FIJE LAS PIEZAS DE PROPULSIÓN POSTERIORES C Levante la parte posterior de la cortadora ubique la ranura de la pieza de unión D por encima de la clavija que hay en la barra posterior d...

Страница 48: ... que ambos lados queden iguales AJUSTE DE DELANTE A ATRÁS Vea Fig 30 y 31 IMPORTANTE El piso debe quedar bien nivelado de lado a lado Para que el césped le quede perfectamente cortado las cuchil las de la cortadora deben ajustarse de tal manera que la punta anterior quede 3 1 a 12 7 mm 1 8 a 1 2 más abajo que la punta posteriorcuandolacortadoraseencuentreensuposiciónmásalta CUIDADO Lascuchillasson...

Страница 49: ...ualificado 02952 A B C D E F G Fig 33 PARA CAMBIAR LA CORREA DE IMPULSIÓN DE MOVIMIENTO Vea Fig 33 Estacione el tractor en una superficie nivelada Ponga el freno de mano Si necesita asistencia del lado de abajo del apoyapiés hay una guía práctica para el montaje de la correa DESMONTAJE DE LA CORREA Desmonte la cortadora Ver PARA DESMONTAR LA COR TADORA en este capítulo del manual NOTE Observe toda...

Страница 50: ...la a montar AVISO En las ruedas traseras solamente alinee las ranuras en el cubo de la rueda trasera en el eje Inserte la llave cuadrada Vuelva a colocar las arandelas e inserte el anillo de retención en forma segura en la ranura del eje Vuelva a colocar la cubierta del eje AVISO Para arreglar las llantas perforadas y péra prevenir que tenga llantas pinchadas a causa de pequeñas fugas comprar de s...

Страница 51: ...R EL FUSIBLE Cámbielo por un fusible tipo enchufable de 30 amps tipo auto motriz El sujetador del fusible está ubicado detrás del tablero ENTRECIERRE Y RELÉS El alambrado suelto o dañado puede producir el mal funcio namiento de su tractor o que deje de funcionar o le impida el arrancar Revise el alambrado TRANSMISIÓN REMOCIÓN REEMPLAZO DE LA TRANSMISIÓN Si por acaso su transmisión debe ser removid...

Страница 52: ...dor conectado MOTOR SISTEMA DE COMBUSTIBLE IMPORTANTE Es important evitar que se forman depositos de goma en partes fundamentales del sistema de combus tible tales como el carburador el filtro del combustible la manguera del combustiblesmezcladosconalcohol conocidocomogasohol o que tienen etanol o metanol pueden atraer humedad lo que conduce a la separación y a la formación de acudos durante elalm...

Страница 53: ... es que exige n la presencia del operador fallado 9 Póngase en contacto con un centro de servicio cuali ficado El motor suena pero no arranca 1 Batería baja o descargada 1 Vuelva a cargar o cambie la batería 2 Terminales de la batería corroídos 2 Limpie los terminales de la batería 3 Alambrado suelto o dañado 3 Revise todo el alambrado 4 Solenoide o arrancador fallados 4 Revise cambie el solenoide...

Страница 54: ... la cajade la segadora 8 La correa de impulsión de la segadora está des gastada o desajustada 8 Cambie ajuste la correa de impulsión de la segadora 9 Las cuchillas están mal coninstaladas 9 Vuelva a instalar las cuchillas elborde afilado hacia abajo 10 Cuchillas inadecuadas en uso 10 Cambie por las cuchillas enumeradas en este manual 11 Los agujeros de ventilación del conjunto agujeros segador tap...

Страница 55: ...nunca transversalmente con respecto a las pendientes No cortar pendientes mayores de 15 grados Haga los virajes gradualmente para evitar volcarse o la pérdida de control Tenga mucho cuidado cuando cambie de dirección en las pendientes 1 Plegar esta página a lo largo de la línea punteada arriba indicada 2 Tener la página ante de sí mismos de modo que su borde izquierdo sea vertical paralelo al tron...

Страница 56: ...10 11 19 CL Printed in U S A ...

Отзывы: