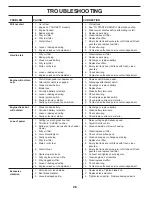
Husqvarna LT19538R Скачать руководство пользователя страница 29

29

TROUBLESHOOTING

PROBLEM

CAUSE

CORRECTION

Engine continues to 

run when operator 

leaves seat with 

attachment clutch 

engaged

1. Faulty operator-safety presence control 

system.

1. Check wiring, switches  and connections.  If not 

corrected, contact an authorized service center/ 

department.

CAUTION: DO NOT operate machine until 

problem is corrected.

Poor cut - uneven

1. Worn, bent or loose blade.

1. Replace blade.  Tighten blade bolt.

2. Mower deck not level.

2. Level mower deck.

3. Buildup of grass, leaves, or trash under mower.

3. Clean underside of mower housing.

4. Bent blade mandrel.

4. Replace blade mandrel.

5. Clogged mower deck vent holes from buildup 

of grass, leaves, and trash around mandrels.

5. Clean around mandrels to open vent holes.

Mower blades will 

not rotate

1. Obstruction in clutch mechanism.

1. Remove obstruction.

2. Worn/damaged mower drive belt.

2. Replace mower drive belt.

3. Frozen idler pulley.

3. Replace idler pulley.

4. Frozen blade mandrel.

4. Replace blade mandrel.

Poor grass 

discharge

1. Engine speed too slow.

1. Place throttle control in “FAST” position.

2. Travel speed too fast.

2. Shift to slower speed.

3. Wet grass.

3. Allow grass to dry before mowing.

4. Mower deck not level.

4. Level mower deck.

5. Low/uneven tire air pressure.

5. Check tires for proper air pressure.

6. Worn, bent or loose blade.

6. Replace blade.  Tighten blade bolt.

7. Buildup of grass, leaves and trash under 

mower.

7. Clean underside of mower housing.

8. Mower drive belt worn.

8. Replace mower drive belt.

9. Blades improperly installed.

9. Reinstall blades sharp edge down.

10. Improper blades used.

10. Replace with blades listed in parts manual.

11. Clogged mower deck vent holes from buildup 

of grass, leaves, and trash around mandrels.

11. Clean around mandrels to open vent holes.

Headlight(s) not 

working

(if so equipped)

1. Switch is “OFF”.

1. Turn switch “ON”.

2. Bulb(s) or lamp(s) burned out.

2. Replace bulb(s) or lamp(s).

3. Faulty light switch.

3. Check/replace light switch.

4. Loose or damaged wiring.

4. Check wiring and connections.

5. Blown fuse.

5. Replace fuse.

Battery will not 

charge

1. Bad battery cell(s).

1. Replace battery.

2. Poor cable connections.

2. Check/clean all connections.

3. Faulty regulator (if so equipped).

3. Replace regulator.

4. Faulty alternator.

4. Replace alternator.

Loss of drive

1. Debris on steering plate (if equipped).

1. See "CLEANING" in the Maintenance section.

2. Motion drive belt worn, damaged, or broken.

2. Replace motion drive belt.

3. Axle key missing.

3. Install axle key at rear wheel.  See "TO REMOVE 

WHEEL" in the Service and Adjustments section.

Engine "backfires” 

when turning 

engine “OFF”

1. Engine throttle control not set between 

half and full speed (fast) position before 

stopping engine.

1. Move throttle control between half and full speed 

(fast) position before stopping engine.

Engine dies when 

tractor is shifted 

into reverse

1. Reverse operation system (ROS) is not 

"ON" while mower or other attachment is 

engaged.

1. Turn ignition key to ROS "ON" position. See 

Operation section.

Содержание LT19538R

Страница 1: ...e containing up to 10 ethanol E10 is acceptable for use in this machine The use of any gasoline exceeding 10 ethanol E10 will void the product warranty Please read this manual carefully and make sure you understand the instructions before using the machine ...

Страница 2: ... Keep clear of the discharge opening at all times Only allow responsible adults who are familiar with the instructions to operate the machine Clear the area of objects such as rocks toys wire etc which could be picked up and thrown by the blades Ensure the area is clear of bystanders before operating Stop machine if anyone enters the area Never carry passengers Do not mow in reverse unless absolut...

Страница 3: ...chine Use extra care when approaching blind corners shrubs trees or other objects that may block your view of a child IV TOWING Tow only with a machine that has a hitch designed for towing Do not attach towed equipment except at the hitch point Follow the manufacturer s recommendation for weight limits for towed equipment and towing on slopes Never allow children or others in or on towed equipment...

Страница 4: ...dule in maintaining caring for and using your tractor Follow the instructions under Maintenance and Stor age sections of this manual WARNING This tractor is equipped with an internal com bustion engine and should not be used on or near any un improved forest covered brush covered or grass covered land unless the engine s exhaust system is equipped with a spark arrester meeting applicable local or ...

Страница 5: ...ion Shaft Steering Wheel Adapter Key s Key Slope Sheet 1 Hex Bolt 1 Lock Washer 1 Large Flat Washer Steering Wheel Insert 1 Seat Washer Hex Bolt Installed by Dealer Brush Guard Kit Battery 2 Hex Bolts 2 Nut Keps Oil Drain Extension Hood 1 Hood Scoop UNASSEMBLED PARTS ...

Страница 6: ...purposes To ensure safe and proper operation of your tractor all parts and hardware you assemble must be tightened securely Use the correct tools as necessary to ensure proper tightness TOOLS REQUIRED FOR ASSEMBLY A socket wrench set will make assembly easier Standard wrench sizes are listed 1 5 16 wrench Utility knife 2 7 16 wrenches Tire pressure gauge 2 1 2 wrenches Pliers 1 9 16 wrench Whenrig...

Страница 7: ...orshieldupagainst tractor Continue with the instructions that follow INSTALL SEAT See Figs 3 and 4 Removeboltandflatwashersecuringseattocardboard packing and set aside for assembly of seat to tractor Remove the cardboard packing and discard Connect switch to seat Place seat on seat pan so all three 3 bottom pads are positioned over large slotted holes in pan WIRING HARNESS SEAT SWITCH PAD TAPE SEA...

Страница 8: ...r level Fuel tank is filled with fresh clean regular unleaded gasoline Become familiar with all controls their location and function Operate them before you start the engine Be sure brake system is in safe operating condition Be sure Operator Presence System and Reverse Op eration System ROS are working properly See the Operation and Maintenance sections in this manual CHECK TIRE PRESSURE The tire...

Страница 9: ...ety inform ation about hazards which can result in death serious injury and or property damage DANGER indicates a hazard which if not avoided will result in death or serious injury WARNING indicates a hazard which if not avoided could result in death or serious injury CAUTION indicates a hazard which if not avoided might result in minor or moderate injury CAUTION when used without the alert symbol...

Страница 10: ...ine C PARKING BRAKE Locks clutch brake pedal into the brake position D THROTTLE CHOKE CONTROL Used for starting and controlling engine speed E ATTACHMENT CLUTCH LEVER Used to engage the mower blades or other attachments mounted to your tractor Fig 6 F IGNITION SWITCH Used for starting and stopping the engine G REVERSEOPERATIONSYSTEM ROS ON POSI TION Allows operation of mower deck or other powered ...

Страница 11: ...ine s operating efficiency Full speed fast offers the best mower performance Fig 8 Fig 9 B C ATTACHMENT CLUTCH LEVER ENGAGED ATTACHMENT CLUTCH LEVER DISENGAGED OPERATION D F GROUND DRIVE To stop ground drive depress clutch brake pedal into full BRAKE position Move gearshift lever J to neutral position ENGINE Move throttle control D to fast position NOTE Failure to move throttle control to fast pos...

Страница 12: ...ft lever to reverse R position and slowly release clutch brake pedal to start movement When use of the ROS is no longer needed turn the ignition key clockwise to engine ON position ROS ON POSITION ENGINE ON POSITION NORMAL OPERATING 02828 Fig 12 OPERATION J TO ADJUST MOWER CUTTING HEIGHT See Fig 11 The position of the attachment lift lever A determines the cutting height Put attachment lift lever ...

Страница 13: ...e Maintenance section of this manual To change engine oil see the Maintenance section in this manual TO TRANSPORT Raiseattachmentlifttohighestpositionwithattachment lift control When pushing or towing your tractor ensure gearshift lever is in neutral N position Do not push or tow tractor at more than five 5 mph 8 km h NOTE To protect hood from damage when transporting your tractor on a truck or a ...

Страница 14: ...rm up period from several seconds to several minutes depending on the temperature The attachments can also be used during the engine warm up period ADD GASOLINE Fill fuel tank to bottom of filler neck Do not overfill Use fresh clean regular gasoline with a minimum of 87 octane Do not mix oil with gasoline Purchase fuel in quantities that can be used within 30 days to ensure fuel freshness CAUTION ...

Страница 15: ...eways etc After one or two rounds mow in the opposite direction making left hand turns until finished See Fig 14 Fig 14 If grass is extremely tall it should be mowed twice to reduce load and possible fire hazard from dried clip pings Make first cut relatively high the second to the desired height Do not mow grass when it is wet Wet grass will plug mower and leave undesirable clumps Allow grass to ...

Страница 16: ...ck Replace Mower Blades Che Clean Debris Off Steering Plate ck Transaxle Cooling Che Check Operator Presence ROS Systems ck V Belts Check Mower Levelness LUBRICATION CHART GENERAL RECOMMENDATIONS The warranty on this tractor does not cover items that have beensubjectedtooperatorabuseornegligence Toreceive full value from the warranty operator must maintain tractor as instructed in this manual Some...

Страница 17: ...is running with the ignition switch in the ROS ON position and the attachment clutch engaged any attempt by the operator to shift into reverse should NOT shut off the engine BLADE CARE Forbestresultsmowerbladesmustbekeptsharp Replace bent or damaged blades BATTERY Yourtractorhasabatterychargingsystemwhichissufficient for normal use However periodic charging of the battery with an automotive charge...

Страница 18: ...mine temperature range expected before oil change All oil must meet API service classification SG SL Ensure tractor is on level surface Oil will drain more freely when warm Catch oil in a suitable container Remove oil fill cap dipstick Be careful not to allow dirt to enter the engine when changing oil Slide oil drain extension under oil drain hole drain hole maybeflushwithorprotrudefromengineblock...

Страница 19: ...the beginning of each mowing sea son or after every 100 hours of use whichever comes first Spark plug type and gap setting is shown in PRODUCT SPECIFICATIONS section of this manual ENGINE COOLING SYSTEM See Fig 19 Debris may clog the engine s air cooling system Remove blower housing and clean the area shown to prevent over heating and engine damage CLEAN OUT CHAFF AND DEBRIS 02744 AIR SCREEN Fig 1...

Страница 20: ...ctor at the opposite end from the tap connection Pull back the lock collar of the hose connector and push the connector onto the deck washout port at the left end of the mower deck Release the lock collar to lock the connector on the nozzle IMPORTANT Tug hose ensuring connection is secure Turn the water on While sitting in the operator s position on the tractor re start the engine and place the th...

Страница 21: ...mower suspension arm A from chassis pin B and rear lift link C from rear mower bracket D remove retainer springs and washers CAUTION AFTER REAR LIFT LINKS ARE DISCONNECTED THE ATTACH MENT LIFT LEVER WILL BE SPRING LOADED HAVE A TIGHT GRIP ON LIFT LEVER WHEN CHANGING POSITION OF THE LEVER Slide mower out from under right side of tractor IMPORTANT IF AN ATTACHMENT OTHER THAN THE MOWER IS TO BE MOUNT...

Страница 22: ... of tractor ATTACH REAR LIFT LINKS C Lift rear corner of mower and position slot in link assembly over pin D on rear mower bracket and secure with washer and retainer spring Insert end of link E into hole in front mower bracket and secure with washer and retainer spring J Hook end of clutch cable spring Q into hole in idler arm R Push clutch cable housing guide P into bracket slide collar L ontogu...

Страница 23: ...st your adjustment by mowing some uncut grass and visually checking the appearance Readjust if neces sary until you are satisfied with the results PRECISION SIDE TO SIDE ADJUSTMENT See Fig 30 With all tires properly inflated park tractor on level ground or driveway CAUTION Blades are sharp Protect your hands with gloves and or wrap blade with heavy cloth Raise mower to its highest position At both...

Страница 24: ...If the rear wheels rotate then the brakeneedstobeserviced Contactaqualifiedservicecenter A B D E F G TO REPLACE MOTION DRIVE BELT See Fig 34 Park the tractor on level surface Engage parking brake For assistance there is a belt installation guide decal on bottom side of left footrest BELT REMOVAL 1 Removemower See TOREMOVEMOWER section in this manual NOTE Observe entire motion drive belt and positi...

Страница 25: ...oneendoftheBLACKcabletotheNEGATIVE terminal C of fully charged battery Connect the other end of the BLACK cable D to good chassis ground away from fuel tank and battery TO REMOVE CABLES REVERSE ORDER BLACK cable first from chassis and then from the fully charged battery RED cable last from both batteries Fig 37 WEAK OR DEAD BATTERY FULLY CHARGED BATTERY TO ADJUST STEERING WHEEL ALIGNMENT If steeri...

Страница 26: ...8 WARNING Do not short battery terminals by allowing a wrench or any other object to contact both terminals at the same time Before connecting battery remove metal bracelets wristwatch bands rings etc Positive terminal must be connected first to prevent sparking from accidental grounding Lift seat pan to raised position DisconnectBLACKbatterycablefirstthenREDbattery cable and carefully remove batt...

Страница 27: ... Plastic cannot breathe which allows condensation to form and will cause your tractor to rust IMPORTANT NEVER COVER TRACTOR WHILE ENGINE AND EXHAUST AREAS ARE STILL WARM Immediately prepare your tractor for storage at the end of the season or if the tractor will not be used for 30 days or more WARNING Neverstorethetractorwith gasoline in the tank inside a building where fumes may reach an open fla...

Страница 28: ...7 Check replace ignition switch 8 Faulty solenoid or starter 8 Check replace solenoid or starter 9 Faulty operator presence switch es 9 Contact an authorized service center department Engine clicks but will not start 1 Weak or dead battery 1 Recharge or replace battery 2 Corroded battery terminals 2 Clean battery terminals 3 Loose or damaged wiring 3 Check all wiring 4 Faulty solenoid or starter 4...

Страница 29: ...er mower 7 Clean underside of mower housing 8 Mower drive belt worn 8 Replace mower drive belt 9 Blades improperly installed 9 Reinstall blades sharp edge down 10 Improper blades used 10 Replace with blades listed in parts manual 11 Cloggedmowerdeckventholesfrombuildup of grass leaves and trash around mandrels 11 Clean around mandrels to open vent holes Headlight s not working if so equipped 1 Swi...

Страница 30: ...30 SERVICE NOTES ...

Страница 31: ... never across the face Do not mow slopes greater than 15 degrees Make turns gradually to prevent tipping or loss of control Exercise extreme caution when changing direction on slopes 1 Fold this page along dotted line indicated above 2 Hold page before you so that its left edge is vertically parallel to a tree trunk or other upright structure 3 Sight across the fold in the direction of hill slope ...

Страница 32: ...06 05 2013 TH ...

Отзывы: