background image

24 – English

TROUBLESHOOTING

Troubleshooting schedule

!

WARNING! If service operations or troubleshooting does not require the machine to be 
on, the engine should be switched off, and the spark plug wire disconnected from the 
spark plug.

Problem

Probable cause

Potential Solution

The machine 
does not start

Incorrect starting procedure.

See instructions under the heading Starting and stopping.

Air filter clogged

Clean the air filter. Replace if necessary.

There is no fuel in the fuel tank

Refill with fuel

Spark plug defective

Replace the spark plug.

Spark plug cable disconnected.

Check that the spark plug wire is connected to the spark plug.

Loose blade or broken blade adapter

Tighten blade bolt or replace blade adapter.

Defect engine brake hommuuandle

Contact an authorized service workshop.

Fuel valve lever (if equipped) in OFF postion

Turn fuel valve lever to the ON position.

The battery voltage is too low (if equipped)

Charge the battery.

Battery connected incorrectly (if equipped)

Connect battery to engine

Less power

Height of cut too low.

Raise height of cut.

Cutting extremely tall grass

Air filter clogged

Clean the air filter. Replace if necessary.

Buildup of grass, leaves and trash under mower

Clean underside of mower housing.

Too much oil in the engine

Check the engine’s oil level

Walking speed too fast

Cut at slower walking speed.

Uneven mowing

Worn, bent or loose blade

Replace the blade if it is bent or damaged.

Wheel heights uneven

Set all wheels at same height

Buildup of grass, leaves and trash under mower

Clean underside of mower housing.

Excessive 
vibrations

Worn, bent or loose blade

Replace the blade if it is bent or damaged.

Bent engine crankshaft

Contact an authorized service workshop.

Starter rope hard 
to pull

Engine flywheel brake is on when the engine brake 
handle is released

Depress the engine brake handle to upper handle before 
pulling starter rope.

Bent engine crankshaft

Contact an authorized service workshop.

Blade adapter broken

Contact your service agent.

Incorrect starting procedure.

See instructions under the heading Starting and stopping.

Grass catcher not 
filling (if 
equippped)

Cutting height too low

Raise height of cut.

Worn blade

Replace the blade

Catcher not venting air

Clean / Inspect Grass Catcher

Difficult to push 
the machine 
forward

Cutting extremely tall grass

Raise height of cut.

Cutting height too low

Grass catcher too full

Empty the grass catcher

Handle height not right for you

Adjust handle height (if equippped)

Drive starts 
feeling slow

Belt wear

See instructions under the heading Replacing the drive belt.

Belt off of pulley

Worn, damaged or untensioned clutch wire

For more information, see the ”Adjusting the clutch wire” 
section.

Содержание LC221Ai

Страница 1: ...perator s manual Manuel d utilisation Please read the operator s manual carefully and make sure you understand the instructions before using the machine Lire attentivement et bien assimiler le manuel d utilisation avant d utiliser la machine ...

Страница 2: ... DANGER Keep hands and feet away Explanation of warning levels The warnings are graded in three levels WARNING IMPORTANT CAUTION STOP STOP WARNING Used if there is a risk of serious injury or death for the operator or damage to the surroundings if the instructions in the manual are not followed IMPORTANT Used if there is a risk of injury to the operator or damage to the surroundings if the instruc...

Страница 3: ...e carton 8 Handle 8 Grass catcher 9 Starter handle 9 Convert the lawn mower 9 Cutting height 10 Filling with oil 10 FUEL HANDLING General 11 Fueling 11 Transport and storage 11 OPERATING Personal protective equipment 12 General safety precautions 12 Basic working techniques 14 Transport and storage 14 Starting and stopping 15 MAINTENANCE General 16 Maintenance schedule 16 General recommendations 1...

Страница 4: ...s our wish that you will be satisfied with your product and that it will be your companion for a long time Think of this operator s manual as a valuable document By following its content using service maintenance etc the life span and the second hand value of the machine can be extended If you ever lend or sell this machine make sure that the borrower or buyer gets the operator s manual so they wi...

Страница 5: ...rrectly and can cause serious even fatal injuries It is extremely important that you read and understand the contents of this operator s manual WARNING Long term inhalation of the engine s exhaust fumes can represent a health hazard WARNING In order to prevent accidental starting when setting up transporting adjusting or making repairs always disconnect spark plug wire and place wire where it can ...

Страница 6: ... 12 9 11 1 Engine brake handle 2 Drive 3 Starter handle 4 Grass catcher 5 Fuel cap 6 Air filter 7 Spark plug 8 Drive cover 9 Muffler 10 Wash out port connector 11 Rear deflector 12 Engine oil cap with dipstick 13 Mulcher door 14 Cutting height control 15 Mulch plug 16 Operator s manual ...

Страница 7: ...lector or springs if damaged Muffler The muffler is designed to keep noise levels to a minimum and to direct exhaust fumes away from the user Inspecting the muffler Check regularly that the muffler is complete and secured correctly WARNING Never use a machine that has faulty safety equipment If your machine fails any checks contact your service agent to get it repaired Prevent unintentional starti...

Страница 8: ...nobs 4 Remove any packing material from around engine brake handle Vertical handle storage The handle can be set in a vertical storage position 1 Loosen the lower handle knobs 2 Rotate the handle to vertical storage indentation on the handle bracket 3 Retighten the knobs Storage Transport position The handle assembly can be folded to minimize space needed for transport and storage 1 Loosen the 2 h...

Страница 9: ...er was shipped ready to be used in mulching mode The mulching mode will recut the grass clippings many times which will reduce the clippings in size so that as they fall onto the lawn they will disperse into the grass and not be noticed In addition the mulched grass will biodegrade quickly to provide nutrients for the lawn Use rear bagging to collect the grass clippings within the grass catcher Re...

Страница 10: ... material to the left of the machine while cutting Cutting height The cutting height can be adjusted to 9 1 9 different positions Raise wheels for low cut and lower wheels for high cut Adjust cutting height to suit your requirements Medium position is best for most lawns To change cutting height squeeze height adjuster lever toward the wheel Move the wheel up or down to suit your requirements Set ...

Страница 11: ...ilizer WARNING Running an engine in a confined or badly ventilated area can result in death due to asphyxiation or carbon monoxide poisoning Fuel and fuel fumes are highly inflammable and can cause serious injury when inhaled or allowed to come in contact with the skin For this reason observe caution when handling fuel and make sure there is adequate ventilation The exhaust fumes from the engine a...

Страница 12: ...and instruction labels as necessary Always disconnect the spark plug before performing maintenance or service Children CHILDREN CAN BE INJURED BY THIS EQUIPMENT The American Academy of Pediatrics recommends that children be a minimum of 12 year of age before operating a pedestrian controlled lawn mower and a minimum of 16 years of age before operating a riding lawn mower Serious accidents may occu...

Страница 13: ... sure that the cutter cannot come into contact with the ground or other objects Always place yourself behind the machine Allow all the wheels to remain on the ground and keep both hands on the handle when mowing Keep your hands and feet away from the rotating blades Do not tilt the machine when the engine is running Pay particular attention when pulling the machine towards you during work Never li...

Страница 14: ...gerous Do not use the lawn mower on slopes steeper than 15 All slopes demand extra care If you feel unsure do not mow it Do Mow across the face of slopes never up and down Exercise extreme caution when changing direction on slopes Remove obstacles such as stones branches etc Watch for holes ruts bumps or hidden objects Uneven terrain could cause a slip and fall accident Tall grass can hide obstacl...

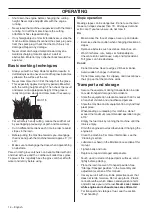
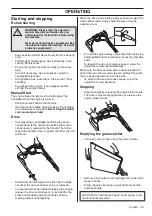
Страница 15: ... drive control lever s only Hold the the brake handle down against handle to continue mowing without self propelling When the drive starts feeling slow you need to adjust the drive control cable Finely adjust the wire using the adjuster screw Turn off the engine Always disconnect the spark plug before performing maintenance or accessing mocable parts To tension the wire and increase speed screw th...

Страница 16: ...ne before carrying out any checks or maintenance Stop the engine motor and wait until the blade comes to a complete stop before cleaning the machine removing the grass catcher or unclogging the discharge chute Prevent unintentional starting by removing the ignition cable from the spark plug The starter key or battery must also be removed on machines with electric start The life span of the machine...

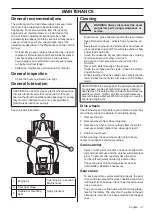
Страница 17: ... sure they move freely Clean the wheels if not rotating freely 1 Remove the bolt 2 Remove wheels from wheel adjusters 3 Remove any trash or grass cuttings from inside the dust cover pinion and or drive wheel gear teeth 4 Replace the wheels If after cleaning the drive wheels do not turn freely contact a authorized service workshop Grass catcher Pores in cloth grass catchers can become filled with d...

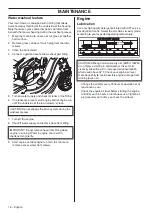
Страница 18: ...e classification SG SL Select the oil s SAE viscosity grade according to your expected operating temperature Change the oil after every 25 hours of operation or at least once a year Check the engine oil level before starting the engine and after each 5 hours of continuous use Tighten oil plug securely each time you check the oil level CAUTION Do not engage the drive system during the washout proce...

Страница 19: ...lways be sure to retighten oil dipstick before starting engine 6 Refit cable to spark plug Oil change 1 Disconnect the spark plug wire from the spark plug 2 Always empty the fuel tank before you place the lawn mower on its side Empty the fuel tank by running the machine until the tank is empty 3 Unscrew the oil filler cap 4 Place a suitable vessel to collect the oil in 5 Drain the oil by tipping t...

Страница 20: ...balancer When using a cone balancer follow the instructions supplied with balancer Do not use a nail for balancing blade The lobes of the center hole may appear to be centered but are not Slide blade on to an unthreaded portion of the steel bolt or pin and hold the bolt or pin parallel with the ground If blade is balanced it should remain in a horizontal position If either end of the blade moves d...

Страница 21: ...h the lock washer and hardened washer into blade adapter and crankshaft 4 Use block of wood between blade and lawn mower housing and tighten the blade bolt turning clockwise 5 The bolt should be tightened with a torque of 35 40 ft Ibs 47 54 Nm 6 Pull the blade around by hand and make sure it rotates freely IMPORTANT Use only a replacement blade approved by the manufacturer of your mower Using a bl...

Страница 22: ...s 8 Front belt keeper 9 Stripper ring 10 Blade 11 Hardened washer 12 Lock washer 13 Blade bolt 14 Belt cover Remove the drive belt Empty the fuel tank by running the machine until the tank is empty Always disconnect the spark plug before performing maintenance or accessing mocable parts Turn lawn mower on its side Make sure air filter and carburetor is facing upward Remove drive cover ...

Страница 23: ... pulley Be sure the new belt is inside the tabs of the belt keeper Reinstall rear transmission pulley Route the other end of the new belt through hole in housing to front transmission pulley Route new belt through idler assembly to blade adapter engine pulley Reinstall all 3 idler pulleys Position the blade adapter engine pulley on the engine crank shaft Be sure key in blade adapter engine pulley ...

Страница 24: ...oil in the engine Check the engine s oil level Walking speed too fast Cut at slower walking speed Uneven mowing Worn bent or loose blade Replace the blade if it is bent or damaged Wheel heights uneven Set all wheels at same height Buildup of grass leaves and trash under mower Clean underside of mower housing Excessive vibrations Worn bent or loose blade Replace the blade if it is bent or damaged B...

Страница 25: ...r les mains et les pieds à l écart Explication des niveaux d avertissement Il existe trois niveaux d avertissement AVERTISSEMENT IMPORTANT REMARQUE STOP STOP AVERTISSEMENT Symbole utilisé en cas de risque de blessures très graves ou de mort pour l utilisateur ou de dommages pour les environs si les instructions du manuel ne sont pas suivies IMPORTANT Symbole utilisé en cas de risque de blessures p...

Страница 26: ...1 Poignée 31 Collecteur d herbe 32 Poignée de lanceur 32 Convertir la tondeuse 32 Hauteur de coupe 33 Remplissage d huile 33 MANIPULATION DU CARBURANT Généralités 34 Remplissage de carburant 34 Transport et rangement 34 COMMANDE Équipement de protection personnelle 35 Instructions générales de sécurité 35 Techniques de travail de base 37 Transport et rangement 37 Démarrage et arrêt 38 ENTRETIEN Gé...

Страница 27: ...ts vous garantit une assistance professionnelle au niveau du service et des réparations en cas de besoin Si la machine n a pas été achetée chez un de nos revendeurs autorisés demandez à un revendeur l adresse de l atelier d entretien le plus proche Nous espérons que cette machine vous donnera toute satisfaction et qu elle vous accompagnera pendant de longues années N oubliez pas que ce manuel d ut...

Страница 28: ...essures personnelles graves voire mortelles Il importe donc de lire attentivement et de bien assimiler le contenu de ce manuel d utilisation AVERTISSEMENT Une inhalation prolongée des gaz d échappement du moteur peut constituer un danger pour la santé AVERTISSEMENT Pour éviter le démarrage accidentel de la tondeuse débrancher et éloigner toujours le fil de la bougie avant toute intervention de rég...

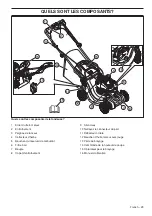
Страница 29: ...aînement 3 Poignée de lanceur 4 Collecteur d herbe 5 Bouchon du réservoir de carburant 6 Filtre à air 7 Bougie 8 Capot d entraînement 9 Silencieux 10 Nettoyez le connecteur du port 11 Déflecteur arrière 12 Bouchon d huile moteur avec jauge 13 Porte du broyage 14 Commande de la hauteur de coupe 15 Obturateur pour le broyage 16 Manuel d utilisation ...

Страница 30: ...tourner les gaz d échappement loin de l utilisateur Contrôle du silencieux Contrôler régulièrement que le silencieux est entier et qu il est attaché correctement AVERTISSEMENT Ne jamais utiliser une machine dont les équipements de sécurité sont défectueux Si les contrôles ne donnent pas de résultat positif confier la machine à un atelier spécialisé Évitez un démarrage accidentel en retirant le câb...

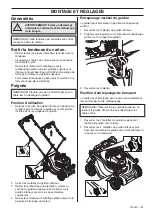
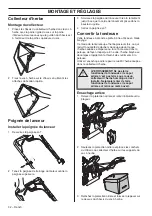
Страница 31: ...rieures 4 Retirer tout matériau d emballage placé autour de la poignée de freinage du moteur Entreposage vertical du guidon Le guidon peut être placé en position d entreposage vertical 1 Desserrez les molettes du guidon inférieur 2 Faites pivoter le guidon sur l empreinte d entreposage vertical sur le support de guidon 3 Resserrez les molettes Position d entreposage de transport Le guidon peut êtr...

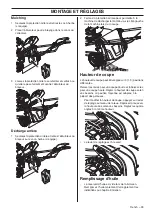
Страница 32: ...isée en mode broyage Ce mode de tonte recoupe l herbe plusieurs fois ce qui réduit la quantité de déchets de coupe de sorte que l herbe coupée se disperse au fur et à mesure dans la pelouse de façon inaperçue En outre l herbe broyée se décompose rapidement et fournit des nutriments à la pelouse Utiliser l ensachage arrière pour recueillir l herbe coupée dans le collecteur d herbe Ensachage arrière...

Страница 33: ...ur le côté gauche de la machine lors de la coupe Hauteur de coupe La hauteur de coupe peut être réglée sur 9 1 9 positions différentes Relever les roues pour une coupe courte et rabaisser les pour une coupe haute Régler la hauteur de coupe selon vos besoins La position moyenne est adaptée à la plupart des pelouses Pour modifier la hauteur de coupe appuyer sur levier de réglage au niveau de la roue...

Страница 34: ...peuvent causer des blessures graves en cas d inhalation ou de contact avec la peau Il convient donc d observer la plus grande prudence lors de la manipulation du carburant et de veiller à disposer d une bonne aération Les gaz d échappement du moteur sont très chauds et peuvent contenir des étincelles pouvant provoquer un incendie Par conséquent ne jamais démarrer la machine dans un local clos ou à...

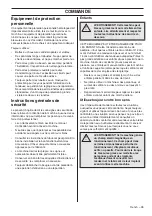
Страница 35: ...sécurité les remplacer si nécessaire Toujours débrancher la bougie avant de procéder à une opération d entretien ou une réparation Enfants CETTE MACHINE PEUT ÊTRE DANGEREUSE POUR LES ENFANTS Selon l Académie américaine de pédiatrie il faut que les enfants aient au minimum 12 ans avant d utiliser une tondeuse à pousser et au minimum 16 ans avant d utiliser une tondeuse autoportée Prêtez la plus gra...

Страница 36: ...re l arbre du moteur Une lame ou un arbre d entraînement faussé peut causer un déséquilibre et produire de fortes vibrations ce qui risque de desserrer la lame L étrier de frein ne doit jamais être fixé de façon permanente dans la poignée lorsque la machine est en marche Placer la tondeuse sur une surface solide et la démarrer Vérifier que le couteau ne peut pas entrer en contact avec le sol ou un...

Страница 37: ...uire la quantité d herbe recueillie Pour éviter ce problème laver régulièrement le collecteur d herbe au jet d eau et laisser sécher avant utilisation Utilisation sur des terrains en pente Tondre la pelouse dans une pente peut être dangereux N utilisez pas la tondeuse sur des pentes de plus de 15 Toutes les pentes exigent la plus grande prudence Si vous n êtes pas sûr de vous ne pas tondre Faire T...

Страница 38: ...nde Pour continuer de tondre le gazon sans utiliser la fonction automoteur maintenez la poignée de frein contre le guidon Si le régime moteur semble avoir ralenti réglez le câble de levier de commande Réglez avec précision le câble à l aide de la vis de réglage Arrêtez le moteur Déconnectez toujours la bougie d allumage avant d effectuer l entretien ou d accéder aux pièces mobiles Pour tendre le c...

Страница 39: ...it être effectué avec le moteur à l arrêt Arrêter le moteur et attendre l arrêt complet de la lame avant de nettoyer la machine de retirer le collecteur d herbe ou de libérer la goulotte d éjection Évitez un démarrage accidentel en retirant le câble d allumage de la bougie La clé de démarrage ou la batterie doivent également être déposées sur les machines équipées d un démarreur électrique La duré...

Страница 40: ...servoir de carburant et placez la machine sur le côté avec le silencieux vers le bas Roues motrices Contrôler les roues avant chaque utilisation pour être sûr qu elles tournent correctement Nettoyez les roues si elles ne tournent pas librement 1 Retirer le boulon 2 Retirer les roues des dispositifs de réglage de roue 3 Éliminer les saletés ou l herbe coupée de l intérieur du capuchon parepoussière...

Страница 41: ...température de fonctionnement prévue Vidanger l huile toutes les 25 heures de fonctionnement ou au moins une fois par an Vérifiez le niveau d huile du moteur avant de démarrer le moteur et après chaque cinq heures d utilisation Serrez fermement le bouchon de la jauge d huile après chaque vérification du niveau d huile Niveau d huile Avant le premier démarrage Votre tondeuse est expédiée sans huile...

Страница 42: ...assurez vous que le filtre à air est toujours placé dans la position la plus haute S informer auprès d une station service comment se débarrasser de l huile moteur résiduelle 6 Si du carburant ou de l huile moteur ont été répandus sur la machine Essuyer soigneusement toutes les éclaboussures et laisser les restes d essence s évaporer 7 Verser lentement l huile par l orifice de remplissage en faisa...

Страница 43: ...ce central peuvent paraître centrés mais ils ne le sont pas Faire glisser la lame sur une partie non filetée de la broche ou du boulon en acier et maintenir la broche ou le boulon parallèle au sol Si la lame est équilibrée elle doit rester en position horizontale Si l une ou l autre des extrémités de la lame se déplace vers le bas aiguiser l extrémité lourde jusqu à ce que le disque soit bien équi...

Страница 44: ...le frein et la rondelle durcie dans l adaptateur de lame et le vilebrequin 4 Placer une cale en bois entre la lame et le carter de la tondeuse et serrer le boulon de lame en le tournant dans le sens des aiguilles d une montre 5 Le boulon doit être serré avec un couple de serrage de 47 à 54 Nm 6 Déplacez la lame à la main et vérifiez qu elle tourne librement IMPORTANT Utiliser uniquement une lame d...

Страница 45: ...déboiseur 10 Couteau 11 Rondelle durcie 12 Rondelle de blocage 13 Boulon de lame 14 Carter de courroie Retirer la courroie d entraînement Vider le réservoir de carburant en faisant fonctionner la machine jusqu à ce que le réservoir soit vide Déconnectez toujours la bougie d allumage avant d effectuer l entretien ou d accéder aux pièces mobiles Placez la tondeuse sur le côté de sorte que le filtre ...

Страница 46: ...ositif de guidage de courroie Réinstallez la poulie de transmission arrière Faites passer l autre extrémité de la nouvelle courroie dans le trou du boîtier de la poulie de transmission avant Faire passer la courroie neuve dans le bloc de poulie tendeur vers l adaptateur de lame la poulie du moteur Réinstaller les 3 poulies tendeur Placez l adaptateur de la lame et la poulie du moteur sur le vilebr...

Страница 47: ... Réduisez la vitesse de déplacement de la tondeuse Tonte irrégulière Lame usée tordue ou desserrée Remplacez la lame si elle est faussée ou endommagée Hauteur de roues inégale Réglez toutes les roues à la même hauteur Accumulation d herbe de feuilles et de déchets sous la tondeuse Nettoyez le dessous du bloc de coupe de la tondeuse Vibrations excessives Lame usée tordue ou desserrée Remplacez la l...

Страница 48: ...1157570 32 z YY 2L z YY 2L 2015 10 26 US Original instructions CA Instructions d origine ...

Отзывы: