Husqvarna K 970 Rescue Скачать руководство пользователя страница 25

English

 – 25

MAINTENANCE

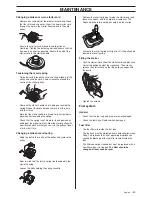
Changing a broken or worn starter cord

Remove any remnants of the old starter cord and check 
that the return spring works. Insert the new starter cord 
through the hole in the starter housing and in the cord 
pulley. 

Secure the starter cord around the cord pulley as 
illustrated. Tighten the fastening well and ensure that the 
free end is as short as possible. Secure the end of the 
starter cord in the starter handle.

Tensioning the recoil spring

Guide the cord through the cut-out in the periphery of the 
pulley and wind the cord 3 times clockwise around the 
centre of the starter pulley.

Now pull the starter handle and in doing so tension the 
spring. Repeat the procedure once more, but this time 
with four turns.

Note that the starter handle is drawn to its correct home 
position after tensioning the spring.

Check that the spring is not drawn to its end position by 
pulling out the starter line fully. Slow the starter pulley with 
your thumb and check that you can turn the pulley at least 
a further half turn.

Changing a broken recoil spring

Undo the bolt in the centre of the pulley and remove the 
pulley.

Bear in mind that the return spring lies tensioned in the 
starter housing.

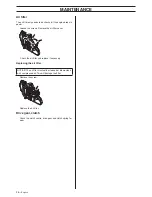
Loosen the bolts holding the spring cassette.

Remove the recoil spring by turning the starter over and 
loosen the hooks, with the help of a screwdriver. The 
hooks hold the return spring assembly on the starter.

Lubricate the recoil spring with light oil. Fit the pulley and 
tension the recoil spring.

Fitting the starter

To fit the starter, first pull out the starter cord and place the 
starter in position against the crankcase. Then slowly 
release the starter cord so that the pulley engages with 
the pawls.

Tighten the screws.

Fuel system

General

Check that the fuel cap and its seal are not damaged.

Check the fuel hose. Replace when damaged.

Fuel filter

The fuel filter sits inside the fuel tank.

The fuel tank must be protected from contamination when 
filling. This reduces the risk of operating disturbances 
caused by blockage of the fuel filter located inside the 
tank.

The filter cannot be cleaned but must be replaced with a 
new filter when it is clogged. 

The filter should be 

changed at least once per year.

Содержание K 970 Rescue

Страница 1: ...0 Rescue US Operator s manual Please read the operator s manual carefully and make sure you understand the instructions before using the machine It is the owner s responsibility to make sure that any persons who use this power cutter have read this manual ...

Страница 2: ...e Air purge Decompression valve Refuelling petrol oil mix You will find the following labels on your power cutter The Emissions Compliance Period referred to on the Emission Compliance label indicates the number of operating hours for which the engine has been shown to meet Federal and Californian emissions requirements Other symbols decals on the machine refer to special certification requirement...

Страница 3: ...al 11 Checking the drive shaft and flange washers 11 Checking the bushing 11 Checking the direction of the blade rotation 11 Fitting the cutting blade 11 Blade guard 11 Reversible cutting head 12 FUEL HANDLING General 13 Fuel 13 Fueling 13 Transport and storage 14 OPERATING Protective equipment 15 General safety precautions 15 Transport and storage 19 STARTING AND STOPPING Before starting 20 Start...

Страница 4: ...rk before you start using the machine The manufacturer s reservation All information and all data in the Operator s Manual were applicable at the time the Operator s Manual was sent to print Husqvarna AB has a policy of continuous product development and therefore reserves the right to modify the design and appearance of products without prior notice For customer assistance contact us at our websi...

Страница 5: ...hoke 6 Throttle lockout 7 Throttle trigger 8 Air purge 9 Starter handle 10 Decompression valve 11 Starter 12 Muffler 13 Adjustment handle for guard 14 Blade guard 15 Type plate 16 Harness 17 Fuel cap 18 Belt guard 19 Cutting arm 20 Belt tensioner 21 Cutting head 22 Cutting blade 23 Combination spanner 24 Bushing decal 25 Operator s manual ...

Страница 6: ... work properly Start the power cutter and apply full throttle Release the throttle control and check that the cutting blade stops and remains stationary If the cutting blade rotates when the throttle is in the idle position you should check the carburettor s idle adjustment See instructions in the section Maintenance Stop switch Use the stop switch to switch off the engine Checking the stop switch...

Страница 7: ...the user Inspecting the muffler Check regularly that the muffler is complete and secured correctly WARNING Overexposure to vibration can lead to circulatory damage or nerve damage in people who have impaired circulation Contact your doctor if you experience symptoms of overexposure to vibration Such symptoms include numbness loss of feeling tingling pricking pain loss of strength changes in skin c...

Страница 8: ...ssure can stop the vibration Otherwise replace the blade Abrasive blades The cutting material on abrasive blades consists of grit bonded using an organic binder Reinforced blades are made up of a fabric or fibre base that prevents total breakage at maximum working speed if the blade should be cracked or damaged A cutting blade s performance is determined by the type and size of abrasive corn and t...

Страница 9: ...ped blades not available on power cutters a so called 360 degree guard Power Cutters this saw use Abrasive or Diamond blades and have a different guarding system which does not provide protection against the dangers presented by wood cutting blades Use of this power cutter with a carbide tipped blade is a violation of OSHA regulations Due to the hazardous nature and exigent circumstances involved ...

Страница 10: ... from the cutter after use and stored carefully Store cutting blades in dry frost free conditions Special care should be taken with abrasive blades Abrasive blades must be stored on a flat level surface If an abrasive blades is stored in humid conditions this can cause imbalance and result in injury Inspect new blades for transport or storage damage ...

Страница 11: ...nds with the centre hole of the cutting blade The blades are marked with the diameter of the centre hole Checking the direction of the blade rotation When using diamond blades make sure that it rotates in the direction indicated by the arrow on the blade The direction of rotation for the machine is shown by arrows on the cutting arm Fitting the cutting blade The blade is placed on the bushing A be...

Страница 12: ...e Operating section for additional information Some of the machine s good ergonomic features may also be jeopardised Cutting with the cutting head reversed should only occur with cuts that are not possible in a standard manner First release the two bolts and then the adjuster screw to release the belt tension Now unscrew the bolts and dismantle the belt guard Disconnect the water hose from the bla...

Страница 13: ...rself or your clothes change your clothes Wash any part of your body that has come in contact with fuel Use soap and water If the machine is leaking fuel Check regularly for leaks from the fuel cap and fuel lines WARNING Running an engine in a confined or badly ventilated area can result in death due to asphyxiation or carbon monoxide poisoning Use fans to ensure proper air circulation when workin...

Страница 14: ...ks or naked flames for example from electrical machinery electric motors electrical relays switches or boilers When storing and transporting fuel always use approved containers intended for this purpose Long term storage When storing the machine for long periods the fuel tank must be emptied Contact your local gas station to find out where to dispose of excess fuel ...

Страница 15: ...perienced user Do not attempt any task that you feel unsure of WARNING The use of products such as cutters grinders drills that sand or form material can generate dust and vapours which may contain hazardous chemicals Check the nature of the material you intend to process and use an appropriate breathing mask Long term exposure to noise can result in permanent hearing impairment So always use appr...

Страница 16: ...Never move the machine when the cutting equipment is rotating The machine is equipped with a friction retarder to shorten the stop time The guard for the cutting equipment should be adjusted so that the rear section is flush with the work piece Spatter and sparks from the material being cut are then collected up by the guard and led away from the user The guards for the cutting equipment must alwa...

Страница 17: ...escue operations the following safety considerations must be adhered to Training and protective equipment Only operators trained in the use of cutting with a power cutter equipped with carbide tipped blade shall be allowed to operate the power cutter Full protective fire fighting gear shall be worn by the operator at all times A full face shield not just protective eye glasses shall be worn by the...

Страница 18: ...al injury Reactive force A reactive force is always present when cutting The force pulls the machine in the opposite direction to the blade rotation Most of the time this force is insignificant If the blade is pinched or stalled the reactive force will be strong and you might not be able to control the power cutter Kickback zone Never use the kickback zone of the blade for cutting If the blade is ...

Страница 19: ...no kickback If the cut closes and pinches the blade ther is always a risk of kickback Take care when inserting the blade in an existing cut Be alert to movement of the work piece or anything else that can occur which could cause the cut to close and pinch the blade Transport and storage Secure the equipment during transportation in order to avoid transport damage and accidents For transport and st...

Страница 20: ...ith your left hand Put your right foot on the lower section of the rear handle pressing the machine against the ground Never wrap the starter cord around your hand Grip the starter handle slowly pull out the cord with your right hand until you feel some resistance the starter pawls grip now quickly and powerfully pull the cord With a cold engine The machine stops when the engine fires becase the c...

Страница 21: ...ast idle Stopping Stop the engine by moving the stop switch STOP to the right CAUTION The cutting blade continues to rotate up to a minute after the motor has stopped Blade coasting Make sure that the cutting blade can rotate freely until it is completely stopped Carelessness can result in serious personal injury ...

Страница 22: ...y an authorized service workshop The engine should be switched off and the stop switch in STOP position Wear personal protective equipment See instructions under the heading Personal protective equipment The life span of the machine can be reduced and the risk of accidents can increase if machine maintenance is not carried out correctly and if service and or repairs are not carried out professiona...

Страница 23: ...elt For correct tensioning of the drive belt the square nut should be positioned opposite the marking on the belt cover Tensioning the drive belt The tension of a new drive belt must be readjusted after one or two tanks of fuel have been used When the machine is equipped with a friction retarder a scraping sound can be heard from the bearing housing when the blade is turned by hand This is quite n...

Страница 24: ...adjustment is necessary first turn the screw clockwise until the blade starts to rotate Now turn the screw anti clockwise until the blade stops rotating Rec idle speed 2700 rpm Starter Checking the starter cord Loosen the screws that hold the starter against the crankcase and remove the starter Pull the cord out about 30 cm and lift it into the cut out in the periphery of the starter pulley When t...

Страница 25: ...at least a further half turn Changing a broken recoil spring Undo the bolt in the centre of the pulley and remove the pulley Bear in mind that the return spring lies tensioned in the starter housing Loosen the bolts holding the spring cassette Remove the recoil spring by turning the starter over and loosen the hooks with the help of a screwdriver The hooks hold the return spring assembly on the st...

Страница 26: ...Remove the air filter cover Check the air filter and replace if necessary Replacing the air filter Remove the screw Replace the air filter Drive gear clutch Check the clutch centre drive gear and clutch spring for wear NOTICE The air filter must not be cleaned or blown clean with compressed air This will damage the filter ...

Страница 27: ... 9000 Ignition system Manufacturer of ignition system SEM Type of ignition system CD Spark plug Champion RCJ 6Y NGK BPMR 7A Electrode gap inch mm 0 02 0 5 Fuel and lubrication system Manufacturer of carburetor Walbro Carburetor type RWJ5 Fuel tank capacity US pint litre 2 1 1 0 Weight Power cutter without fuel and cutting blade lb kg 12 300 mm 23 4 10 6 14 350 mm 24 3 11 0 16 400 mm 26 0 11 8 Cutt...

Страница 28: ...rranty period begins on the date small nonroad engine is delivered LENGTH OF COVERAGE Husqvarna Construction Products warrants to the initial owner and each subsequent purchaser that the engine is free from defects in materials and workmanship which cause the failure of a warranted part for a period of two years WHAT IS COVERED REPAIR OR REPLACEMENT OF PARTS Repair or replacement of any warranted ...

Страница 29: ...r and fuelfilter covered up to maintenance schedule 4 Ignition System 1 Spark Plug covered up to maintenance schedule 2 Ignition Module MAINTENANCE STATEMENT The owner is responsible for the performance of all required maintenance as defined in the operator s manual ...

Страница 30: ......

Страница 31: ......

Страница 32: ... breath including chronic bronchitis silicosis and pulmonary fibrosis from exposure to silica These diseases may be fatal Skin irritation and rash Cancer according to NTP and IARC NationalToxicology Program International Agency for Resaearch on Cancer Take precautionary steps Avoid inhalation of and skin contact with dust mist and fumes Wear and ensure that all bystanders wear appropriate respirat...

Отзывы: