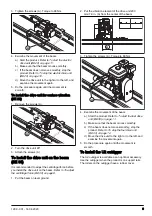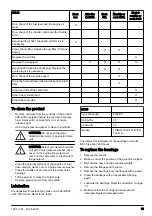
1. Install the brackets (A) to the beam with the supplied
screws and nuts.
B
A
2. Adjust the height and length of the extension arm
(B).
Note: The height between the lower edge of the
extension arm and the beam can be adjusted from
125 mm/6 in. to 250 mm/10 in. in 25 mm/1 in.
intervals. The length can be extended between 130
mm/5 in. and 500 mm/16 in.
To install the U3 outrigger
The U3 outrigger is available as an optional accessory.
Use the outrigger when the product is on support rails.
The rollers on the outrigger have a rubber cover. The
outrigger has wheels that are attached to a shaft. The
shaft and the wheels lift the beam from the concrete
surface. This makes it easier to move the beam back
across the concrete surface.
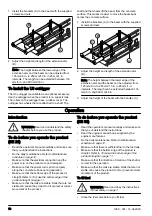
1. Install the brackets (A) to the beam with the supplied
screws and nuts.
B
C
A
2. Adjust the height and length of the extension arm
(B).
Note: The height between the lower edge of the
extension arm and the beam can be adjusted from
125 mm/6 in. to 250 mm/10 in. in 25 mm/1 in.
intervals. The length can be extended between 130
mm/5 in. and 500 mm/16 in.
3. Adjust the height of the beam with the handles (C).
Operation
Introduction
WARNING: Read and understand the safety
chapter before you use the product.
To do before you operate the product
(BE 20)
• Read the operator's manual carefully and make sure
that you understand the instructions.
• Do the daily maintenance. Refer to
schedule on page 12
.
• Make sure that the electrical connection and the
power cord on the product are not damaged.
• Make sure that the power cord can move freely
along the concrete surface during operation.
• Make sure that the bottom edge of the product is
straight. Refer to
To make the bottom edge of the
product straight on page 11
.
• Make sure that the rails are stable. Rails that are not
stable can cause the product to tilt or prevent correct
movement of the product.
To do before you operate the product
(BE 30)
• Read the operator's manual carefully and make sure
that you understand the instructions.
• Read the engine manual that is supplied by the
engine manufacturer.
• Do the daily maintenance. Refer to
schedule on page 12
.
• Make sure that there is sufficient fuel in the fuel tank.
• Make sure that the bottom edge of the product is
To make the bottom edge of the
.
• Make sure that the direction of rotation of the shaft is
correct for the operation.
• Make sure that the rails are stable. Rails that are not
stable can cause the product to tilt or prevent correct
movement of the product.
To fill fuel
WARNING: Read and obey the instructions
.
• Close the fuel valve before you fill fuel.
10
1299 - 001 - 14.04.2020
Содержание BD 32
Страница 1: ...BE 20 BE 30 BD 32 BD 42 BD 52 BD 62 EN Operator s manual 2 21 ...
Страница 22: ...22 1299 001 14 04 2020 ...
Страница 23: ...1299 001 14 04 2020 23 ...
Страница 24: ...www husqvarnacp com Original instructions 1140662 26 2020 04 22 ...

