11
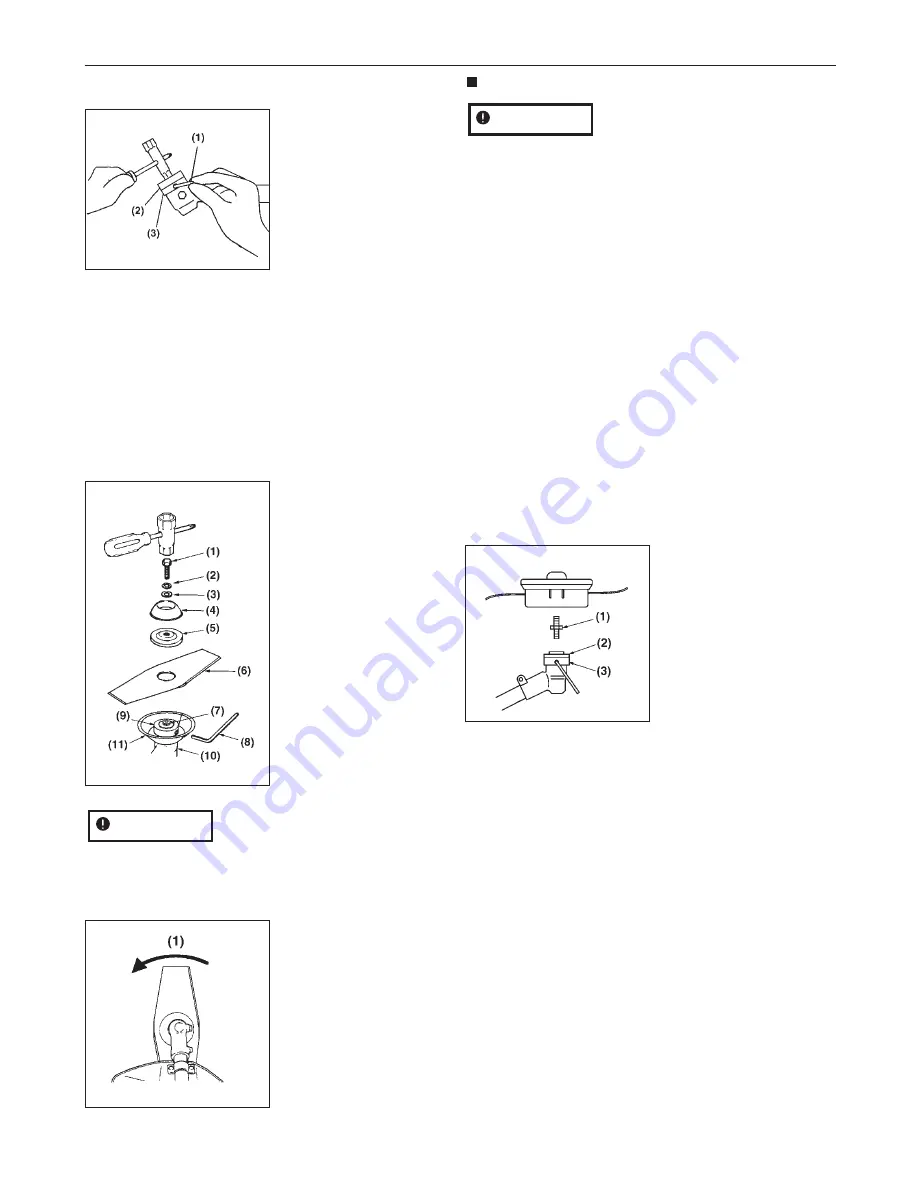
(Note that this is a left-turning screw.)
(1) Bar
(2) Holder B
(3) Holder A
2. Attach the cover (SE11,(11)) and fix it with screw.
3. Insert blade between cutter holder A and cutter
holder B. (SE11)
4. Attach cover and spring washer. (SE11)
5. Screw the bolt to fix them into place. (SE11)
Tightening torque:
14.7~19.6 N-m
(150~200kgf-m)
(1) Bolt
(2) Spring Washer
(3) Washer
(4) Bolt cover
(5) Holder B
(6) Blade
(7) Gear shaft
(8) Bar
(9) Holder A
(10) Gear case
(11) Cover preventing
grass from getting
caught up
Look at the blade from above, and make sure that the
direction in which the blade is mounted is correct.
(SE12)
(1) Rotating direction
IMPORTANT
LINE HEAD (SE11) (SE13)
Since the resistance of the nylon cutter is larger than
that of the metal cutter, wrong operation of the nylon
cutter will cause the clutch to overheat, deform and be
damaged. When using the nylon cutter, carefully note
the following.
•
Use HUSQVARNA’s genuine nylon cutter. When using
a commercially-available nylon cutter, make sure that
it is no longer than 10 cm in external shape.
•
Make sure that the length of the nylon cord is 17 cm
or shorter.
•
Keep the engine rotating at high speed while
working.
1. Detach bolt (1), spring washer (2), washer(3), bolt
cover (4) and cover (11).
2. Put holder B (5) to holder A (9).
Screw arbor bolt (12) in holder B (5).
3. Then attach the cutting head to the gear shaft over
the holders. Hard-tighten it securely.
(1) Arbor bolt
(2) Holder B
(3) Holder A
IMPORTANT
SE11
SE13
SE12
5. Set up
SE10
Содержание 532RBS
Страница 22: ......
Страница 23: ......
Страница 24: ...Original instructions 2010 11 01 1153989 26 www husqvarna com ...


