background image

4

1

502 50 18-01

502 50 18-01

Starter

Dismantling

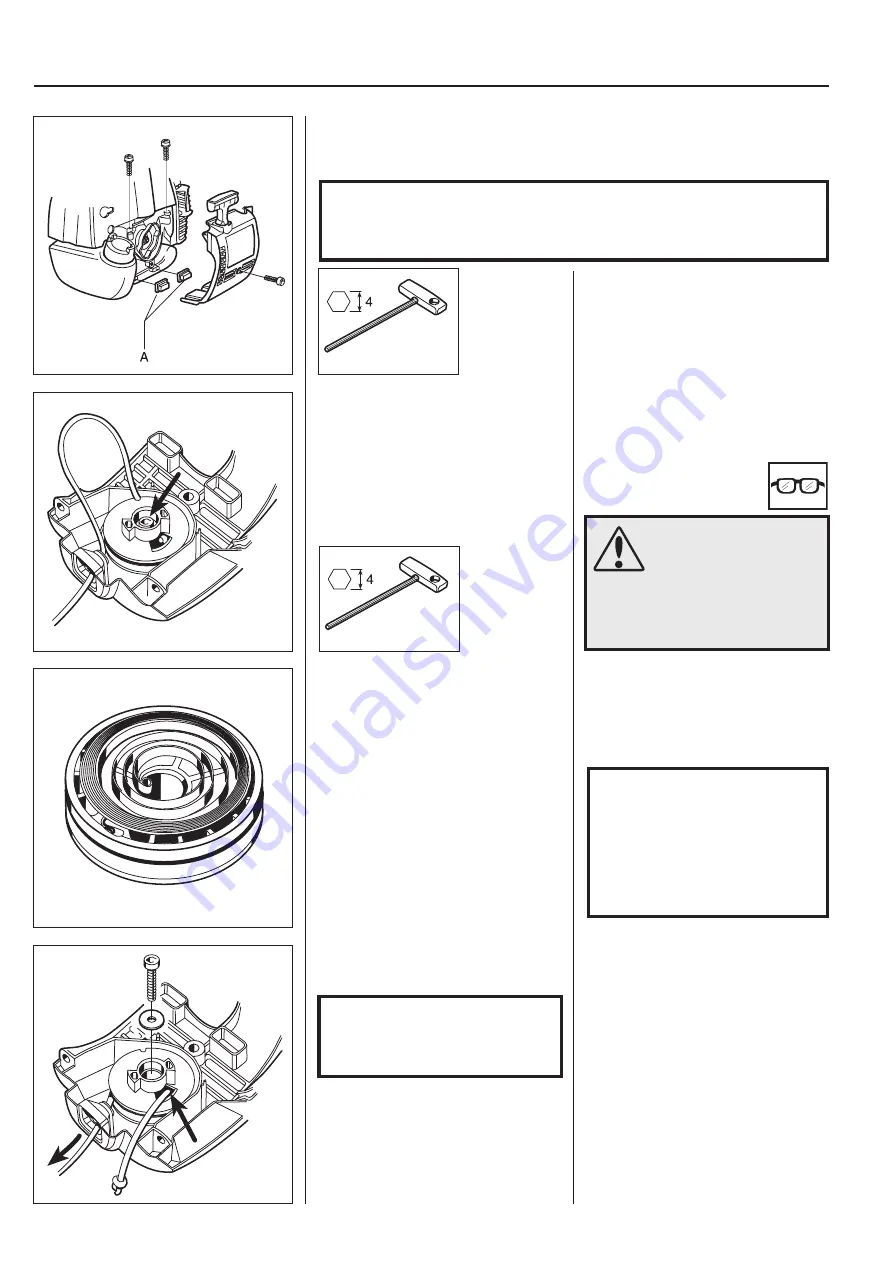
Remove the 3 screws and lift off the starter.

Offload the spring tension.

Remove the screw from the centre of
the starter pulley and lift off the starter
pulley.

Offload the spring tension.

Remove the screw in the centre of the
starter pulley. Carefully lift out the starter
pulley from the starter housing.

Assembly

Clean the component parts and
assemble in the reverse order as set out
for dismantling.

Assembly

Clean component parts before
assembling.

Replace the return spring/starter pulley
and starter cord, if necessary.

Assemble the starter pulley.

Assemble a new starter cord.

Lubricate the spindle with a little grease
and fit the starter pulley.

Position the washer and tighten the
screw.

Assemble a new starter cord. Slide it
into the starter pulley’s slot as
illustrated and then out through the
cord guide in the starter housing.

Make sure the knot on the end of the
cord is as small as possible!

NOTE!

The return spring and starter
pulley are supplied pre-
assembled and are fitted in the
starter housing as a single unit.

Exercise care when opening the
packaging so that the spring
does not fly out.

NOTE!

A new starter cord can be fitted
without the need of dismantling
the starter!

NOTE!

Ensure the bushings (A) that guide the starter towards the fuel tank are not
lost.

WARNING!

Wear protective glasses.

The return spring lies tensioned in
the starter and can fly out and
cause personal injury with
careless handling.

Содержание 326C, 326L, 326LX-Series, 326LDX-Series

Страница 1: ...Workshop manual 326R 326L 326C English ...

Страница 2: ...______________________________ 3 2 Electrical system___________________________ 7 3 Fuel system _____________________________ 13 4 Centrifugal clutch _________________________ 27 5 Angle gear_______________________________ 31 6 Cylinder and piston________________________ 35 7 Crankshaft and crankcase __________________ 45 8 Tools ___________________________________ 51 ...

Страница 3: ...t has been dismantled The sensitive sealing lip can easily be damaged resulting in inferior sealing capacity Surfaces which the seal shall seal against must also be completely undamaged Lubricate the sealing lip with grease before it is fitted and ensure that it is not damaged e g by shoulders and splines on a shaft Use tape or a conical sleeve as protection It is important that the sealing ring f...

Страница 4: ...3 1 1 Starter Contents Dismantling ___________________________________ 4 Assembly ____________________________________ 4 Replacing the drive dogs ________________________ 6 ...

Страница 5: ...ricate the spindle with a little grease and fit the starter pulley Position the washer and tighten the screw Assemble a new starter cord Slide it into the starter pulley s slot as illustrated and then out through the cord guide in the starter housing Make sure the knot on the end of the cord is as small as possible NOTE The return spring and starter pulley are supplied pre assembled and are fitted...

Страница 6: ... starter pulley further at least a half turn Fit the starter on the engine body First press in the top edge of the starter under the cylinder cover Fit the starter on the engine body 1 Check that the rubber bushings are in position in the starter housing 2 Insert the top edge of the starter under the cylinder cover and fold the starter in against the engine body Press in the starter against the en...

Страница 7: ... circlip holdings the drive dog Lift out the drive dog and spring for replacement Assemble in the reverse order as set out for dismantling Replacing the drive dogs Dismantle the drive body Replacing the drive dogs Fit the piston stop no 502 54 15 01 in the spark plug hole and loosen the nuts holding the drive body ...

Страница 8: ...7 2 Electrical system 2 Electrical system Contents Checking the ignition spark __________________ 8 Dismantling ______________________________ 11 Assembly _______________________________ 12 ...

Страница 9: ...heck the electrode gap It should be 0 5 mm Adjust the gap as needed to the correct value with the side electrode If the electrodes are worn more than 50 the spark plug should be changed If the electrodes are worn more than 50 the spark plug should be changed Too large a spark gap entails a great deal of stress on the ignition module and risk for short circuiting Check if a spark occurs when attemp...

Страница 10: ...lug now sparks the fault is either in the stop switch or the short circuit cable Change the switch as needed and check to see if the cable insulation is damaged Check that the connection between the ignition lead and the contact coil is not burnt If this is the case cut off the damaged section 3 Check the connection between the ignition lead and the contact coil Cut off a piece of the ignition lea...

Страница 11: ...e that the cables are correctly drawn and lie in the cable grooves Do not forget to check the cables in the throttle too See chapter 3 Throttle TIP Use an Ohmmeter in order to easily check if cable breakage has occurred due to pinching for example Still no spark Check the air gap Still no spark Check the air gap between the flywheel magnet and the ignition module The gap should be 0 3 mm Use a 502...

Страница 12: ...fuel tank Remove the screws holding the clutch cover Remove the clutch cover complete with the shaft from the engine Remove the three screws holding the clutch cover on the engine Lift off the cover together with the shaft NOTE Do not lose the rubber bushings fitted between the fuel tank and the clutch cover Loosen the short circuit cable from the ignition module Loosen both ends of the short circ...

Страница 13: ...ew with a hammer if the flywheel sits tightly on the crankshaft Assembly Check that the cast key in the flywheel and key way in the crankshaft are undamaged Fit the flywheel and centrifugal clutch Do not forget the washers A Note the slots on the washer lie closest to the flywheel Align with the equivalent pins on the flywheel Assemble the ignition module and adjust the air gap to 0 3 mm Assemble ...

Страница 14: ...g _______________________________ 15 Fuel filter __________________________________ 15 Fuel pump _________________________________ 16 Carburettor ________________________________ 16 Throttle ___________________________________ 23 Carburettor settings _________________________ 24 Fuel system ...

Страница 15: ... Remove the air filter and clean it in warm soapy water A damaged filter should be replaced with a new filter Air filter Remove the cover over the carburettor and lift off the air filter The filter is manufactured of foamed plastic and should be cleaned in tepid soapy water A damaged filter should be replaced with a new filter WARNING Do not clean not the filter with petrol Hazardous NOTE Do not b...

Страница 16: ...ll out the filter with your fingers or with help of tool 502 50 83 01 The fuel cap can be taken apart for cleaning Use a screwdriver and prise off the housing A that contains a rubber diaphragm B and a filter C Knock the housing against a tabletop so that the cover D over the diaphragm falls off Blow the filter C clean and the sintered filter E with compressed air and mount the fuel cap in the rev...

Страница 17: ... filter connection to the side remove the fuel pipe and lift off the carburettor The carburettor is made by Zama Design function and servicing correspond with the Walbro carburettor Default carburettor settings H 1 revolution open L 1 revolution open The carburettor needles are fitted with movement limiters caps The carburettor is made by Zama It has the same design and function as the Walbro carb...

Страница 18: ...red Dismantling the carburettor Carefully remove the control diaphragm A and gasket B Check the diaphragm for holes and wear on the pin C Replace the diaphragm if required The pump unit Pumps fuel from the tank to the carburettor The pump unit This is where the pump diaphragm E that pumps fuel from the tank to the carburettor s measuring unit is found The diaphragm is affected by pressure variatio...

Страница 19: ...e and the lever arm for damage or wear Replace damaged components with new ones Check the needle valve for damage on the tip and in the lever arm groove Check the lever arm for damage to the groove for the needle valve and wear on the mounting points towards the control diaphragm Replace damaged components with new ones In the event of leakage remove the needle valve In the event of leakage remove...

Страница 20: ...s are bent the pump will not function in a satisfactory manner Hold it up to a light as well to discover any holes in the material Carefully remove the fuel screen D using a needle for example Clean or replace the fuel screen NOTE During assembly the pump diaphragm should lie closest to the carburettor housing Remove the movement limiters from the jet needles using flat nose pliers Unscrew the jet...

Страница 21: ...for wear Replace if required Remove the valves and dampers If these components are worn idling is disrupted Always replace the valves and dampers at the same time Assembling the carburettor Blow all channels in the carburettor compartment clean Mount a new plug Use a suitable punch to get a completely tight seal Press in a new main jet Assembling the carburettor Blow the carburettor housing clean ...

Страница 22: ... are turned correctly and that they close completely and tightly in the closed position Use Loctite on the valve screws Attach the various parts of the measuring unit in the reverse order as set out for dismantling The lever arm should lie flush with the carburettor housing Attach the various parts of the measuring unit in the reverse order as set out for dismantling The lever arm should lie flush...

Страница 23: ...stance piece Tighten the carburettor screws Assembly 1 Secure the seal on the carburettor with a little grease 2 Connect the fuel pipe from the tank 3 Slide in the carburettor between the air filter connection and the distance piece on the cylinder 4 Tighten the carburettor screws and ensure that the seal is positioned correctly Connect the throttle cable and check that it sits correctly in the gu...

Страница 24: ...ver Remove the throttle from the shaft Remove both screws A one on each side Remove the screws B and pull away the shaft with the throttle from the clutch cover Loosen the 3 front screws C approx 2 turns holding the throttle halves and pull the throttle off of the shaft Remove the screws holding the throttle together and carefully separate the halves Note how the different parts are fitted Pay spe...

Страница 25: ...can vary a little depending on the humidity temperature and air pressure L Low speed needle H High speed needle T Idle adjustment screw The fuel quantity in relation to the air flow permitted by the throttle opening is adjusted by the L and H jets Turning the needles clockwise gives a leaner fuel mixture less fuel and turning them anticlockwise gives a richer fuel mixture more fuel A leaner mixtur...

Страница 26: ...d when all adjustments are made First adjust the L needle then the H needle and finally the idling speed s T screw Idling speed 2 800 rpm NOTE Always use a tachometer when adjusting the carburettor The recommended max speed must not be exceeded Correctly adjusted carburettor A correctly adjusted carburettor means that the engine accelerates without hesitation and it splatters a little at full thro...

Страница 27: ...th cord The cord length should be 150 mm measured from the end of the cord to the cord bushing on the trimmer head 2 Run the engine warm for about 5 minutes Let the engine idle 3 Turn the L needle so that the highest speed is attained 4 If the speed exceeds 3 700 rpm reduce it with the aid of the idling speed s T screw T and a carry out a new adjustment in accordance with point 3 5 Then turn the L...

Страница 28: ...27 4 Centrifugal clutch 4 Contents Dismantling ________________________________ 28 Assembly _________________________________ 28 Replacing the clutch drum and drive axle ________ 29 Centrifugal clutch ...

Страница 29: ...pment s drive shaft rotating Dismantling Dismantle the clutch by following the instructions in the chapter Electrical system Dismantling The centrifugal clutch is bolted to the flywheel Follow the detailed instructions in the chapter Electrical system when the clutch is to be dismantled Twist apart the clutch and inspect the different parts with regard to wear or damage Twist apart the clutch Insp...

Страница 30: ...he reverse order as set out for dismantling Use Loctite intended for mounting bearings when the bearing is mounted in the clutch cover Replacing the clutch drum and drive axle Separate the shaft from the clutch cover Pull away the clutch cover complete with drive axle and clutch drum The drum is bolted on the drive axle and can be dismantled using tool 502 52 16 01 The clutch drum should be replac...

Страница 31: ...30 4 Centrifugal clutch ...

Страница 32: ...31 5 Angle gear 5 Contents Dismantling ________________________________ 32 Assembly _________________________________ 33 Angle gear ...

Страница 33: ... the same time efficient In other words the power from the engine via the drive axle should be angled so that the cutting tool works parallel with the ground Remove the circlips holding the bearings on the input respective output shafts Heat the entire angle gear to approx 110 C and first dismantle the input axle and then the output axle 4 Remove the support washers and the dust protection disc 5 ...

Страница 34: ...this side faces outwards Heat the gearbox to approx 110 C and first place the output axle in position and then the input axle Make sure the bearing bottoms in its seating Fit the circlips B and C Make sure they lie correctly in their grooves Assemble remaining parts in the reverse order as set out for dismantling NOTE Do not forget the circlip A holding the bearing on the input axle Dismantle the ...

Страница 35: ...34 5 Angle gear ...

Страница 36: ...________ 36 Cleaning inspection _________________________ 37 Analysis and actions _________________________ 38 Service tips ________________________________ 42 Wear tolerances ____________________________ 42 Assembly _________________________________ 43 Cylinder and piston ...

Страница 37: ...t a compression test is made to easily determine whether any faults exist for example leaking valves leaking valve guides damaged piston rings or a damaged piston Pull off the cylinder Pull the cylinder straight up without turning it There is a risk that a piston ring may break Dismantling Dismantle all parts around the cylinder incl the distance piece with attached carburettor Dismantling Dismant...

Страница 38: ...the gudgeon pin from the piston using the punch 505 38 17 05 If the pin is too tight carefully warm the piston 4 Wash all the components 5 Inspect the different components for damage and wear Check the piston and cylinder for seizure damage and wear Also see the Analysis and actions section Check the gudgeon pin If it has blued it must be replaced If the piston moves too easily both the piston and...

Страница 39: ...o deep scores along the entire piston skirt on the exhaust side Action Change to a fuel with the correct oil mixture Change to a higher octane petrol Replace damaged parts Replace leaking gaskets and shaft seals Clean the cooling fins and air intake Clean or replace the spark arrestor mesh Cause Incorrect oil mixture in the fuel Too low octane fuel Air leaks Cracked fuel hose Leaking inlet gaskets...

Страница 40: ...n or black discoloration of the piston skirt Piston damage caused by a too high engine speed Typical damage associated with a too high engine speed includes broken piston rings broken circlip on the gudgeon pin faulty bearings or that the guide pin for the piston ring has become loose Piston ring breakage A too lean carburettor setting results in a too high speed and a high piston temperature If t...

Страница 41: ...ring failure Failure of the crankshaft bearing or on the connecting rod bearing is usually caused by a too high engine speed resulting in the bearing being overloaded or overheating This in turn can cause the bearing rollers or ball to glide instead of rotate which can cause the roller or ball retainer to break The broken debris can be trapped between the piston and cylinder wall damaging the pist...

Страница 42: ...posits on the top of the piston and in the piston ring groove The piston ring sits firmly in the groove Piston material has been worn away The lower part of the piston skirt is thinner on the inlet side than on the exhaust side Larger softer particles that penetrate into the engine cause damage to the piston skirt under the piston ring as the illustration shows Cause Air filter incorrectly fitted ...

Страница 43: ...this is damaged or if carbon deposits remain the compression pressure can leak through Check the wear on the piston ring by placing it in the lower part of the cylinder Position a suitable punch on the bolt head and give a few sharp knocks with a hammer If the bolt still does not loosen repeat the procedure Defect Broken cooling fins damaged threads or sheared bolts by the exhaust port Seizure mar...

Страница 44: ...p of the piston towards the exhaust port Press in the gudgeon pin and fit the circlips NOTE Place a rag in the crankcase opening to prevent the circlip from falling into the crankcase in case it should fly out Check that the circlips are correctly fitted into the grooves by turning the clips with flat nosed pliers NOTE Do not turn the cylinder as the piston rings can easily be broken Check that th...

Страница 45: ...44 6 Cylinder and piston ...

Страница 46: ...________________________________ 46 Inspecting the crankshaft _____________________ 46 Assembly _________________________________ 47 Leakage testing the crankcase_________________ 48 Husqvarna E Tech __________________________ 49 Crankshaft and crankcase ...

Страница 47: ...t be perfectly sealed so as not to affect this pump function There cannot be any leakage from the crank shaft between the crankcase halves or between the crankcase and the cylinder Always replace the sealing rings and gaskets when servicing the crankcase Dismantling Dismantle all components so that only the crankcase and crankshaft remain Now lift the crankshaft out of the crankcase Dismantling Di...

Страница 48: ... are heavy indentation marks in the seal casing the holder must be replaced as leakage can otherwise occur between the crankcase and bearing If the bearing is free from defects but the rubber covering on the sealing ring holder is damaged the holder can be dismantled from the bearing Carefully saw a slot in the cover with a hacksaw and pry off the sealing ring holder Assembly Check the crankshaft ...

Страница 49: ...position the crankshaft in the crankcase Assemble all the remaining parts in the reverse order as set out for dismantling See respective sections if necessary in the Workshop Manual Leakage testing the crankcase Fit the two sealing plates A Leakage testing the crankcase Remove the cylinder cover spark plug and grille over the muffler Loosen the screws holding the carburettor sufficiently so that t...

Страница 50: ...detection easier Bubbles clearly mark the position of the leakage Husqvarna E Tech In 1996 Husqvarna presented a new improved two stroke engine as a part of the company s efforts to produce engines that emit smaller amounts of hazardous substances The new engine was given the designation E Tech and was first used in a new brush cutter model More stringent environment regulations in the USA which p...

Страница 51: ...50 7 Crankshaft and crankcase ...

Страница 52: ..._______________________ 52 Fuel system _____________________________ 52 Centrifugal clutch _________________________ 52 Angle gear ______________________________ 53 Cylinder and piston ________________________ 53 Crankshaft and crankcase __________________ 53 Workshop equipment ______________________ 53 ...

Страница 53: ...1 502 54 15 01 531 00 60 76 502 50 83 01 501 60 02 03 502 52 16 01 502 50 18 01 502 50 18 01 505 69 85 70 502 54 15 01 502 50 64 01 502 50 64 01 502 51 49 01 531 00 48 63 531 03 03 98 531 03 06 23 Electrical system Centrifugal clutch Starter Fuel system Electrical system ...

Страница 54: ...4 11 02 503 84 40 01 502 51 03 01 502 71 14 01 503 97 64 01 531 03 06 23 502 50 18 01 505 69 85 70 101 64 23 48 505 38 17 05 531 03 06 23 503 80 17 01 Angle gear Cylinder and piston Crankshaft and crankcase Workshop equipment ...

Страница 55: ...2004W38 114 03 03 26 ...

Отзывы: