

NOTE:
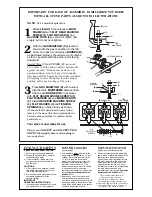
Unit is assembled upside down.
Attach
LEG (D)
in four places to
MAIN
FRAME (A)
with
FLAT HEAD MACHINE
SCREW (1)
,
FLAT WASHER (6)
and
MACHINE NUTS (2)
as shown. Tighten nuts
snugly, but do not over-tighten.
With the
GAS MANIFOLD (C)
placed as
shown with the gas connection to the left,
screw onto each control valve
BURNER (B)
as illustrated. Burners should screw onto valves
as far as possible with the burner ports facing
downward.
Special Note: When BURNER (B) is screwed
on to valve, turn the burner until it bottoms out
against the valve. If the burner ports are not
positioned down, turn the burner the opposite
direction until the burner ports are directed down.
Attempting to force the burner into the proper
position will cause breakage of the valve.
Place
GAS MANIFOLD (C)
with burners
attached into
MAINFRAME (A)
as shown.
Attach each
BURNER (B)
in six places
with
FLAT HEAD MACHINE SCREWS (1)
,
FLAT WASHERS (6)
and
MACHINE NUTS
(2)
. Install
HEX HEAD MACHINE SCREW
(4)
,
FLAT WASHER (3)
and
TENSION
SPRINGS (5)
in three places as shown.
(These are the Air Adjustment Screws. Screw
them in all the way at this time. Adjustments can
be made during operation for optimum burner
performance.)
Your stove is now ready for use.
Please read SAFETY and INSTRUCTION
NOTES thoroughly before attempting to
use your stove.
IMPORTANT: FOR EASE OF ASSEMBLY, FAMILIARIZE YOURSELF
WITH ALL STOVE PARTS AS SHOWN IN ILLUSTRATIONS
1
2
3
FOR YOUR SAFETY
If gas odor is sensed at any time:
1. Shut off gas to cooker immediately.
2. Extinguish any open flame, check for
leaks with soapy water.
3. If odor continues, immediately call
your gas supplier after shutting main
gas source off.
CAUTIONS:
1. Do not store or use gasoline or other
flammable materials in the vicinity of
this or any other appliance.
2. Store all flammable materials in safety
containers appropriate for the
specific material.
IMPORTANT
OPERATING INSTRUCTIONS:
1. This appliance is designed to be used
and operated on L.P. gas (propane)
typically stored in a gas cylinder
and commonly used on portable
gas barbecues.
2. This appliance will not operate at the
gas pressure directly from an L.P. gas
cylinder. A pressure regulator set at
11" W.C. is required for safe and
proper functioning of your stove. It is
necessary to purchase the correct
regulator, and your local L.P. Gas
dealer can assist you with this. If there
is any question as to the correct
regulator to purchase, you may call our
toll free
Customer Assistance Line:
800-624-4711.
3. Before each use of your stove, and
especially after long periods of non-
use, check all gas connections or joints
with soapy water. to insure that no leak
exists which would make for an unsafe
condition, inspect the hose for
cracking, cuts, excessive wear or dry
rotting. Never use a hose that shows
aging or any abnormal condition.
4. The burner should operate with a blue
flame, with a slight yellow tipping. If the
flame sputters, excessively hisses,
pops or burns with long flames, adjust
the Air Screws.If this fails, check the
burner ports and orifice to see if any
object is obstructing gas flow. If you
feel that your stove is still not operating
correctly, discontinue use and
immediately call our toll free
Customer
Assistance Line: 800-624-4711.
These instructions should be
kept for future reference.
Please do not dispose of them.
We thank you for purchasing our
product. We appreciate any comments
or questions. Feel free to contact us
toll free at the number above.
(D)
LEG
(A)
MAIN FRAME
(B)
(A)
(2)
(6)
(2)
(6)
(1)
(1)
AIR
ADJUSTMENT
SCREWS
(A)
MAIN FRAME
(B)
BURNERS
(5)
(3)
(4)
(B)
(C)
GAS MANIFOLD
ATTACH
BURNERS


