INSTALLATION
6
Mount the Installation Brackets — Inside Mount
Important:
If your shade has PowerView
™
Motorization as a lifting system for an
independent operable liner, please refer to the PowerView Motorization
Installation, Operation,
and Care
manual for installation and operation.
■
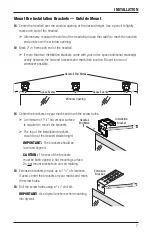
Mark 2" in from each jamb.
➤
If more than two installation brackets came with your order, space additional bracket(s)
evenly between the two end brackets and mark their location. Mount into wood
whenever possible.
■
Center the brackets on your marks, then mark each of the screw holes.
➤
For fully recessed mounting, the fabric will be flush with the front of the window
casement, when raised. A minimum depth of 3" is needed to fully recess your shade.
➤
Minimum mounting depth for bracket attachment is
7
/
8
".
Important:
The front edges of the installation brackets must be level and aligned.
■
Drill the screw holes using a
3
/
32
" drill bit.
■
Attach the installation brackets using the screws provided.
➤
Check that the mounting surface is level and the brackets are aligned. If mounting to a
heavily textured surface, shim the brackets, if needed.
Important:
Use drywall anchors when mounting into drywall.
Proceed to “Install the Shade” on page 8.
2"
2"
Space Evenly
Space Evenly
Jamb
Jamb
Window Opening
Minimum
7
/
8
"
2"
2"
Fully
Recessed
Minimum
3"


