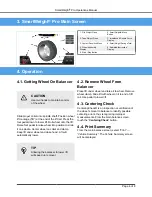
3. SmartWeight
®
Pro Main Screen
1. Clip Weight Plane
6. SmartWeight® Menu
Button
2. Tape Weight Plane
7. Imbalance & Couple Force
Display
3. Context Sensitive Menu
8. SmartWeight Savings Total
4. Wheel Assembly
Display
9. Animated Instruction
Display
5. Start / Stop Button
4. Operation
4.1. Getting Wheel On Balancer
CAUTION
Use two hands to maintain control
of the wheel
Slide proper collet onto spindle shaft. Position wheel
lift carriage (“lift”) at the end of the lift rail. Press the
foot pedal down to lower lift. Roll wheel onto the lift.
Raise foot pedal to raise wheel into position to slide
it on spindle. Center wheel on collet and clamp.
Keep lift under wheel and close hood. Lift will
automatically lower.
TIP
Allowing the balancer to lower lift
will speed up removal.
4.2. Remove Wheel From
Balancer
Place lift under wheel and raise it to wheel. Remove
wheel clamp. Slide lift with wheel on it to end of lift
rail. Use pedal to lower lift.
4.3. Centering Check
CenteringCheck® is an inspection or verification of
the wheel’s mount to balance to identify possible
centering errors, thus recognizing improper
measurements. From the main balance screen,
touch the “
CenteringCheck
” button.
4.4. Print Summary
From the main balance screen, select “Print” →
“Vehicle Summary”. The Vehicle Summary screen
will be displayed.
SmartWeight
®
Pro Operations Manual
Page 6 of 8


