


www.HunterFan.com
1.888.830.1326
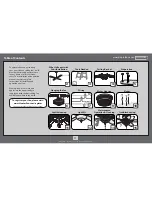
Ceiling Bracket
OFF
Refer to warning w.1 on pg. 2
To avoid possible electrical shock, before installing your fan,
disconnect the power by turning off the circuit breakers to the
outlet box associated with the wall switch location.
Turn P
ow
er
Use wood screws
(included) when securing
to support structure with
approved electrical outlet
box. Drill 9/64” pilot holes
in support structure to aid
in securing ceiling bracket
with hardware found in
the
hardware bag.
Use machine screws
(provided with outlet
box) when securing to
existing ceiling fan-rated
outlet box. Make sure
it is securely installed
and is acceptable for fan
support of 31.8 kg (70 lbs)
or less.
Make sure all four bumpers are still attached.
Bumper
4
M0136-01 • 05/26/17 • © 2017 Hunter Fan Company


