background image

4

1886

1886

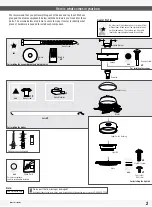
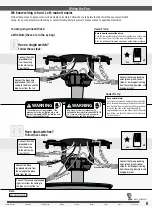
Check the outlet box:


Use wood screws and 
washers (included) when 
securing to support structure 
with approved electrical 
outlet box. Drill 9/64” pilot 
holes in support structure 
to aid in securing ceiling 
bracket with hardware found 
in the   hardware bag.

Option 2: 

Wood Screws

OFF

Turn P

ow

er

Do this first!

The machine screws are the ones 
that came with your outlet box. 

Hunter Pro Tip:

You have 

two options

 for installation. Pick which one works best for your location. Remove any existing 

bracket prior to installation. 

Only use the provided Hunter ceiling bracket that came in your fan’s box.

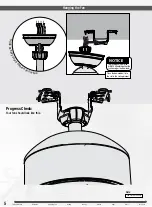
Ceiling Bracket

Downrod

Hanging Fan

Wiring

Canopy

Blades

Light

Glass

Pull Chain

Installing the Ceiling Bracket

WARNING

To avoid possible electrical shock, before 

installing your fan, disconnect the power by 

turning off the circuit breakers to the outlet 

box associated with the wall switch location.

2

PB

1886

1886

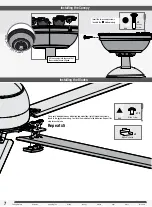
Follow below if you are using the downrod that came pre-assembled in your box. Need to 
install a longer or shorter downrod? Check out the guide at the end of this manual.

Slide the adapter cover onto 
the downrod until it rests 
against the hanger ball.

Pass all wires to one side of horizontal bar in 
downrod assembly. Hand tighten the downrod 
(at least 4–5 full turns) until it stops. Trim the 
wires coming from the fan so that 8-inches 
remain coming from the top of the downrod.

Hunter Pro Tip:

The ground wire attached to the 
downrod is approximately 8 inches.

Hunter Pro Tip:

The adapter cover is not used for 
low-profi le mounting.

Installing the Downrod

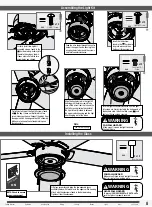
Tighten the setscrew 
with pliers. 

DO NOT 

HAND TIGHTEN. 

FAN FALL HAZARD


To prevent 

SERIOUS INJURY

 or 

DEATH:


• ALWAYS


tighten setscrew with pliers.

• DO NOT


hand tighten setscrew.

• CHECK


the setscrew is tight using pliers 

each time you change fan direction.

Lower the adapter cover until it rests fl ush 
against the motor housing.

Fan style may vary.

Note: 

KEEP!

Back out the pre-installed setscrew  
so that the setscrew’s threads 
are still engaged while the shank 
does not protrude and obstruct the 
insertion of the downrod.

DO NOT 
REMOVE 
SETSCREW 
COMPLETELY

8”

3/8”

C

U

T

ST

R

IP

(not t

o scale)

DR-01 r061622

Use machine screws 

(provided with 

outlet box)

 and washers when securing 

to existing ceiling fan-rated outlet box. 
Make sure it is securely installed and 
is acceptable for fan support of 31.8 kg 
(70 lbs) or less.

Option 1: 


Machine Screws

For angled ceilings, 
point opening 
toward peak.

ANGLED

MOUNTING TIP

Washer

x2

bag

Wood Screw

x2

Содержание Erling 51759

Страница 1: ...Installation Manual 2022 Hunter Fan Co Model 51759 Burnished Brass 51760 Flat Matte Black 51761 Matte Fresh White Fan weight 2 lbs 18 96 lbs 8 6 kg Erling PG4073 r070122 ...

Страница 2: ...d persons with reduced physical sensory or mental capabilities or lack of experience and knowledge if they have been given supervision or instruction concerning use of the appliance in a safe way and understand the hazards involved Children shall not play with the appliance Cleaning and user maintenance shall not be made by children without supervision It is recommended that children be supervised...

Страница 3: ...For installing the hanger bracket and wiring the fan For installing the canopy Canopy Canopy Screw Ceiling Bracket Wood Screw Wire Nut Washer bag Hunter Pro Tip Find a part that is missing or damaged Don t take it back to the store Let us make it right Visit us at HunterFan com or call us at 1 888 830 1326 Here is what comes in your box bag x15 For installing the blades For installing the light ki...

Страница 4: ...port Structure Ceiling Outlet Box required Angled Mounting If you have a flat ceiling Hang your fan by a standard downrod Some fans come with a shorter downrod for a Low Profile installation Support Structure Ceiling Outlet Box required Standard Mounting A little more information on Angled Mounting For optimum performance and appearance a longer downrod should be used with your Hunter ceiling fan ...

Страница 5: ...ball Pass all wires to one side of horizontal bar in downrod assembly Hand tighten the downrod at least 4 5 full turns until it stops Trim the wires coming from the fan so that 8 inches remain coming from the top of the downrod Hunter Pro Tip The ground wire attached to the downrod is approximately 8 inches Hunter Pro Tip The adapter cover is not used for low profile mounting Installing the Downro...

Страница 6: ...o p y o v e r d o wnrod and wires Place the downrod ball into the slot in the ceiling bracket NOTICE To prevent damage to fan ALWAYS lift holding either the fan housing or the downrod Ceiling Bracket Downrod Hanging Fan Wiring Canopy Blades Light Glass Pull Chain Fan style may vary Note ...

Страница 7: ...he ceiling downrod and hanging bracket Connect the three grounding wires green green yellow stripe or bare copper coming from the ceiling downrod and hanging bracket Connect the black ungrounded wire from the ceiling to the black wire from the fan B l u e Black Green Yellow Stripe Green Yellow Stripe DRPC 01 r092421 White White Ungrounded Ungrounded light Grounded Grounded Grounding Grounding G r ...

Страница 8: ... p y i n place as shown bag Canopy Screw Installing the Blades Place each blade between a blade iron and medallion Install three blade screws found in the hardware bag to attach the medallion to the blade iron Repeat this step for each blade Repeat x5 x15 x5 bag Blade Screw Blade Medallion Ceiling Bracket Downrod Hanging Fan Wiring Canopy Blades Light Glass Pull Chain ...

Страница 9: ...ght kit counterclockwise until the light kit screws are firmly situated in the narrow end of the keyhole slots Install the third screw and tighten all three screws securely Partially install two of the light kit screws found in the bag It does not matter which two screw holes you choose Connect the plugs from the upper switch housing and the LED assembly Make sure to line up the colored markings o...

Страница 10: ...ins Repeat x2 Reversing the Fan Reverse Switch Ceiling fans work in two directions downdraft counterclockwise rotation and updraft clockwise rotation To change the direction of air flow turn the fan off and let it come to a complete stop The reversing switch is located inside the light fixture It can only be accessed when the glass is removed Slide the reversing switch to the opposite position Res...

Страница 11: ...otherwise noted remote control batteries fans purchased or installed outside the United States fans owned by someone other than the original purchaser fans for which proof of purchase has not been established fans purchased from an unauthorized dealer ordinary wear and tear minor cosmetic blemishes refurbished fans and fans that are damaged due to any of the following improper installation misuse ...

Страница 12: ...5 6 7 8 9 10 1 10 9 2 7 4 8 3 6 5 Here is another view of the downrod assembly unassembled Pin Assembled downrod should look like this Pin WARNING FAN FALL HAZARD To prevent SERIOUS INJURY or DEATH ALWAYS follow the downrod assembly instructions exactly VERIFY the downrod is assembled correctly by firmly pulling on the hanger ball Pin must be reinserted to secure downrod assembly ...

Отзывы: