


3
1886
1886
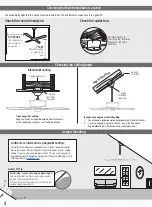
Choosing the Right Installation Location
Checking the Ceiling Angle:
Angled Mounting
You probably bought this fan with a location in mind. Let’s check below to make sure it is a good fit.
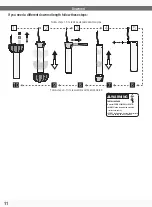
If you have an angled or vaulted ceiling:
1. You will need a longer downrod. (sold separately at HunterFan.com)
2. If your ceiling angle is greater than 34°, you will also need an
Angled Mounting Kit. (Sold separately at HunterFan.com)
Check the room dimensions:
Check the outlet box:
You must be able to
secure the fan to building
structure or fan-rated
outlet box.
30 inches
from blade tip to
nearest wall or
obstruction
7 feet
from bottom edge
of blade to the
floor
Support
Structure
Ceiling
Outlet Box
(required)
Angled Mounting
If you have a flat ceiling:
Hang your fan by a standard downrod. Some fans come
with a shorter downrod for a Low Profile installation.
Support Structure
Ceiling
Outlet Box
(required)
Standard Mounting
A little more information on Angled Mounting:
For optimum performance and appearance, a longer downrod should
be used with your Hunter ceiling fan when installing on high or angled
ceiling. If your ceiling is angled greater than 34
°
you will also need an
Angled Mounting Kit. Longer downrods and the Angled Mounting Kit are
sold separately at
HunterFan.com
.
Determining if you need an Angled Mounting Kit:
Fold on the dotted line. Place against edge againts
the wall. Slide towards the ceiling.
If the guide touches the wall but not the ceiling, you
need an angled mounting kit.
Hunter Pro Tip:
CEILING
WA
LL
34°
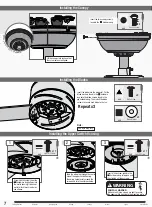
Installing the Downrod
Installing the Ceiling Bracket