background image

9

42857-01  •  02/17/10  •  Hunter Fan Company

All wiring must be in accordance with national and local electrical 
codes and ANSI/NFPA 70. If you are unfamiliar with wiring, use a 
qualified electrician.

Wall switches are not included. Select an acceptable general-use switch 
in accordance with national and local electrical codes.
4-1.  Before attempting installation, make sure the power is still off. 
4-2.  To connect the wires, hold the bare metal leads together and place 

a wire connector over them, then twist clockwise until tight. For 
all these connections use the wire connectors provided.

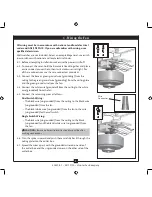
4-3.  Connect the bare or green ground wire (grounding) from the 

ceiling to the green ground wire (grounding) from the ceiling plate 
and the green ground wire from the fan.

4-4.  Connect the white wire (grounded) from the ceiling to the white 

wire (grounded) from the fan.

4-5.  Connect the remaining wires as follows:

    Dual Switch Wiring: 

• The black wire (ungrounded) from the ceiling to the black wire 

(ungrounded) from the fan

• The black/white wire (ungrounded) from the fan to the wire 

(ungrounded) for the wall switch

    Single Switch Wiring: 

• The black wire (ungrounded) from the ceiling to the black 

(ungrounded) and the black/white wire (ungrounded) from 
the fan 

 CAUTION:

  Be sure no bare wire or wire strands are visible after 

making connections.

4-6.  Turn the splices upward and push them carefully back through the 

ceiling plate into the outlet box. 

4-7.  Spread the wires apart, with the grounded wires on one side of 

the outlet box and the ungrounded wires on the other side of the 
outlet box.

Wire 

Connector

4 •Wiring the Fan

Содержание 42857-01

Страница 1: ...also attach your receipt or a copy of your receipt to the manual __________________________________________ Model Name __________________________________________ Model No _____________________________...

Страница 2: ...an motor housing CautionsandWarnings READ THIS ENTIRE MANUAL CAREFULLY BEFORE BEGINNING INSTALLATION SAVE THESE INSTRUCTIONS Use only Hunter replacement parts To reduce the risk of personal injury att...

Страница 3: ...eptable and safe for your new Hunter fan If you cannot check off every item prepare a new fan site as described on this page Fan Support System Fan attaches directly to building structure Fan support...

Страница 4: ...2 outlet box plus two 8 x 1 1 2 wood screws and washers available from any hardware store or electrical supply house 4 2 Orient the outlet box so that both the inner and outer holes in the box align...

Страница 5: ...ories including a wall mounted or remote speed control To install and use the accessories follow the instructions included with each product For quiet and optimum performance of your Hunter fan use on...

Страница 6: ...endent upon installation site CheckingYourFanParts Carefully unpack your fan to avoid damage to the fan parts Refer to the included Parts Guide Check for any shipping damage to the motor or fan blades...

Страница 7: ...3 Your fan comes with four mounting isolators Position the isolators between the hanger bracket and ceiling by inserting the raised areas on each isolator into the holes in the hanger bracket 2 4 Thre...

Страница 8: ...of the way lift the motor assembly and place the square hanger into the opening in the ceiling plate WARNING Make sure the square hanger can not rotate in the metal bracket Failure to do so could resu...

Страница 9: ...m the ceiling plate and the green ground wire from the fan 4 4 Connect the white wire grounded from the ceiling to the white wire grounded from the fan 4 5 Connect the remaining wires as follows Dual...

Страница 10: ...er bracket Rotate the fan housing to situate the screws in the narrow ends of the keyholes 5 3 Install the two remaining canopy screws into the holes in the fan housing and into the hanger bracket Sec...

Страница 11: ...ng screws and rubber shipping bumpers from the motor Note Some blade mounting screws are installed in the motor to secure shipping blocks 6 4 For each blade insert one blade mounting screw through the...

Страница 12: ...housing assembly screws 7 4 Turn the housing counterclockwise until the housing assembly screws are firmly situated in the narrow end of the keyhole slots Install the remaining screw into the housing...

Страница 13: ...s are polarized and will only fit together one way Make sure the connectors are properly aligned before connecting them Incorrect connection could cause improper operation and damage to the product 7...

Страница 14: ...lace the cover plate up against the glass bowl Align the holes in the cover plate and glass bowl 7 12 Thread the light pull chain through the finial and screw the finial onto the threaded rod end unti...

Страница 15: ...xture from the lower switch housing pulling disconnected wires through the hole in the center of the lower switch housing Note When removing the wires pull the thin plug connector male through first a...

Страница 16: ...ard clockwise blade rotation will distribute the warmer air trapped at the ceiling around the room without causing a draft 8 5 For cleaning finishes use a soft brush or lint free cloth to prevent scra...

Страница 17: ...all the blades 4 Change to an approved speed control 5 Be sure that the glass is secure 6 Check and tighten the screws in the switch housing mounting plate and in the upper and lower switch housing Pr...

Отзывы: