Hunter 42688-01 Скачать руководство пользователя страница 9

9

42688-01  •  05/08/09  •  Hunter Fan Company

9

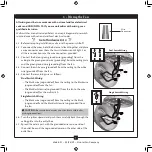
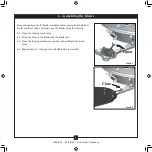
Our exclusive Easy Lock

 blade assembly enables you to lock the blades 

in place without tools and to remove the blades easily for cleaning.

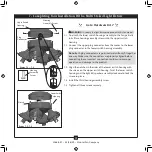
6-1.  Open the locking mechanism.
6-2.  Align the holes in the blade with the blade iron.
6-3.  Close the locking mechanism securely. You will feel it lock into 

place.

6-4.  Repeat steps 6-1 through 6-3 until all blades are installed.

Step 6-1

Step 6-3

Open

Close

6 • Assembling the Blades

Содержание 42688-01

Страница 1: ...lso attach your receipt or a copy of your receipt to the manual __________________________________________ Model Name __________________________________________ Model No ______________________________...

Страница 2: ...housing CautionsandWarnings READ THIS ENTIRE MANUAL CAREFULLY BEFORE BEGINNING INSTALLATION SAVE THESE INSTRUCTIONS Use only Hunter replacement parts To reduce the risk of personal injury attach the...

Страница 3: ...cluded with each product For quiet and optimum performance of your Hunter fan use only Hunter speed controls For ceilings higher than 8 feet you can purchase Hunter extension downrods All Hunter fans...

Страница 4: ...pendent upon installation site CheckingYourFanParts Carefully unpack your fan to avoid damage to the fan parts Refer to the included Parts Guide Check for any shipping damage to the motor or fan blade...

Страница 5: ...olators are in place and were not removed during shipment Go to Hardware Kit 2 2 3 Place a flat washer on each of the two 3 wood screws 2 4 Thread the supply wires from the outlet box in the ceiling t...

Страница 6: ...not remove the downrod Go to Hardware Kit 3 For Low Profile mounting Note For low profile mounting the downrod is replaced with the low profile washer 3 4 Remove the setscrew from the adapter 3 5 Plac...

Страница 7: ...ng plate and the green ground wire grounding from the fan 4 4 Connect the white wire grounded from the ceiling to the white wire grounded from the fan 4 5 Connect the remaining wires as follows Dual S...

Страница 8: ...nstall two canopy screws into the holes opposite the ceiling plate tabs 5 4 Partially install a canopy screw into the hole between the two ceiling plate tabs When all the holes are properly aligned se...

Страница 9: ...tools and to remove the blades easily for cleaning 6 1 Open the locking mechanism 6 2 Align the holes in the blade with the blade iron 6 3 Close the locking mechanism securely You will feel it lock i...

Страница 10: ...way Make sure the connectors are properly aligned before connecting them Incorrect connection could cause improper operation and damage to the product 7 3 Align the notches in the sides of the lower...

Страница 11: ...7 8 Install B10 candelabra based light bulbs 40 Watt maximum each Steps 7 7 7 8 Thumbscrews Shade Bulb 7 Completing Your Installation With a Multi Staked Light Fixture Continued Note In compliance wi...

Страница 12: ...ith a direct breeze In winter having the fan draw air upward clockwise blade rotation will distribute the warmer air trapped at the ceiling around the room without causing a draft 8 5 For cleaning fin...

Страница 13: ...Check to see if the blade is cracked If so replace all the blades Problem Excessive wobbling 1 If your fan wobbles when operating use the enclosed balancing kit and instructions to balance the fan 2 T...

Отзывы: