Hunter 41931-01 Скачать руководство пользователя страница 12

1

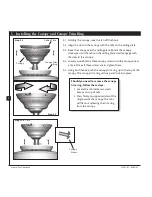
Installing the Glass Bowl

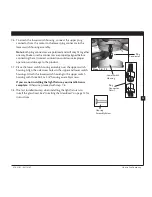
1.  First install two B10 candelabra bulbs (60 Watt Maximum) into the 

sockets. 

2.  Attach the extra pull chain (included) to the fan pull chain using the 

plastic breakaway connector. (You may find the plastic breakaway 
connector on the end of the extra chain.)

3.  Thread the fan pull chain through the hole in the metal disk. Then, 

thread the fan pull chain through the hole in the center of the glass 
bowl.

4.  Thread the light pull chain through the hole in the center of the glass 

bowl.

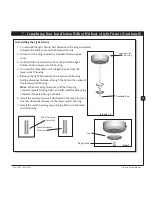
5.  Place the cover plate up against 

the glass bowl. Align the holes in 
the cover plate and glass bowl.

6.  Thread the fan pull chain and 

light pull chain through the 
appropriate holes.

7.  Thread the light pull chain 

through the finial and screw the 
finial onto the threaded rod end 
until tight.

Light Bulbs  

(B10 

Candelabra 

Base 60 Watt 

Maximum)

Metal Rod

Metal Disk

Glass Bowl

Cover Plate

Finial

Breakaway 

Connector

7 • Completing Your Installation With or Without a Light Fixture (Continued)

Hunter Fan Company 

41931-01 • 04/14/07

Содержание 41931-01

Страница 1: ...Name ______________________ Catalog Model No _________________ Serial No ________________________ Date Purchased ____________________ Where Purchased _ _________________ For reference also attach you...

Страница 2: ...motor housing CautionsandWarnings READ THIS ENTIRE MANUAL CAREFULLY BEFORE BEGINNING INSTALLATION SAVE THESE INSTRUCTIONS Use only Hunter replacement parts To reduce the risk of personal injury attac...

Страница 3: ...cluded with each product For quiet and optimum performance of your Hunter fan use only Hunter speed controls For ceilings higher than 8 feet you can purchase Hunter extension downrods All Hunter fans...

Страница 4: ...on site CheckingYourFanParts Carefully unpack your fan to avoid damage to the fan parts Refer to the included Parts Guide Check for any shipping damage to the motor or fan blades If any parts are miss...

Страница 5: ...ilot holes you drilled in the wood support structure For proper alignment use slotted holes directly across from each other Note The isolators should be flush against the ceiling 2 5 Place a flat wash...

Страница 6: ...ating on the threads Do not remove this coating the coating prevents the downrod from unscrewing Once assembled do not remove the downrod 3 3 Remove the set screw from the adapter 3 4 Place the low pr...

Страница 7: ...l the fan and light separately using two wall switches connect the wires as follows connect the green ground wire to the ground wire connect white wire to white wire connect black wire to black wire a...

Страница 8: ...to the canopy one at a time Once all three screws are in tighten them 5 5 Using both hands push the canopy trim ring up to the top of the canopy The canopy trim ring will snap and lock into place Shou...

Страница 9: ...are tightened This is normal 6 3 Some blade mounting screws are installed in the motor to secure shipping blocks Remove the blade mountings screws and rubber bumpers from the motor Save the screws an...

Страница 10: ...in the housing with the housing assembly screws 7 4 Turn the housing counterclockwise until the housing assembly screws are firmly situated in the narrow end of the keyhole slots Install the remainin...

Страница 11: ...nnection could cause improper operation and damage to the product 7 7 Place the lower switch housing assembly over the upper switch housing Align the side screw holes in the upper and lower switch hou...

Страница 12: ...e glass bowl 4 Thread the light pull chain through the hole in the center of the glass bowl 5 Place the cover plate up against the glass bowl Align the holes in the cover plate and glass bowl 6 Thread...

Страница 13: ...ower switch housing 5 Remove the light fixture from the lower switch housing pulling disconnected wires through the hole in the center of the lower switch housing Note When removing the wires pull the...

Страница 14: ...the ceiling around the room without causing a draft 8 5 For cleaning finishes use a soft brush or lint free cloth to prevent scratching A vacuum cleaner brush nozzle can remove heavier dust Remove su...

Страница 15: ...ked If so replace all the blades 4 Change to an approved speed control 5 Be sure that the glass is secure 6 Check and tighten the screws in the switch housing mounting plate and in the upper and lower...

Отзывы: