Hunter 28679 Скачать руководство пользователя страница 4

4

42439-01  •  06/15/10  •  Hunter Fan Company

Preparing the Fan Site (continued)


CAUTION:

 All wiring must be in

accordance with national and local 

electrical codes and ANSI/NFPA 70. If 

you are unfamiliar with wiring, use a 
qualified electrician.

Steps 2 – 3

Step 4

Step 5

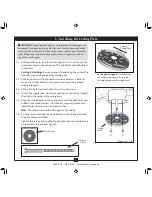
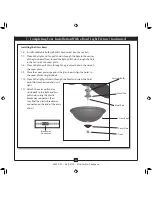
Step 2 - Cut the Ceiling Hole

2-1. Locate the site for the ceiling hole directly below the joist or support brace that 

will hold the outlet box and fan.

2-2. Cut a 4” diameter hole through the drywall or plaster of the ceiling. You will use 

the hole to install the support brace and outlet box.

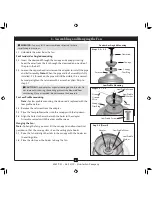
Step 3 - Install a Support Brace, If Necessary

Determine if there is a ceiling joist directly above the ceiling hole. If the joist is there, 

determine if it is positioned to allow you to recess the outlet box a minimum of 

1/16” into the ceiling. If NOT, install a support brace as follows:

3-1. Attach a 2” x 4” support brace between two joists. Position it to allow you to 

recess the bottom of the outlet box a minimum of 1/16” into the ceiling.

3-2. Check the support brace to ensure it will support the full weight of the fan and 

light kit.

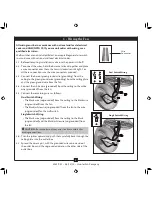
Step 4  - Install the Outlet Box

4-1. Obtain a UL-approved octagonal 4” x 1-1/2” outlet box, plus two #8 x 1-1/2” 

wood screws and washers, available from any hardware store or electrical supply 

house.

4-2. Orient the outlet box so that both the inner and outer holes in the box align 

with the joist or support brace.

4-3. Drill pilot holes no larger than the minor diameter of the wood screws (5/64”) 

through the inner holes of the outlet box.

4-4. Attach the outlet box directly to the support brace or joist with two #8 x 1-1/2” 

wood screws and washers. Th e bottom of the outlet box must be recessed a 

minimum of 1/16” into the ceiling.

Step 5 - Prepare the Wiring

5-1. Make sure the circuit breakers to the fan supply line leads and associated wall 

switch location are turned off . If you cannot lock the circuit breakers in the 

off position, securely fasten a prominent warning device, such as a tag, to the 

service panel.

5-2. Thread the fan supply line through the outlet box so that the fan supply line 

extends at least 6” beyond the box.

5-3. Attach the fan supply line to the outlet box with an approved connector, 

available at any hardware store or electrical supply house.

5-4. Make certain the wiring meets all national and local standards and ANSI/NFPA 

70.

You have now successfully prepared your ceiling fan site. For instructions to install 

your ceiling fan, go to your fan manual and continue with Section 

2 • Installing the 

Ceiling Plate.

Содержание 28679

Страница 1: ...also attach your receipt or a copy of your receipt to the manual __________________________________________ Model Name __________________________________________ Model No __________________________________________ Date Purchased __________________________________________ Where Purchased English Español Owner s Guide and Installation Manual ...

Страница 2: ...he power by turning off the circuit breakers to the outlet box and associated wall switch location If you cannot lock the circuit breakers in the off position securely fasten a prominent warning device such as a tag to the service panel All wiring must be in accordance with national and local electrical codes and ANSI NFPA 70 If you are unfamiliar with wiring use a qualified electrician To reduce ...

Страница 3: ...ceptable and safe for your new Hunter fan If you cannot check off every item prepare a new fan site as described on this page Fan Support System Fan attaches directly to building structure Fan support system will hold full weight of the fan and light kit Ceiling Hole e outlet box clearance hole is directly below the joist or support brace Outlet Box e outlet box is an UL approved octagonal 4 x 1 1...

Страница 4: ...1 2 outlet box plus two 8 x 1 1 2 wood screws and washers available from any hardware store or electrical supply house 4 2 Orient the outlet box so that both the inner and outer holes in the box align with the joist or support brace 4 3 Drill pilot holes no larger than the minor diameter of the wood screws 5 64 through the inner holes of the outlet box 4 4 Attach the outlet box directly to the sup...

Страница 5: ...ncluded with each product For quiet and optimum performance of your Hunter fan use only Hunter speed controls For ceilings higher than 8 feet you can purchase Hunter extension downrods All Hunter fans use sturdy 3 4 diameter pipe to assure stability and wobble free performance Standard Mounting hangs from the ceiling by a downrod included Angled Mounting recommended for a vaulted or angled ceiling...

Страница 6: ...der height dependent upon installation site CheckingYourFanParts Carefully unpack your fan to avoid damage to the fan parts Refer to the included Parts Guide Check for any shipping damage to the motor or fan blades If any parts are missing or damaged contact your Hunter dealer or call Hunter Technical Support Department at 888 830 1326 In Canada call 1 866 268 1936 PreparingtheFanSite Before you b...

Страница 7: ...all four isolators are in place and were not removed during shipment 2 3 Place a flat washer on each of the two 3 wood screws 2 4 Thread the supply wires from the outlet box in the ceiling through the hole in the center of the ceiling plate 2 5 Align the slotted holes in the ceiling plate with the pilot holes you drilled in the wood support structure For proper alignment use slotted holes directly...

Страница 8: ...sembled do not remove the downrod For Low Profile mounting Note For low profile mounting the downrod is replaced with the low profile washer 3 4 Remove the setscrew from the adapter 3 5 Place the low profile washer into the canopy with the lip down 3 6 Align the holes in the washer with the holes in the adapter Assemble securely with three low profile screws Hanging the Fan Note To hang the fan yo...

Страница 9: ... and the green ground wire from the fan 4 4 Connect the white wire grounded from the ceiling to the white wire grounded from the fan 4 5 Connect the remaining wires as follows Dual Switch Wiring The black wire ungrounded from the ceiling to the black wire ungrounded from the fan The black white wire ungrounded from the fan to the wire ungrounded for the wall switch Single Switch Wiring The black w...

Страница 10: ...nstall two canopy screws into the holes opposite the ceiling plate tabs 5 4 Partially install a canopy screw between the slots in the canopy When all the holes are properly aligned securely tighten all three canopy screws 5 5 Verify that the tabs in the canopy are still in the grooves of the hanger ball 5 6 Align the tabs on the trim ring opposite the grooves in the hanger ball Using both hands pu...

Страница 11: ...e Removal 1 Cover the blade iron posts with a protective cloth to prevent scratching the blades 2 Using pliers loosen the blade iron posts by turning them counterclockwise Once they are loosened finish unscrewing them by hand until they are completely separated from the blade iron 3 Carefully remove the blade Note The blades on this fan have been treated with Hunter s Dust Armor protection making ...

Страница 12: ...attach the lower switch housing assembly to the fan partially install two housing assembly screws into the upper switch housing 7 2 Connect the upper plug connector from the motor to the lower plug connector in the lower switch housing assembly Note Both plug connectors are polarized and will only fit together one way Make sure the connectors are properly aligned before connecting them Incorrect c...

Страница 13: ...8 Thread the fan pull chain through the grommet hole in the side of the cover plate 7 9 Place the cover plate up against the glass bowl Align the holes in the cover plate and glass bowl 7 10 Thread the light pull chain through the finial and screw the finial onto the threaded rod end until tight 7 11 Attach the extra pull chains included to the light and fan pull chains using the plastic breakaway...

Страница 14: ...he fan draw air upward clockwise blade rotation will distribute the warmer air trapped at the ceiling around the room without causing a draft 8 5 The blades on this fan have been treated with Hunter s Dust Armor protection making the blades less likely to attract dust and dirt Use a dry or slightly damp lint free cloth to clean the blades Do not use a furniture polish or any other cleaners that le...

Страница 15: ...n 2 Tighten all blade iron screws 3 Turn power off support fan very carefully and check that the hanger ball is properly seated Problem Lights shut off suddenly but fan is still operating 1 Check to make sure the wattage and type of the light bulbs that are installed meet the specifications on the MAX wattage sticker affixed to the light socket 2 Turn the power to the fan off at the wall switch Wa...

Отзывы: